MEE TSD-ST194-CN Скачать руководство пользователя страница 31

Functions

11

6 Functions

1
2
3
4
5
6
7
8
9

10

11

12
13

640 x 480
640 x 480
640 x 480
720 x 400
800 x 600
800 x 600
800 x 600

1024 x 768  
1024 x 768  
1024 x 768  
1280 x 960  
1280 x 1024
1280 x 1024

Resolution

31.5kHz
37.9kHz
37.5kHz
31.5kHz
37.9kHz
48.1kHz
46.9kHz
48.4kHz
56.5kHz
60.0kHz
60.0kHz
64.0kHz
80.0kHz

60.0Hz
73.0Hz
75.0Hz
70.0Hz
60.0Hz
72.0Hz
75.0Hz
60.0Hz
70.0Hz
75.0Hz
60.0Hz
60.0Hz
75.0Hz

Horizontal            Vertical 

Frequency

Remarks

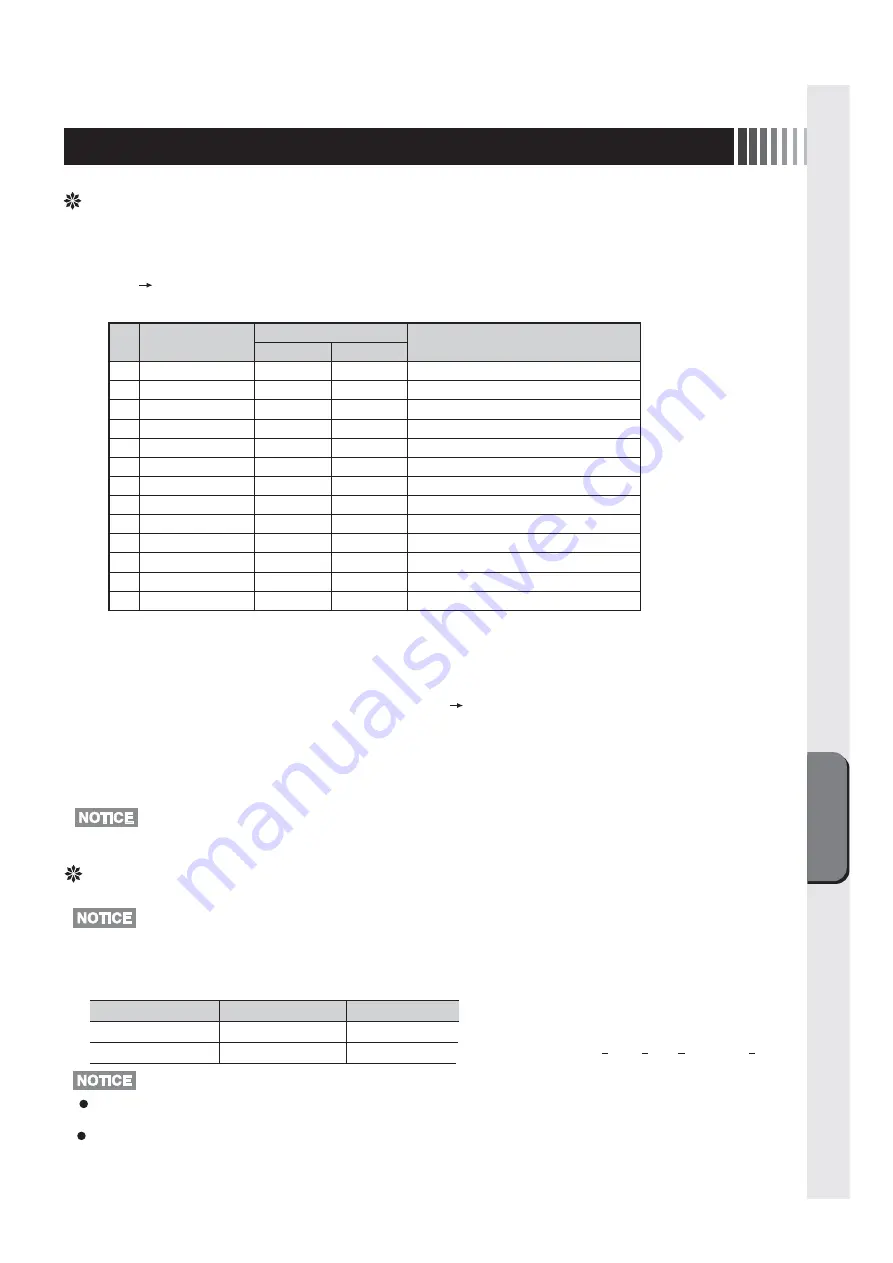
Recommended Signal Timing.

<Factory Preset Timing>

The power management function may not operate properly for computer that the video signal (R, G, B) is output 
though the vertical or horizontal synchronous signal is OFF.
Press any key on the keyboard or touch the screen, or move the mouse, and the screen will return to the previous 
state.
If the screen dose not return, or is connected to computer without the power management function, it is estimated 
that the signal cable is disconnected or the power of the computer is "OFF". Please check.

Automatic Screen Display

This device performs the kinds of auto-detection described in the table below (factory preset timing) to set monitor
information and automatically show the appropriate display when connected to your computer. However, flickering and
blurring may occur in some computers. Also, some signals may cause display errors. When errors occur, adjust your
monitor            . The monitor information is saved after the monitor is adjusted.

 (    P10)


·  Input signal identification is performed on the basis of horizontal frequencies, vertical frequencies, synchronizing 

signal polarity and synchronizing signal type.

·  In addition to factory preset timing, This machine is equipped with a function for storing 10 types of timing (the user
  memory function).  Enter the signal you want to save, then use the OSD function to adjust to your desired display.
·  Timing and display information will be automatically saved.
·  Executing "All Reset" will erase all values saved in user memory.
·  This machine is compatible with horizontal frequencies of 30.0 ~ 80.0kHz and vertical frequencies of 50 ~ 75Hz.
  However, some input signals may not be able to display correctly even if they fall within this range.
  In such cases, please change the frequency or the resolution of your computer.
·  This device in not compatible with interlaced signals.

 (    P9)


·  Characters may blot or figures may deform if signal other than resolution 1280x1024 is input.

Ordinary operation

Power save mode

Mode

Power consumption Power Indication

24W (standard)

3W or less

Green
Orange

Power Management Function

This function reduces the power consumption when the computer is not used.

The power consumption and power lamp state when the power management function is operating are as shown below.

[AC 100V input when the setting to the default.]

·  This function comes to ineffective if the connected PC has no power management function responding to VESA

TM


DPMS

TM

.

[Glossary] 
DPMS: Abbreviation for “Display Power Management Signaling”.

Содержание TSD-ST194-CN

Страница 1: ...2 3 6 6 7 7 OSD 8 8 8 9 9 9 14 14 16 16 17 17 18 19 11 11 11 12 http www mee co jp sales visual touch monitor 19 TSD ST194 CN...

Страница 2: ...2 VCCI B VCCI WindowsNT Windows Vista Windows Microsoft Corporation Macintosh Apple Inc...

Страница 3: ...3 AC100V AC100V...

Страница 4: ...4 During servicing disconnect the plug from the socket outlet...

Страница 5: ...5 This Touch monitor is designed for use in Japan and can not be used in any other countries 40 70cm OA...

Страница 6: ...6 SELECT INPUT OSD OSD P10 MENU EXIT OSD OSD SELECT OSD OSD OSD OSD OSD 1 OSD OSD OSD OSD SELECT MENU EXIT SELECT INPUT P11...

Страница 7: ...7 Kensington DVI D 24 DVI D DVI D D Sub15 D Sub 9 RS 232C USB DVI D USB U2C JB20BK 2m DVI D CAC DV2D 2m AV 352 2m RS 232C D Sub 15 D Sub 15 2 CD ROM USB B USB USB D sub 9 D sub 9...

Страница 8: ...shall be installed near the equipment and shall be easily accessible AC100V 1 0A RS 232C DVI VGA 2 4 5 6 USB DVI D 3 5 3 D Sub 15 USB B D Sub 9 DVI 1 USB USB 1 6 D Sub 9 5 USB B 2 D Sub 15 3 DVI D 4 3...

Страница 9: ...0 80 0kHz 50 75Hz 1 1 2 OSD Auto Image Display Width Phase H Position V Position Auto Ad just Image 2 1 2 OSD 3 SELECT INPUT SELECT INPUT OSD MENU EXIT OSD OSD OSD On Screen Display OSD Auto Adjust Im...

Страница 10: ...OSD Control Information Exit Brightness Contrast OSD OSD OSD OSD OSD Brightness Contrast Reset Bright Cont Exit Auto Color Color Temperature Exit Auto Image Display Width Phase H Position V Position...

Страница 11: ...60 0Hz 2 640 x 480 37 9kHz 73 0Hz 3 640 x 480 37 5kHz 75 0Hz 4 720 x 400 31 5kHz 70 0Hz 5 800 x 600 37 9kHz 60 0Hz 6 800 x 600 48 1kHz 72 0Hz 7 800 x 600 46 9kHz 75 0Hz 8 1024 x 768 48 4kHz 60 0Hz 9...

Страница 12: ...2000 Windows XP WindowsVista Windows 7 CD ROM CD ROM Windows 2000 Windows XP WindowsVista Windows 7 CD ROM Administrator Windows 3 1 WindowsNT 4 OS 2 Macintosh CD ROM CD ROM CD ROM CD ROM index html...

Страница 13: ...13 Unzip 4 5 6 7 8 4 5 5 5 6...

Страница 14: ...14 4 3 5 6 1 2 7 8 9 1 1 P6 2 3 1 OSD Contrast Brightness OSD P9 2 1 P11 2 3 2 1 2 OSD Image Control Phase 3 60Hz 3 1 4 1 1...

Страница 15: ...15 5 1 LED 2 3 OSD Color Control Color Temperature USER Tool Reset 6 1 7 1 AC100V 5 5 2 3 8 1 AC100V 5 5 2 3 CD ROM P12 9 1 2 3 OSD Mute OFF...

Страница 16: ...16 TSD ST194 CN 1 1...

Страница 17: ...17 9 2 TSD ST194 CN 1 TEL 1 2 3 1 2 3 4 5 4...

Страница 18: ...R 10 0 65mm RS232C USB 0 7Vp p RGB TTL 30 0kHz 80 0kHz 50Hz 75Hz 1670 1000 1 376 32 H mm 301 06 V mm 300cd m2 D Sub15 DVI D D Sub9 USB type B 3 5 1W 1W 3 5 5 35 30 80 RH AC100 240V 50 60Hz 24W 35W VCC...

Страница 19: ...sition OSD Lock OSD Timer OSD V Position Phase Reset Resolution Select Input Sharpness TFT Tool USB Version VESA Volume V Position 10 10 10 10 10 10 10 10 10 10 11 7 10 10 10 10 10 10 10 6 9 10 10 10...

Страница 20: ...40D871114B10 http www mee co jp...

Страница 21: ...ent OSD Function 6 Functions Automatic Screen Display Power Management Function Installation for Touch driver 7 Troubleshooting If the Device Malfunctions Cleaning Instructions 8 Addendum Specificatio...

Страница 22: ...outlet Be sure to follow the instructions Be sure to ground earth the earth wire Beware of high voltage indicated on the back surface of the unit The symbols used in this User s Manual and their mean...

Страница 23: ...designated power voltages may cause fire or electric shock This device comes with a power cord AC100V compatible with the power outlets in general households When operating at voltages other than AC10...

Страница 24: ...e connector cables are connected May cause fire or electric shock Check that you have unplugged the power cable and disconnected the cables connecting the device to other machines before you move it P...

Страница 25: ...screen display with Screen Saver etc Wipe the dust etc from the power plug regularly May cause fire Clean and inspect connection of your power plug once a year Remove dust For use in Japan only This t...

Страница 26: ...this button to adjust the desired screen Power Switch Press to turn on off the power Do not turn power on or off frequently within a short period of time This may cause malfunction MENU EXIT Button W...

Страница 27: ...nnects the audio cable The audio cable is not provided Connects the DVI D cable The DVI D cable is not provided THEFT PREVENTION LOCK HOLE You can attach a theft prevention key manufactured by Kensing...

Страница 28: ...ad wire touch the power outlet It causes the fire or the electric shock The power cord that comes with this device is for use with this device only For your safety do not use it with any other device...

Страница 29: ...might not function well for a character representation alone like DOS prompt This function may fail to operate depending on the used PC type and or video cards In such case use Manual screen adjustme...

Страница 30: ...uency of horizontal and vertical sync signals Displays the F W Version of the MCU End OSD adjustment Brightness Contrast Reset Bright Cont Exit Auto Color Color Temperature Exit Auto Image Display Wid...

Страница 31: ...information is saved after the monitor is adjusted P10 Input signal identification is performed on the basis of horizontal frequencies vertical frequencies synchronizing signal polarity and synchroni...

Страница 32: ...lation for Touch driver The installation menu automatically appears after the accessory CD ROM is inserted to the CD drive If the installation menu does not appear automatically double click the icon...

Страница 33: ...the Execute Unzip button Installation is started Install refer to the User s Guide After installation perform the correction of the touch position calibration Refer to User s Guide 4 5 6 7 8 4 5 5 5...

Страница 34: ...Check to make sure that your PC and equipment should be connected completely and correctly Power indicator is lit in ORANGE 1 Power management function may be operating To release it touch the screen...

Страница 35: ...he controller located within the monitor may not respond for initialization for approx 5 seconds soon after its power is turned on Allow more than 5 seconds for optimum performance 2 Check to make sur...

Страница 36: ...a soft cloth when cleaning If the monitor is too soiled soak a cloth in synthetic detergent and give it a wring before cleaning Finish it with a dried soft cloth finally Avoid using any cleaning solu...

Страница 37: ...t signal connectors Video signal Mini D sub 15 pins female DVI D female Touch communication signal D sub 9 pins male USB type B Audio in output Input Connector 3 5 stereo mini jack Speaker 1W 1W stere...

Страница 38: ......

Страница 39: ......

Страница 40: ...40D871114B10...

Отзывы: