background image


100RA PIC-00311

Revised: 09/20/2016

9

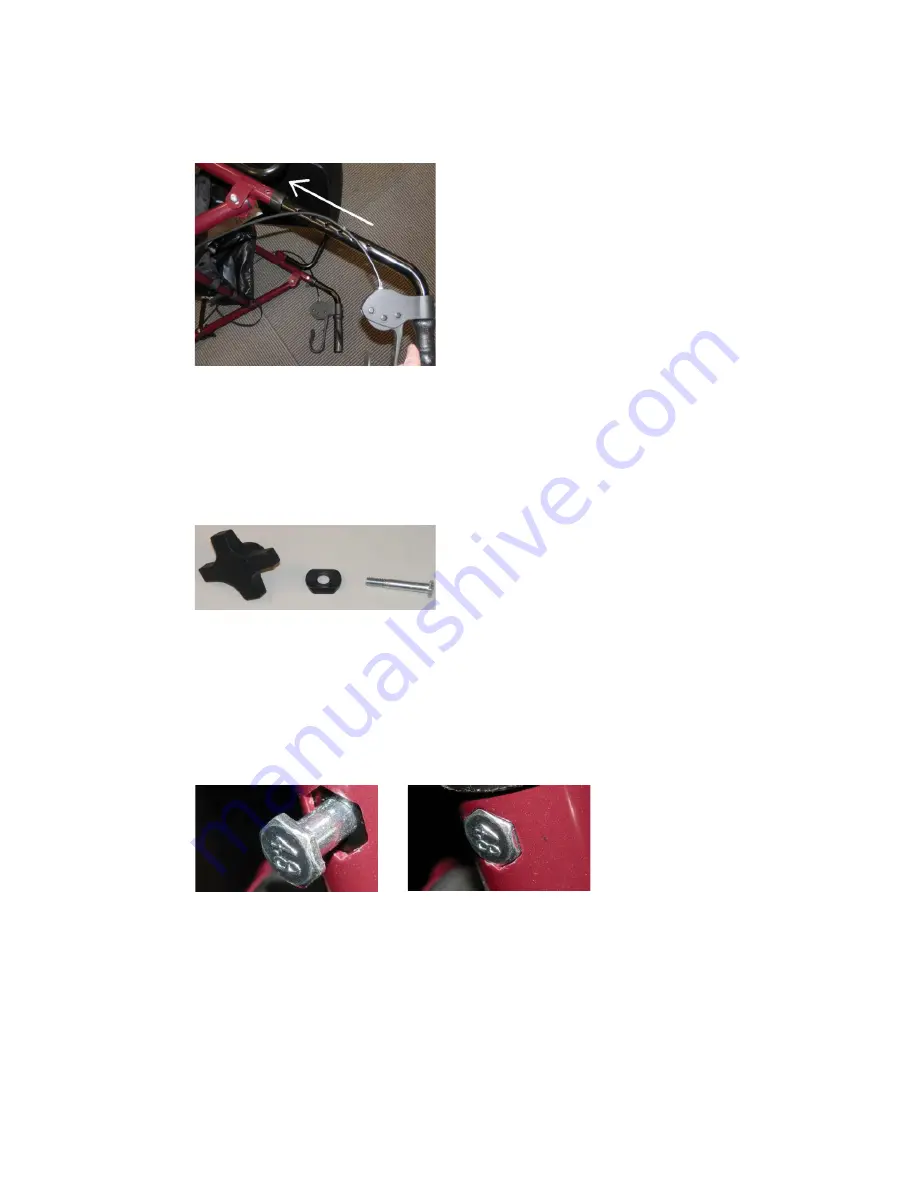
9.  Insert the handle/brake handle assembly (B and G) into  
  the frame (Figure 9). The brake cables should be on the  
  outside of the handlebars and frame. Ensure excess   
  brake cable loops towards the front of the rollator.

10. Align one of the holes to the hole in the frame and insert  
  the four point knob, washer and bolt (C) (Figure 10) to  
  hold the handle/brake handle assembly in place.

a) Insert the bolt into the 6 sided hole in the frame (Figure  
  11). Make sure the bolt head recesses into the frame   
  (Figure 12).

Figure 9

Figure 10

Figure 11

Figure 12

Содержание 100RA

Страница 1: ...100RA BASIC STEEL ROLLATOR WITH 6 WHEELS KNOCKDOWN ROLLING WALKER USER INSTRUCTIONS WARRANTY Product is not made with natural rubber latex ...

Страница 2: ...100RA PIC 00311 Revised 09 20 2016 2 ...

Страница 3: ...09 20 2016 3 Table of Contents Safety Instructions 4 Rollator Parts List 6 Assembly Instructions 7 Operating Instructions 12 Maintenance 13 Warranty 16 For any and all questions regarding this product please call 800 289 9793 ...

Страница 4: ...LCHAIR Serious injury to the user and or damage to the rollator s frame or wheels may result from improper use DO NOT use the rollator to walk backwards down gradients or to climb stairs curbs or to go over obstacles Serious risk of fall or injury may occur The backrest is intended to provide back support while seated The backrest is not intended to support full body weight Avoid leaning while sit...

Страница 5: ...hen the rollator is on an incline BRAKE CAUTIONS Check the brakes for proper operation Make sure that all parts are secure and that the moving parts are in good working order Wheels should roll easily and not wobble When rising from a lower position DO NOT use the rollator to provide assistance to the user If the rollator is used to pull the user up to a standing position the rollator may move eve...

Страница 6: ... A Handgrips B Adjustable Handlebars C Four Point Knobs D Backrest E Backrest Attachment F Seat 1 Rollator Frame 1 Backrest with Pad 2 Handlebars with Brake Assembly 1 Bag 2 Front Wheels 2 Rear Wheels 2 Four Point Knobs 2 Screws and Curved Washers 4 Triangular Knobs A B D H E F J K C M G I G Brake Lock H Brake Cables I Folding Support Bracket J 6 15 2 cm Front Wheels K 6 15 2 cm Back Wheels L Tria...

Страница 7: ...the bag are missing If there are missing or damaged parts please call Medline Customer Care toll free at 1 800 MEDLINE 3 Remove plastic cover from wheels Check all of the wheels to see that they are in good working order and roll freely Please also ensure that all four wheels touch the ground 4 Unfold the rollator by pushing down on the folding bracket I until the frame is in full extension 5 Note...

Страница 8: ...wheel assembly Figure 3 and Figure 4 on the side facing up Insert one triangular knob L Figure 5 8 Insert the rear wheel assembly Figure 6 and Figure 7 on the side facing up Make sure that the brake shoe M is toward the outside of the frame Insert one triangular knob L Figure 8 CAUTION Wheels and Brake shoes MUST be on the outside of the rollator ...

Страница 9: ...nsure excess brake cable loops towards the front of the rollator 10 Align one of the holes to the hole in the frame and insert the four point knob washer and bolt C Figure 10 to hold the handle brake handle assembly in place a Insert the bolt into the 6 sided hole in the frame Figure 11 Make sure the bolt head recesses into the frame Figure 12 Figure 9 Figure 10 Figure 11 Figure 12 ...

Страница 10: ...ide so that the wheels that were just installed are on the floor Repeat steps 7 through 10 above for the other side 12 Stand the rollator up so all 4 wheels are on the floor Make sure all 4 wheels are contacting the floor 13 Insert the backrest D so that the curved portion faces the front of the unit Make sure that the button snaps firmly into the hole so the back is secure Figure 16 Figure 16 Fig...

Страница 11: ...is position the handgrips A of the rollator should be adjusted to a height even with the wrists This will position the arms at an approximate 20º to 30º bend when using the rollator See Figure 16 You will have to remove the four point knob C to adjust the height of the handles Do one side at a time Secure the handlebars at the closest hole to the desired height Repeating Step 10 secure the four po...

Страница 12: ...mber at 1 800 MEDLINE for returns or repairs To release the brakes from the locked position simply pull up on the brake handles Figure 17 Operating Instructions Using the rollator as a walker For proper positioning and use of the rollator imagine a line drawn across the back of the rear wheels Part of one foot should be slightly ahead of that line as you walk Using the rollator as a seat Push the ...

Страница 13: ... brakes on the rollator keep in mind if you adjust it too far one way or the other the lock will not function properly Please test thoroughly and tighten all parts completely prior to using rollator 1 At the top of the rollator find the adjustment nut which is located where the cable goes into the brake handle This part is usually silver If the brake is too tight at the handles of the rollator che...

Страница 14: ...e adjustment nut counter clockwise screwing the adjustment nut to the thumb screw Adjust to correct tension If there is no gap no further adjustment can be made here If the brake is too loose not locking standing at the handles of the rollator turn the adjustment nut and thumbscrew counter clockwise You may need pliers to get started The thumbscrew and adjustment nut will push away from the handle...

Страница 15: ... too loose not locking pull up on the cable then looking at the adjustment nut from the top turn the adjustment nut clockwise screwing the adjustment nut to the bracket There will now be a gap between the thumb screw and the adjustment nut Adjust to correct tension ...

Страница 16: ...tion about your Medline product or this warranty please call us at 1 800 MEDLINE This warranty gives you specific legal rights and you may have other rights which vary from state to state LIFETIME WARRANTY 6 MONTHS WARRANTY FRAME HAND BRAKES BRAKE CABLES PUSH BUTTONS BRAKES UPHOLSTERY WHEELS FRONT AND REAR MEDLINE BAG TRIANGULAR HAND SCREWS ALL OTHER PARTS For any and all questions regarding this ...

Отзывы: