Medion P15109 Скачать руководство пользователя страница 15

14

Telephone: 

1300 884 987

Internet: www.medion.com.au

After Sales Support

Picture Setting


Use the 

R K E V W T G

 button to switch between the following picture modes: 

STANDARD, DYNAMIC, 

MILD, PERSONAL

. The 

PERSONAL

 setting is defined under the menu option 

PICTURE > PICTURE 

MODE

.


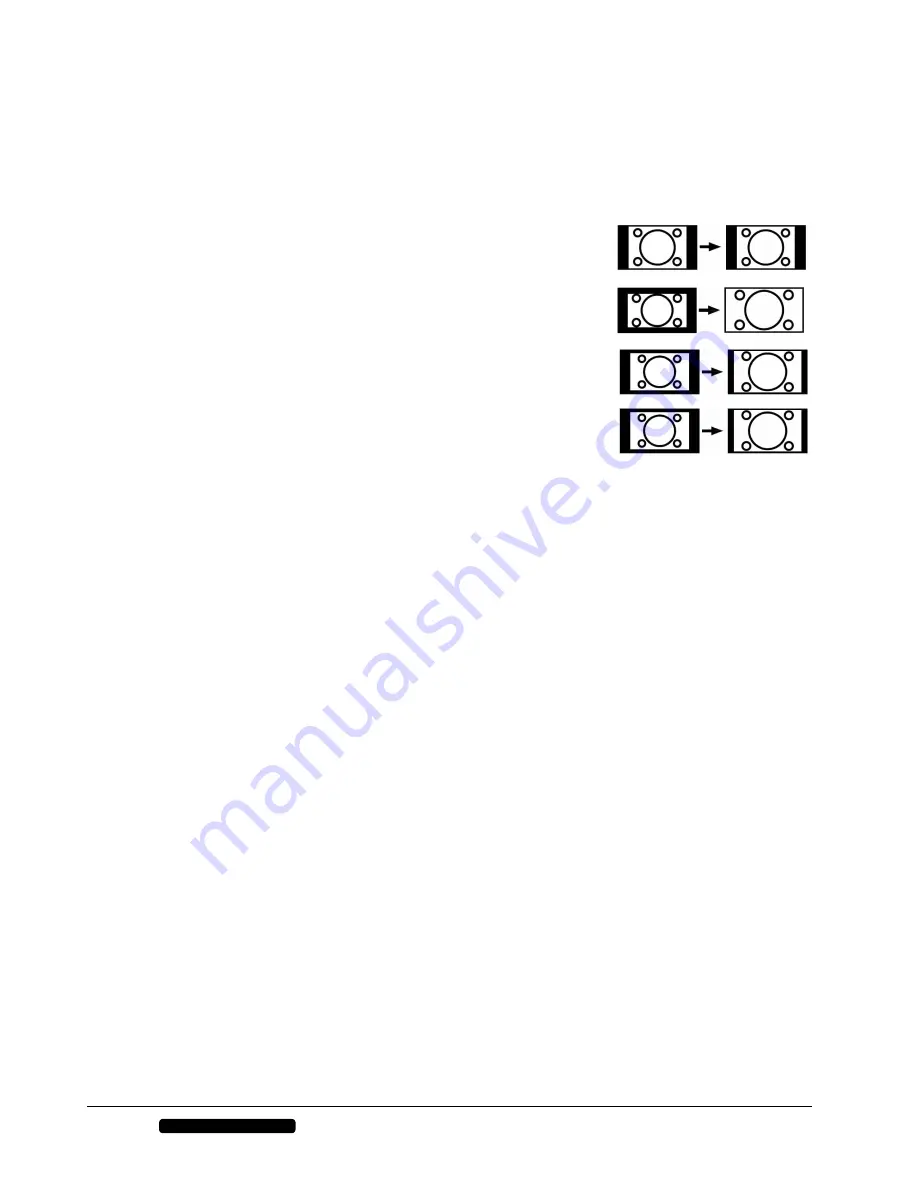
Depending on the program, the pictures are displayed in the formats 

4:3

 or 

16:9

. Use the 

C U R G E V


button to adjust the picture format:

:


AUTO

: The format displayed is automatically adjusted to match the input signal. 

4:3

: For undistorted screen display in 4:3 format. 

16:9

: A 16:9 picture (“letterbox“) is zoomed to the full screen size.

ZOOM1

: For undistorted screen display in 14:9 format. 

ZOOM2

: A picture in 14:9 format (“letterbox“) is stretched at the top and 

bottom margins of the screen.

You can also change these settings in 

SETUP > ASPECT RATIO

Note:

Please note that not all picture formats will be available depending on the image source setting.

Displaying Information


Press the 

F K U R N C[

 button to display the following current settings: 


− Channel position


− Color System


− Sound System 


You can get the same information when you switch over to a different channel.

Favourites List

You can enter a list of your favourite channels under the menu options 

CHANNEL > PROGRAMME 

EDIT

.


Press 

HCX

 to display your list of favourite channels.


Use the direction buttons 



 to select a channel.

Input Source Selection


Use 

K P R W V

 to call up the source selection list. The following sources are available: 

ATV


TV mode (analogue signal)

DTV


TV mode (digital signal)

MEDIA


Playback of media via USB

AV 


Device on AV input

PC


Device on PC input

COMPONENT


Device on the video and audio input components 

HDMI1


Device on HDMI 1 input

HDMI2


Device on HDMI 2 input

HDMI3


Device on HDMI 3 input


Use the direction arrows 



 to go to the desired source.


Confirm your selection with 

Q M

.

Содержание P15109

Страница 1: ...N26968 80 cm 31 5 Full HD Direct LED LCD TV MEDION P15109 MD 30612 Instruction Manual...

Страница 2: ...efits conferred by this warranty are in addition to all rights and remedies in respect of the product that the consumer has under the Competition and Consumer Act 2010 and similar state and territory...

Страница 3: ...Direct LED LCD Display 2 D LED LCD Mode indicator Press RQYGT to turn on and off Infrared sensor reception field for the infrared TV signals 3 RQYGT Standby on off 4 XQN 1XQN Adjust the volume or nav...

Страница 4: ...d Component IN 5 XKF GQ Video input 1 yellow 6 T H Antenna connection 7 XI C VGA connection to connect a PC or Notebook 8 XIC CW FKQ KP RE CWF KQ K P Audio input for PC or Notebook 9 RdRt to connect t...

Страница 5: ...WER MUTE PICTURE ASPECT SOUND SLEEP SUBTITLE CH LIST REC LIST REC 1 2 3 4 5 6 7 8 9 0 VOL CH INPUT DISPLAY EPG TV RADIO FAV MENU TV TXT CANCEL REVEAL NICAM A2 INDEX HOLD SIZE SUBPAGE EXIT 1 3 4 5 6 7...

Страница 6: ...see the bottom half of page double size Press again for normal size Previous chapter 19 JQNF No function Fast forward 20 Pause play program 21 KP F GZ Go to index Fast reverse 22 E C P EGN No function...

Страница 7: ...itching on the Unit for the First Time 13 Channel Selection 13 Setting the Volume 13 Picture Setting 14 Displaying Information 14 Favourites List 14 Input Source Selection 14 Media Mode 15 Media Mode...

Страница 8: ...corder 25 Device with HDMI or DVI Output 25 Connecting an External Device with HDMI Output 25 Connecting an External Device with DVI Output 25 Connecting a PC or Notebook 26 Troubleshooting 27 Do You...

Страница 9: ...etc This unit is intended for use in dry indoor areas only It is not suitable for use as a data monitor for office workstations The unit is intended for private use only and not for industrial or comm...

Страница 10: ...ging the screen do not touch it with fingers or sharp objects Contact customer services on 1300 884 987 if the power cable is burnt or damaged liquid has penetrated the device the device is not operat...

Страница 11: ...t with 100 240 V 50 60 Hz Contact you electricity provider if you are not sure if the socket is earthed or not The socket must be near the Direct LED LCD TV and easily accessible In order to disconnec...

Страница 12: ...and the relevant Australian EMC guidelines electromagnetic compatibility and the Australian electrical safety guidelines This device fulfils the basic requirements and the relevant regulation of the E...

Страница 13: ...eries Connect TV aerial To connect to the house antenna or cable system connect a double screened cable from the antenna socket to the D LED LCD TV DVB T Mode Standard Definition and High Definition Y...

Страница 14: ...finish You can use the OGPW button to cancel the search prematurely Note Consider a DVB T aerial if you are searching for digital channels Channel Selection To select a channel either press the button...

Страница 15: ...IO Note Please note that not all picture formats will be available depending on the image source setting Displaying Information Press the F KURNC button to display the following current settings Chann...

Страница 16: ...large a new partition allocated for recording will be While recording on your external USB device a new folder will be created labelled MSTPVR The OSD will show the file format and size selected how...

Страница 17: ...time set via the AUTO STANDBY timer is longer than the time set for the recording session to allow that your program has been fully recorded The scheduled recording can be checked via the EPG interfac...

Страница 18: ...direction button to access a sub menu not every menu has a sub menu option Press O GPW to return to the next higher menu Use the direction buttons to enter a desired value or make another selection Pr...

Страница 19: ...utton on the remote control Press the YES key if you are sure that you wish to reset the transmitter Press the NO key if you wish to stop the process RENAME only available for ATV Select the transmitt...

Страница 20: ...E MODE Select picture mode STANDARD MILD PERSONAL DYNAMIC This function corresponds to the RKE VWTG button The Personal setting lets you set the CONTRAST BRIGHTNESS COLOUR TINT and SHARPNESS yourself...

Страница 21: ...Limiting compensates for the various volumes of the different channels If you set to OFF you will hear the original volumes If you set to ON you will hear a balanced volume SPDIF MODE Select the spdif...

Страница 22: ...Enter a new four digit password CONFIRM NEW PASSWORD Enter the new password again The appropriate message will appear Information Note the new password It will not be set back at the recreation of the...

Страница 23: ...impaired you can set the setting to On to receive these signals This option is only available in DTV mode PVR FILE SYSTEM You will be able to record on a USB storage medium through the USB connection...

Страница 24: ...me EVERY DAY Manual entry of the recording The recording will be started daily at the pre set time WEEKLY Manual entry of the recording The recording will be started weekly at the pre set time Only pr...

Страница 25: ...ble Connect a video cinch RCA cable yellow jack to the video input on the D LED LCD TV and the video output on the external device Connect a stereo cinch RCA cable red and white jack to the audio inpu...

Страница 26: ...nt cable cinch RCA cable green red blue Connect a stereo cinch RCA cable red and white plugs to the AUDIO L R inputs for sound transmission 3 HDMI Cable If the external device has a HDMI output connec...

Страница 27: ...D LCD TV to the PC as follows Switch both devices off Connect a VGA cable monitor cable not supplied to the VGA input of the Direct LED LCD TV and to the graphic card output of the PC or Notebook Tigh...

Страница 28: ...rly The picture is not clear The reception might be poor Check if the antenna is connected properly The picture is too bright or too dark Check the settings for contrast and brightness The picture is...

Страница 29: ...ould help us What is the MD Number What external devices are connected What messages appear on the screen When operating the device at which step did the problem occur If you have a PC connected to th...

Страница 30: ...up of three sub pixels red green blue there are a total of approx 6 2 Mio control elements in use Occasionally one or more pixels can fail or become incorrectly controlled because of this very high n...

Страница 31: ...lean the screen with a soft lint free cloth Ensure that no water droplets remain on the Direct LED LCD TV Water droplets may result in permanent discolouration Do not place the screen in strong sunlig...

Страница 32: ...Audio Stereo audio in for Composite Video YUV Cinch RCA Headphone jack 3 5 mm jack PC audio in 3 5 mm jack Digital audio out SPDIF coaxial Speaker output rating 2 x 8 Watt RMS Drives USB Supported for...

Страница 33: ...ing the process of repair some or all of your stored data may be lost We recommend you save this data elsewhere prior to sending the product for repair You should also be aware that rather than repair...

Страница 34: ...US 8 M I 07 2013 MEDION Australia Pty Ltd St Leonards NSW 2065 Australia Hotline 1300 884 987 Opening hours Mon Fri 08 30AM to 06 00PM EST Internet www medion com au E mail Support australia medion co...

Отзывы: