background image

English

   - 15 -

GREEN

• 

: Tag/untag all channels.

BLUE

• 

: Displays fi ltering options.

Managing Stations: Sorting 
Channel List

You can select broadcasts to be listed in the channel 
list. To display specifi c types of broadcast, you should 
use Active channel list setting.

Select Active channel list from the Channel list 
menu by using “ ” or “ ” button. Press 

OK

 button 

to continue.

You can select a broadcast type option from the list 
by using “

” /“

” and

 OK

 buttons.

On-Screen Information

You can press “INFO” button to display on-screen 
information. Details of the station and current 
programme will be displayed on the information 
banner.

The information banner gives information on the 
channel selected and the programmes on it. The 
name of the channel is displayed, along with its 
channel list number. 

Hint: Not all channels broadcast 

the programme data. If the name and time of the 
programme are not available, then information banner 
will be displayed with blanks.


If the selected channel is locked, you must enter the 
correct four-digit numeric code to view the channel 
If the selected channel is locked, you must enter the 
correct four-digit numeric code to view the channel 
(default code is 

0000

). “

Enter PIN

” will be displayed 

on the screen in such a case:

Media Playback Using Media 
Browser

If the USB stick is not recognized after power off/on 
or First Time Installation, fi rst, plug the USB device 
out and power off/on the TV set. Plug the USB device 
in again.

To display Media Browser window, press either 

“MENU”

 button on the remote control and then select 

Media Browser by pressing “ ” or “ ” button. Press 

OK

 button to continue. Media Browser menu options 

will be displayed. 

Also, when you plug USB devices, media browser 
screen will be displayed automatically:

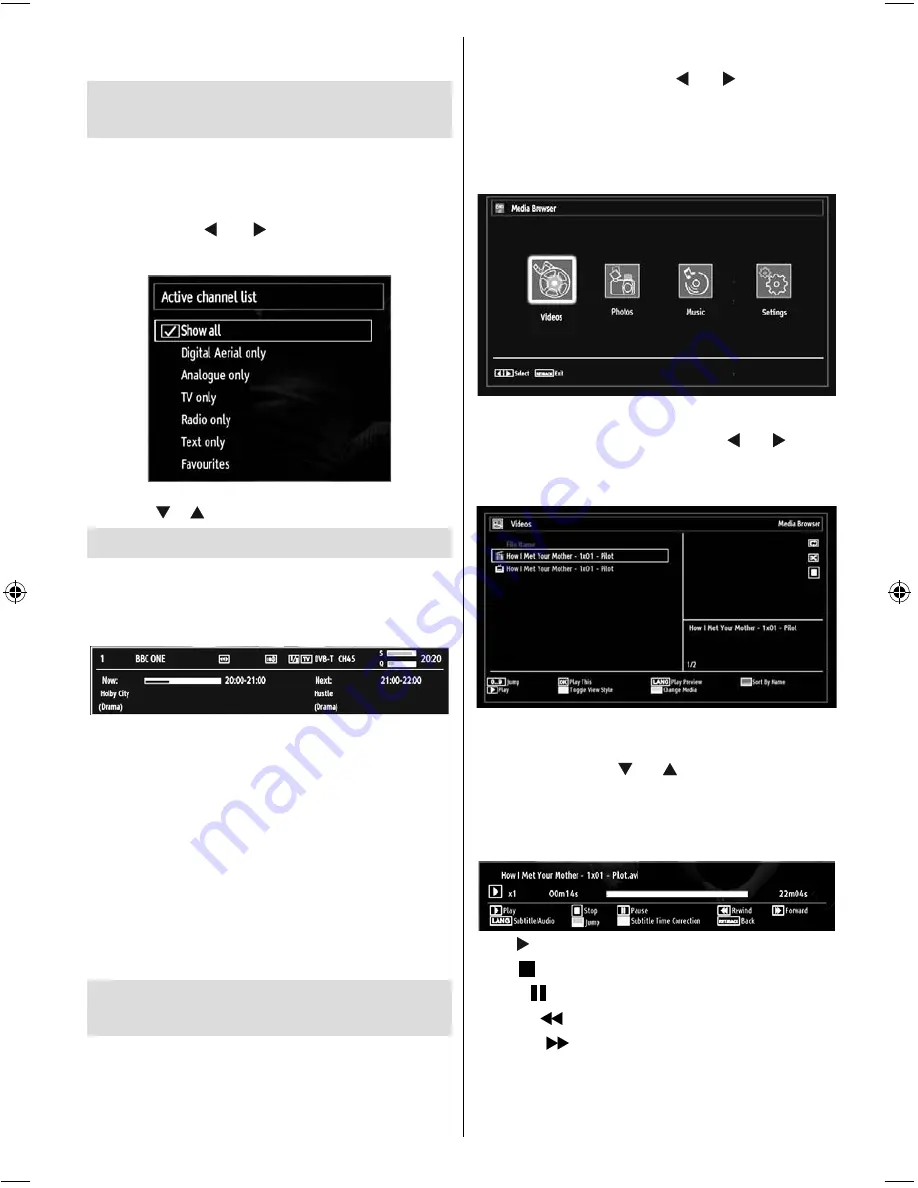
You can play music, picture and video fi les from the 
connected USB memory stick. Use “ ” or “ ” button 
to select Videos, Photos, Music or Settings. 

Viewing Videos via USB 

When you select Videos from the main options, 
available video fi les will be fi ltered and listed on this 
screen. You can use “ ” or “ ” button to select a video 
fi le and press 

OK

 button to play a video. If you select 

a subtitle fi le and press 

OK

 button, you can select or 

deselect that subtitle fi le. The following menu will be 
displayed while playing a video fi le:

Play (  button): Starts the video playback.

Stop (

 button)

: Stops the video playback.

Pause (  button)

: Pause the video playback.

Rewind (

 button)

: Goes backward.

Forward (

 button)

: Goes forward.

Subtitle/Audio (LANG. button)

: Sets subtitle/Audio.

Yellow

: Opens subtitle time correction menu

01_MB60_[GB]_(01-TV)_1900UK_IDTV_BRONZE17_19841W_10070519_5017797.indd   15

01_MB60_[GB]_(01-TV)_1900UK_IDTV_BRONZE17_19841W_10070519_5017797.indd   15

10.11.2010   11:40:50

10.11.2010   11:40:50

Содержание P13132 (MD 21009)

Страница 1: ...18 5 Design LCD TV with integrated HD DVB T tuner and DVD player MEDION LIFE P13132 MD 21009 Instruction manual Medion Service Center Visonic S A c Miguel Faraday 6 Parque Empresarial La Carpetania N...

Страница 2: ...the Channel List 14 Moving a Channel 14 Deleting a Channel 14 Renaming a Channel 14 Locking a Channel 14 Managing Stations Favourites 14 Button Functions 14 Managing Stations Sorting Channel List 15 O...

Страница 3: ...ly suitable for the operation in dry interiors This appliance is intended solely for private domestic use and may not be used for industrial and commercial purposes We exclude liability in principle i...

Страница 4: ...manner Find out about the legal regulations which apply in your area Don t try to recharge batteries Danger of explosion Replace batteries only with the same or equivalent type This symbol on the prod...

Страница 5: ...children Never let children use electrical device unsupervised Children can t always recognize properly the possible dangers Batteries accumulators can be life threatening when swallowed Store batter...

Страница 6: ...ed button Zooms videos in Media Browser 16 video mode Green button 17 Yellow button 18 Menu on off 19 Blue button 20 OK Edit Channel list Hold in TXT mode 21 Cursor right Subpage in TXT mode 22 Cursor...

Страница 7: ...sound connection is needed for an HDMI to HDMI connection RF Input 2 connects to an aerial antenna system Note that if you use a decoder or a media recorder you should connect the aerial cable throug...

Страница 8: ...or into the YELLOW input located on the plural side of the supplied AV connection cable Colours of the connected jacks should match To enable audio connection you must use RED and WHITE inputs of the...

Страница 9: ...t supported Connecting the LCD TV to a PC For displaying your computer s screen image on your LCD TV you can connect your computer to the TV set Power off both computer and display before making any c...

Страница 10: ...s an HDMI socket you can connect via HDMI for better video and audio quality HDMI 1 SPDIF Coax OUT External device not supplied HDMI Cable When you connect to DVD player as illustrated above switch to...

Страница 11: ...l and onset buttons Operation with the Buttons of the TV Main menu OSD cannot be displayed via control buttons buttons will function as volume up down as default Even if you set other functions for th...

Страница 12: ...s of the next time slice Yellow button Prev Day Displays the programmes of previous day Blue button Next day Displays the programmes of the next day Numeric buttons Jump Jumps to the preferred channel...

Страница 13: ...ions Afterwards select the desired Teletext Language Press OK button on the remote control to continue and the following message will be displayed on the screen To select the Yes or No option highligh...

Страница 14: ...or frequency number using the numeric buttons and press OK button to search Analogue Manual Search After selecting search type as analogue you can use button to highlight an item and then press or bu...

Страница 15: ...option Press OK button to continue Pressing or button moves to the previous next character Pressing or button toggles the current character i e b character becomes a by and c by Pressing the numeric...

Страница 16: ...fault code is 0000 Enter PIN will be displayed on the screen in such a case Media Playback Using Media Browser If the USB stick is not recognized after power off on or First Time Installation first pl...

Страница 17: ...ET BACK Back to file list INFO Displays help screen Listening to Music via USB When you select Music from the main options available audio files will be filtered and listed on this screen 0 9 Numeric...

Страница 18: ...mode manually 16 9 This uniformly stretches the left and right sides of a normal picture 4 3 aspect ratio to fill the wide TV screen For 16 9 aspect ratio pictures that have been squeezed into a norma...

Страница 19: ...e loaded Note When Game Mode is on some items in the Picture Settings menu will be unavailable to be set Picture Zoom Sets the picture size to Auto 16 9 Subtitle 14 9 14 9 Zoom 4 3 Panoramic or Cinema...

Страница 20: ...ne volume AVL Automatic Volume Limiting AVL function sets the sound to obtain fixed output level between programmes For instance volume level of advertisements tend to be louder than programmes Dynami...

Страница 21: ...ange depending on the service provider Press MENU button and select the icon by using or button Press OK button to view Settings menu Use or button to highlight Conditional Access and press OK to view...

Страница 22: ...PIN number should be entered Factory default PIN number is 0000 After coding the correct PIN number parental settings menu will be displayed Parental Settings Menu Operation Select an item by using or...

Страница 23: ...he starting and ending time Repeat Sets a timer to be repeated as Once Daily or Weekly Use or buttons to select an option Press GREEN button to save the timer Press RED button to cancel Change Delete...

Страница 24: ...se this setting In order for the proper operation please ensure that the TV is set to standby mode You can enable or disable automatic upgrade by setting Automatic Scanning option You can manually sea...

Страница 25: ...use when TOP text transmission is present Pressing or commands will request the next or previous page respectively Tips Screen Care Clean the screen with a slightly damp soft cloth Do not use abrasiv...

Страница 26: ...2 1360x768 60 Hz Appendix B AV and HDMI Signal Compatibility Input Signal Types Source Supported Signals Available EXT SCART PAL 50 60 O NTSC 60 O RGB 50 O RGB 60 O Side AV PAL 50 60 O NTSC 60 O YPbPr...

Страница 27: ...Format Remarks Video Audio Maximum resolution Bit rate etc Movie mpg dat vob mkv rmvb ts trp tp MPEG1 MPEG Layer 1 2 3 20Mbit sec MPEG2 MPEG2 XviD 3ivx PCM MP3 XviD Verson up to 1 1 2 Mpeg2 TS H264 T...

Страница 28: ...is found and downloaded successfully with next power up TV opens with new software version Note on reboot operation Reboot is the last step in software upgrade operation if download of new software is...

Страница 29: ...W max 1 W Standby PANEL 16 9 display 19 Screen Size DIMENSIONS mm DxLxH With foot 118 x 459 x 344 Weight Kg 4 8 DxLxH Without foot 63 x 459x 312 Weight Kg 4 6 Digital Reception MHEG 5 ENGINE compliant...

Страница 30: ...3 JPEG MPEG playback NTSC PAL playback according to disc content LPCM audio via coaxial digital audio output optional Multi Audio up to 8 support According to disc content Multi Subtitle up to 32 supp...

Страница 31: ...the disc to direct sunlight or heat sources such as hot air ducts or leave it in a car parked in direct sunlight as the temperature can rise quickly and damage the disc After playing store the disc i...

Страница 32: ...a the remote control While playing a file you should press STOP button three times to eject Overview of the Remote Control Standby 1 Numeric buttons 2 Return back 3 Language selection Set language 4 D...

Страница 33: ...mode selection during playback Press repeatedly to switch between modes LANG Audio language X X MENU Displays TV menu OK SELECT Enter View Play REPEAT Displays repeat options RETURN Returns back to t...

Страница 34: ...ack to the initial settings If a language is selected not supported by the 7 disc the subtitle language will automatically be set to the disc s priority language Usually a circulation will happen whil...

Страница 35: ...technical service SPDIF OUTPUT You can set Spdif Output as PCM or RAW If you select PCM from SPDIF Output in DVD menu and play DVD with Dolby audio you can get audio output with two channels via the s...

Страница 36: ...und have been recorded by means of digital signals Incorporating a new video compression technology MPEG II and high density recording technology DVD enables aesthetically pleasing full motion video t...

Страница 37: ...x c ellen t s o u n d a n d v id eo d u e to D o lb y D ig i tal an d M P E G 2 S y s tem Var io u s s c r een an d au d io fu n c t io n s c a n b e eas ily s el ec t ed t h r o u g h th e o n s c r...

Отзывы: