background image

 MVR/MVRPRO-UG01-EN-200727

<

27

>

MVR / MVR Pro User Guide - English

Recording Options 


Settings 

➤ 

Video/Audio 

➤ 

Recording Options

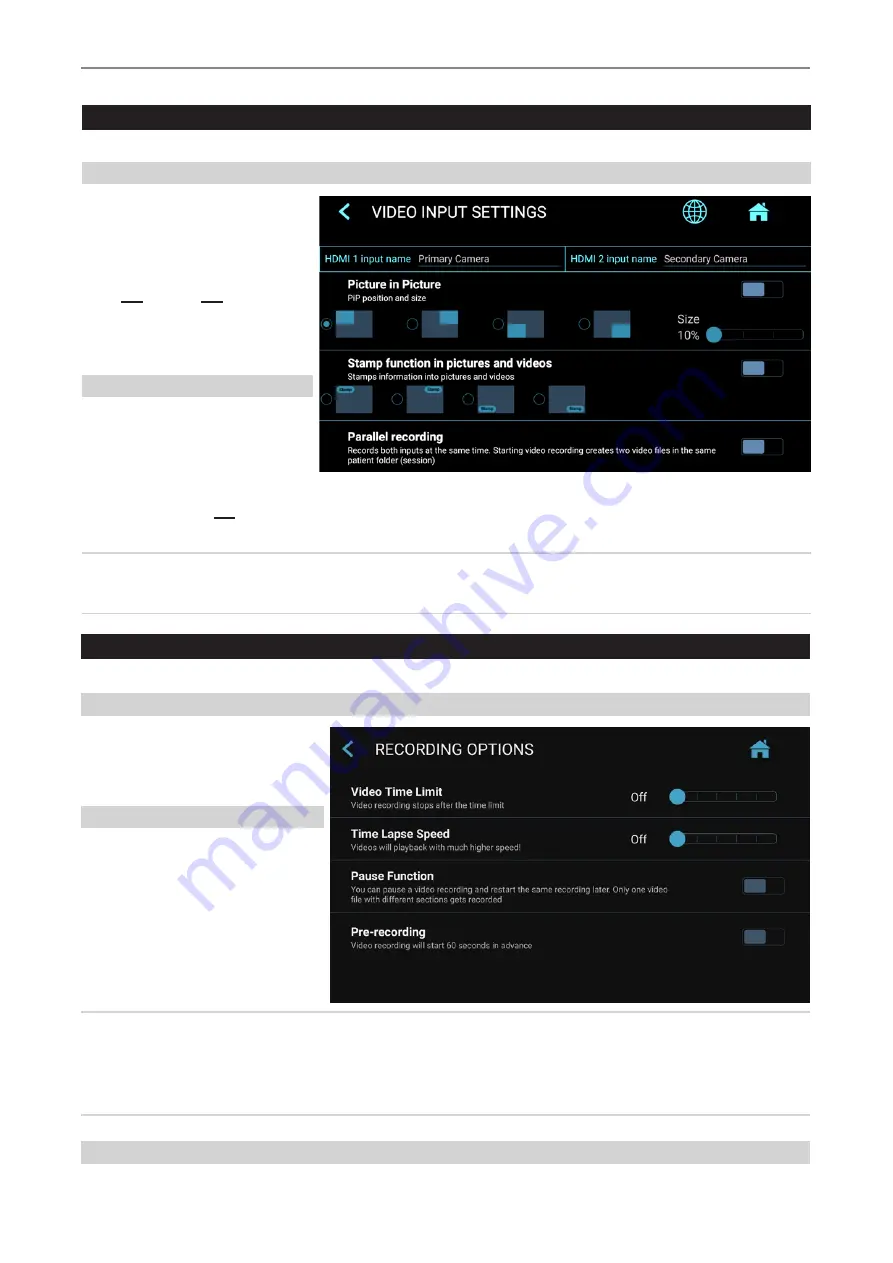
Video Time Limit

Allows you to choose time limits on 

recordings. For example, you can set  

a recording time limit of 5 minutes.

Time Lapse recording

Time Lapse recording is an option to 

save recording space on your storage 

media. It is useful for documentation of 

complete, long operations or processes 

which last over a very long period. You 

can take snapshots from the recorded 

video in the editing function of the 

Archive afterwards to extract important 

events as a captured picture.

Please note:  Videos recorded in time lapse mode play back in a much shorter time (depending on the time lapse speed).  

Do not use time lapse recording when your demand for video documentation is video playback in real-time. 

You can change the speed (=factor) of time lapse recording by moving the slider. 

Example: x60 will speed up video playback 60 times (1 hour of recording will be played in 1 minute).

Pause Function

You can activate the optional pause function.

Special Video Input Settings


 Settings 

➤ 

Video/Audio 

➤ 

Video Input

Picture-in-Picture Recording (PIP)

When using Multi-Input you can set 

MVR / MVR Pro to Picture-in-Picture.
Input 2 will be displayed as a window  

in Input 1. 

 • Exactly this view gets recorded as 

one picture or one video into the 

patient study folder.

 • You can choose the size and 

position of the PIP window.

Parallel Recording

When using Multi-Input you can set 

MVR / MVR Pro to Parallel Recording.
Both inputs, Input 1 and Input 2 get 

recorded at the same time when you  

start a recording. 
 

• This creates two independent video files in your patient study folder. 


• You can only see one input in the live view screen, second input gets recorded as well.

Note: You can only choose one option for Special Video Input Settings: Either PIP or Parallel recording.  

Both functions are limited to 1080p60 on both inputs.  

When a 4K camera is connected to input 1, you cannot use these options.

Содержание MVR

Страница 1: ...MVR MVR Pro High Definition Medical Video Recorder User Guide Applies to Firmware 180810 and higher MVR MVRPRO UG01 EN 200727 OB ...

Страница 2: ...kground color Yellow Triangular band Black Symbol Black Before attempting to set up the product carefully read through the User Guide This symbol indicates the manufacturer and appears next to the manufacturer s name and address Caution Indicates a potentially hazardous situation or improper use which if not avoided may result in minor or moderate injury and or appreciable material financial and e...

Страница 3: ...quirements of medical system standard IEC 60601 1 1 Equipment not complying with UL EN IEC 60601 1 shall be kept outside the patient environment as defined on the systems standard CAUTION To reduce the risk of fire or shock hazard and annoying interference use the recommended accessories only Do not use the images for diagnosis or evaluation purposes The compression reduces the information of the ...

Страница 4: ...uvant causer des blessures graves ou la mort NOTE Couleur de fond Jaune Bande triangulaire Noire Icone Noir Lire les instructions avec attention avant d installer le produit Cette icône représente le fabricant et apparaît avec le nom et l adresse de celui ci Attention Symbole avertissant l utilisateur de situation potentiellement dangereuse ou d utilisation inappropriée pouvant causer des blessure...

Страница 5: ...danger pour le patient l utilisateur ou tout autre partie Si aucun règlement d usage n est disponible il est recommandé de mettre en place et procéder à un test de sécurité conformément à la norme EN 62353 tous les 2 ans Il est important que les personnes réalisant ces tests de sécurité aient les qualifications nécessaires Après une perturbation électrique forte comme la foudre ou une forte déchar...

Страница 6: ...Recording Videos 16 Pausing a Video Recording 16 Changing Input Signals in Live View Multi Input 17 Storage Options Multi Storage 17 Recording to a USB Flash Drive 17 Recording to a USB Hard Drive 18 Hard Drive Formats 18 How to Determine the Format of a USB Hard Drive 18 Transferring Images from a USB Drive to Your Computer 18 Recording to Internal Storage 18 Recording to Network Storage 19 Revie...

Страница 7: ...ing 12 Use only with a cart stand tripod bracket or table specified by the manufacturer or sold with the apparatus When a cart is used use caution when moving the cart apparatus combination to prevent the cart from tipping over and to avoid injury Place device in the position for easy disconnection of power cord 13 Unplug this apparatus during lightning storms or when unused for long periods of ti...

Страница 8: ...tion MVR Pro can record a 4K HDMI signal in 2160p30 Without activation the signal will be downscaled to 1080p30 In the Review function a user can playback and edit the recorded data within the active patient study After closing the study the user has access to the Archive internal storage or USB media to review and edit several stored studies of different patients MVR MVR Pro features multi input ...

Страница 9: ...turn icon or ESC ony your keyboard to go back 7 When you finish the study it is safe to remove the USB flash drive from the MVR MVR Pro Insert the stick into the USB connector of a computer Drop and drag your recordings from the stick to your computer for viewing archiving etc Note Do not remove the flash drive from MVR MVR Pro while recording a User Interface Language Settings System Language Not...

Страница 10: ...re the patient s images and videos End of study Closes the active recording study USB Drive Connector Connect a USB drive here Images and videos are captured to the drive Record Video button Records video clips of what is displayed on monitor Press once to start recording and again to stop IR Receiver Light Rings Flash blue when ready for recording or when a new study can be created Blue LED light...

Страница 11: ...ro live view screen This is the icon size displayed on a Full HD monitor On a 4K monitor the icons will appear smaller End of study USB keyboard with integrated trackpad A USB keyboard with integrated trackpad can serve as an alternative to a touchscreen monitor The integrated trackpad works like a mouse with double click function Please note the short cut key functions to operate the user interfa...

Страница 12: ...age Record Video button Records video clips of what is being displayed on monitor Press once to start recording and again to stop Input Selection button Toggle between Input 1 and Input 2 Remote control with a Remote Device tablet by using the MVR Remote App Android remote devices tablets can be used for external control of MVR MVR Pro either via USB connection as an external touchscreen monitor U...

Страница 13: ...back panel A footswitch or trigger can be used to capture photos Connect the footswitch or trigger to the Remote connector By tapping the footswitch or trigger it will perform the same function as pushing the Capture Photo button on the front panel Please note To operate two remote cables from your image source Capture Photo Record Video an adapter is necessary for the MVR MVR Pro remote connector...

Страница 14: ...the front to finish a study Light Ring Is illuminated blue when a recording study can be closed END OF STUDY Workflow after MVR MVR Pro was switched on No Patient Info MVR MVR Pro creates a folder to store images and videos recorded in that study Manual Patient Info You can type in patient information to assign images and videos to a patient To input patient information please use the intergrated ...

Страница 15: ...r MVR MVR Pro storage media those which are enabled and connected Tap on the search icon in the screen ENTER PATIENT DATA to retrieve the list Select existing patient data and tap again to copy the patient data to your new study You can still change these data Tap on Start to start your new study Capturing Images To capture an image tap on the Capture Photo icon on the touchscreen Front panel Pres...

Страница 16: ...t tags in chapter Reviewing Videos on MVR MVR Pro Video Start Video Stop Pause Pause Part 1 Part 2 Part 3 Video Start Video Stop More information about tags in chapter Reviewing Videos on MVR MVR Pro Pausing a Video Recording To use Pause you have to enable the function in Settings Settings Video Audio Recording Options The Pause icon will appear in the live screen after Pause is enabled To pause ...

Страница 17: ... Options are Internal Storage USB Storage Network Storage You can also select different video resolutions for different storage targets Example Recording to USB in the highest possible resolution and recording to a network server in reduced resolution Resolutions 1920x1200 and 1280x1024 will be supported at setting 1080p recorded and captured in original resolution and format Note Images are alway...

Страница 18: ...B flash drive or USB hard drive unplug it from the MVR MVR Pro at the end of your imaging studies Insert the drive into a USB connector on your computer Note Do not remove the flash drive from MVR MVR Pro while recording Your recording file may get corrupted 2 The computer will manage the USB drive just like any other drive on your computer Navigate to the drive and open it so you can see the fold...

Страница 19: ...creen This is helpful to control your recordings before you finish this study Video recordings must be stopped before changing to Review Tab on the Review icon to enter Review Closing the Review screen brings you back to your live recording screen Control Icon and Review last study Archive The Archive offers intuitive features to browse your recorded studies You can enter the Archive from the Star...

Страница 20: ...nfirmation of each deleting activity is requested on the screen Deleting single files pictures videos Select the file you want to delete and tap on the delete icon Deleting of a complete study is possible as soon as it is empty all files where already deleted Clearing of all data from the device storage Please use the formatting process to delete all data from directly connected storages USB memor...

Страница 21: ...ame backward One tag backward Tag Position in timeline One tag forward One frame forward Snapshot the video is paused during recording an image is captured during recording the video signal lost synchronization for less than 10 seconds most probably caused by a damaged video cable You can jump between tags by using the blue forward backward icons Reviewing Still images on MVR MVR Pro A selected im...

Страница 22: ...e older computers may need additional software to play H 264 HEVC videos For example on Windows XP and Vista computers playback is enabled by installing a simple add on to Windows Media Player For information on how to install this add on please visit medicapture com support Other Features Capturing Images While Recording Videos While video is being recorded you can also record still images simply...

Страница 23: ...ed on the back panel It serves the same function as the corresponding Record Photo button on the front panel Note that the footswitch trigger connectors respond to a simple closed contact they are not programmable Please note To operate two remote cables from your image source Capture Photo Record Video an adapter is necessary for the MVR MVR Pro remote connector Information Page System Settings A...

Страница 24: ...partment Location Device title Printer Printer Selection Number of copies Display MVR Pro only Brightness Date and Time Time zone selection Date Time Language User Interface language selection Archive Storage Activation of USB Internal Network Resolution limits Report Settings Header image import Page layout Page size Auto print report activation Advanced can be password protected Connections Netw...

Страница 25: ...ection and data security of recorded studies MVR MVR Pro can be locked with User accounts Enable user accounts and add users Password for User Account User Name Advantages are No user has access to Advanced Settings The administrator can use the User Login screen see next section by using his password for Advanced Settings no User Name only Password This opens the protected screen for Advanced Set...

Страница 26: ...count information and therefore no Master Password exists In case you do not remember your user account information MVR MVR Pro requires a complete setup to factory default settings which means many of your achieved information will get lost User log in with User Name and Password Note If the User account information is lost the administrator can login with his password configurated to lock Advanc...

Страница 27: ...he slider Example x60 will speed up video playback 60 times 1 hour of recording will be played in 1 minute Pause Function You can activate the optional pause function Special Video Input Settings Settings Video Audio Video Input Picture in Picture Recording PIP When using Multi Input you can set MVR MVR Pro to Picture in Picture Input 2 will be displayed as a window in Input 1 Exactly this view ge...

Страница 28: ...0p30 If your camera equipment provides 4x 3G SDI in Quad Split Square Division or 2 Sample Interleave format MediCapture s additional item MVC Pro HDMI to SDI will convert your SDI signals to HDMI Please enter the 8 digit activation key The key is specific to the current device and cannot be used for other devices Please contact MediCapture for ordering information to the 4K activation key of MVR ...

Страница 29: ...24x768 For recording 4K input signals in 4K resolution 4K recording needs to be activated Otherwise 4K input signals will be recorded in HD Video Recording Format MP4 H 264 HEVC H 265 High Efficiency Video Coding Video Recording Bitrate H 264 coding Adaptive Constant Bitrate Normal quality HD 1080 16 Mbps HD 720 8 Mbps Super quality HD 1080 32 Mbps HD 720 16 Mbps HEVC coding Adaptive Constant Bitr...

Страница 30: ...HS compliant Mechanical MVR MVR Pro with touchscreen monitor Dimensions WxDxH 173 x 153 x 50mm without antenna attached Weight 1 28kg MVR without touchscreen monitor Dimensions WxDxH 160 x 150 x 40mm without antenna attached Weight 1 00kg Environmental Operating ambient temperature 20 to 40 C air pressure 700 to 1060hPa humidity 30 to 75 non condensing Storage and transportation ambient temperatur...

Страница 31: ...the FCC Rules These limits are designed to provide reasonable protection against harmful interference in a residential installation This equipment generates and radiates radio frequency energy and if not installed and used in accordance with the instructions may cause harmful interference to radio communications However there is no guarantee that interference will not occur in a particular install...

Страница 32: ...ed for point to point and non point to point operation as appropriate IV Users should also be advised that high power radars are allocated as primary users i e priority users of the bands 5250 5350 MHz and 5650 5850 MHz and that these radars could cause interference and or damage to LE LAN devices Avertissement Le guide d utilisation des dispositifs pour rêseau x locaux doit Inclure des instructio...

Страница 33: ...ENTIAL DAMAGES SO THE ABOVE EXCLUSION OR LIMITATION MAY NOT APPLY TO YOU This warranty gives you specific legal rights You may also have other rights which vary from state to state In the event any of the provisions of this warranty are found to be unenforceable all remaining provisions shall retain full force Owner Responsibilities Read the User Guide completely Warranty registration is not neces...

Отзывы: