Mediacom SportCam Xpro 12 Скачать руководство пользователя страница 7


6


2. Use the battery 

2.1 Install the battery. 

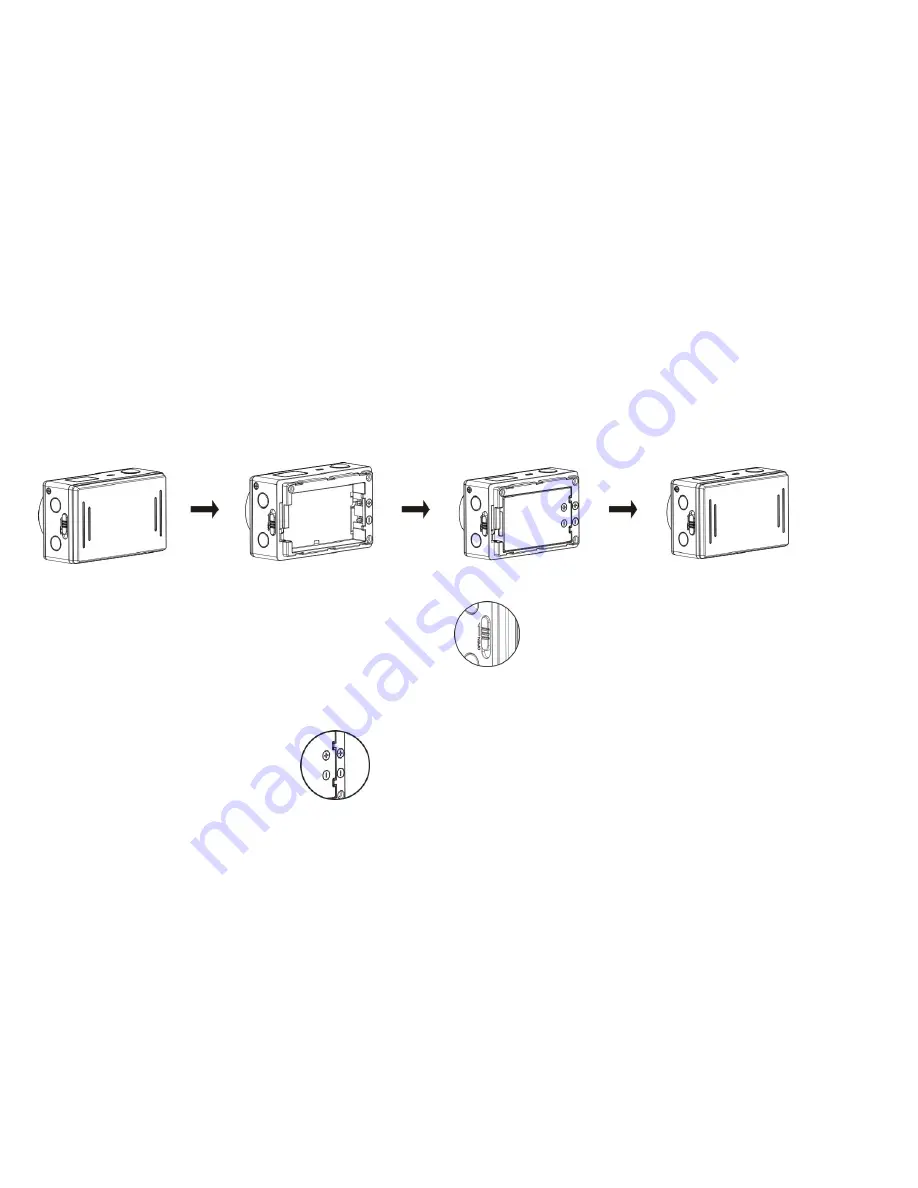
Please install the lithium battery correctly as shown in the following graphic. 


      Figure 1       


                    Figure 2 


    Figure 3                            Figure 4   

Step 1. Push the battery cover switch to the lock position (

), and remove the cover as shown in figure 1. 

Step 2. Put the lithium battery into the battery slot. Make sure the contacts of the battery are corresponding to the 

symbols of the SportCam WiFi shell(

). As shown in figure 2 and figure 3. 

Содержание SportCam Xpro 12

Страница 1: ...User Manual...

Страница 2: ...Thank you for buying the SportCam Xpro 12 HD WiFi Before start using this product please read this manual carefully to maximize its performance and extend the life of the product Appearance and Button...

Страница 3: ...o SD card slot 4 Lens 11 External microphone 5 Wi Fi switch and status indicator red 12 Battery cover push switch 6 Power Mode button 13 LED light 7 Infrared signal reception light LCD Display Illustr...

Страница 4: ...080 30fps In camera mode LO stands for 5 Mega Pixels 2592x1920 and in video recording mode it stands for 720P 1280x720 30fps HILO only displays in video recording mode standing for 720P 1280x720 60fps...

Страница 5: ...o switch the following modes in turn In video mode press the Shutter button to start recording LED flash and press it again to stop In camera mode press the Shutter button to take photo Camera mode 8M...

Страница 6: ...1 Insert a micro SD or micro SDHC card as shown in the following picture A Class 4 High speed card is recommended When using the time delay function or recording video in professional mode a Class 10...

Страница 7: ...Figure 1 Figure 2 Figure 3 Figure 4 Step 1 Push the battery cover switch to the lock position and remove the cover as shown in figure 1 Step 2 Put the lithium battery into the battery slot Make sure...

Страница 8: ...the battery The SportCam WiFi uses removable rechargeable lithium battery When the SportCam WiFi is off connect it to the PC via USB cable to charge the battery During charging the status indicator b...

Страница 9: ...he button for about 3 seconds LCD displays ON and the camera beeps 2 Turn off press and hold the button for about 3 seconds LCD displays OFF and the camera beeps Note The SportCam WiFi will turn off a...

Страница 10: ...arts with following default settings Video recording mode icon The SportCam WiFi is in video recording mode HI Video resolution FHD 1080p 30fps Recording time Stands for 0 hour and 00 minute Micro SD...

Страница 11: ...WiFi provides different record modes Press the button several times to switch to the different modes The following first two modes will be show on the SportCam WiFi screen and other modes available on...

Страница 12: ...Start recording Press and release the button the icon and displayed on the LCD will flash At the same time the red indicator flashes indicating the recording is in process Stop recording Press and re...

Страница 13: ...LCD screen can only display up to 999 3 Enable disable WiFi The WiFi is disabled by default Press the WiFi button on the side of the SportCam WiFi to enable it When starting connecting to WiFi networ...

Страница 14: ...s and hold the Shutter button to disable the buzzer and indicator to enter Mute mode In Mute mode the icon will be displayed on the screen press and hold the Shutter button again to exit Mute mode Buz...

Страница 15: ...WiFi to a HDTV via HDMI cable optional If you want to playback picturs videos or audio records to a HDTV connect the Com end of the HDMI cable to the SportCam WiFi and the other end output to the HD i...

Страница 16: ...and disconnect WiFi first 5 2 When the camera is connected to a HDTV the LCD screen will show following S N Icon name Description 1 Playback mode Camera is in Playback mode currently 2 File number The...

Страница 17: ...ideo file is selected press the Shutter button to start the playback and press the Shutter button again to stop playing In Playback mode press and hold the Shutter button a prompt of deleting the file...

Страница 18: ...n the SportCa WiFi and connect it to the USB port of the PC via the attached USB cable The SportCam WiFi will enter U disk mode and the LCD will indicates following Now you can view the photos or vide...

Страница 19: ...the other one stores the system file information including a file named SSID_PW CFG containing the AP ID of the and the password for AP login Users can view this information but cannot modify delete...

Страница 20: ...PCC mode on Windows XP SP3 version or above Remote Controller Application Buttons Instruction You can use the remote controller to record videos take photos and shut down the SportCam WiFi When using...

Страница 21: ...the remote controll aim the signal emission port to the infrared signal reception light of the SportCam WiFi and press the video button photo button or power off button Infrared signal reception ligh...

Страница 22: ...ll it according to the instruction 1 2 Search for SYMAGIX in APP Store for iOS or scan the QR code 2 Android APP 2 1 Install SYMAGIX APP provided by at the App Store on your smart phone or tablet When...

Страница 23: ...hen connected the screen states Connected successfully Note The first time connecting to SportCam WiFi you need to enter password 1234567890 2 4 Click the icon in the App list of the Android phone or...

Страница 24: ...23 1 Video resolution 6 Photo mode 2 White balance 7 Video mode 3 Setup enter setup menu 8 WiFi signal icon 4 Enter Playback mode 9 SportCam WiFi battery icon 5 Shutter button...

Страница 25: ...iFi button to enable it Now you can see the WiFi icon on the LCD 3 3 Enable Wi Fi on your iOS phone or tablet and search for wireless AP signal SportCam_WIFI then connect it with the SportCam WiFi Whe...

Страница 26: ...ne or tablet The operation interface on terminal is shown in the following figure 1 SportCam WiFi battery icon 2 Video resolution 3 White balance 4 Setup enter setup menu 5 Enter Playback mode 6 Shutt...

Страница 27: ...ng the camera Submerse the case completely in water for about one minute Remove the case from the water dry off its exterior with a towel and then open the case If the interior is dry the case is safe...

Отзывы: