background image

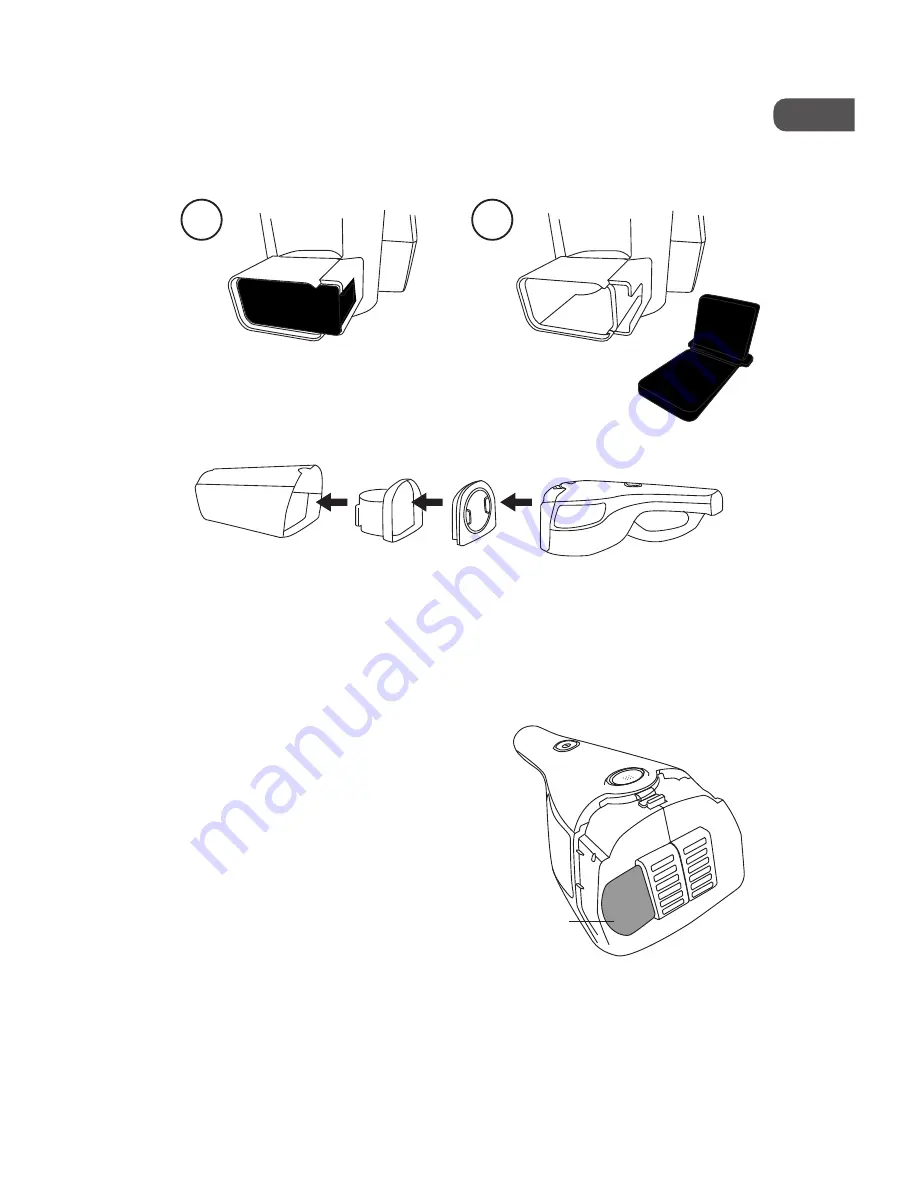
Cleaning the motor filter

1.  Take out the motor filter from the motor body.
2.  Wash it under water.
3.  Replace only after drying thoroughly.

Motor filter

7.  Make sure to dry all of them thoroughly before re-assembling.

8.  Re-attach the dust tank to the handheld unit until a click is heard.

5.  Throw away the dirt from the dust tank.

6.  Wash all of them under water. For the shroud assembly, make sure that no dirt is hidden 

inside the valve.

GB

Содержание MVC-14P-GR

Страница 1: ...PEMBERSIH VAKUM PANDUAN PENGGUNA SILA BACA BUKU PANDUAN INI DENGAN TELITI SEBELUM PENGGUNAAN DAN SIMPAN DENGAN BAIK UNTUK RUJUKAN KELAK MODEL MVC 14P OR MVC 14P GR...

Страница 2: ...an atau keselamatan perkakas anda Jangan tanggalkan mana mana pelindung tetap kerana ini mungkin akan mendedahkan voltan berbahaya Jangan biarkan mana mana perkakas elektrik terdedah kepada titisan da...

Страница 3: ...pengawasan Jauhkan perkakas dan kordnya daripada dicapai oleh kanak kanak yang berusia kurang daripada 8 tahun Kanak kanak harus diawasi bagi memastikan mereka tidak bermain dengan perkakas ini Jangan...

Страница 4: ...abut keluar plag penyesuai sesalur dan dapatkan nasihat daripada pengedar anda Mana mana kerja penyelenggaraan dan pembaikpulihan mesti dilakukan oleh juruteknik profesional Jangan cuba membaiki denga...

Страница 5: ...hendak melupuskannya sila berbuat mengikut mana mana peraturan tempatan Benda benda di dalamnya termasuk Unit pegang Gagang untuk unit pegang Badan utama Pemegang Pemegang soket kuasa Muncung Tiub mu...

Страница 6: ...uka unit utama 4 Butang kuasa unit utama Petunjuk LED 5 Butang pembuka tangki debu 6 Tangki debu 7 Penapis 8 Butang pembuka berus 9 Berus 10 Skru mengunci 11 Soket kuasa 12 Pemegang soket kuasa 13 unc...

Страница 7: ...7 Persediaan sebelum penggunaan Penyambungan pemegang dengan badan utama Pemasangan penopang unit 1 2 1...

Страница 8: ...8 Penyambungan dengan berus 2 3...

Страница 9: ...m Apabila mengecas lampu merah akan menyala Apabila sudah penuh dicas lampu hijau akan menyala 1 2 Sentiasa cabut plag dari soket sesalur apabila tiada pembersih vakum sedang dicas Power Socket Power...

Страница 10: ...nit pegang Anda boleh selaraskan kepala muncung mengikut penggunaan 3 Tekan Butang Kuasa Unit Utama untuk menghidupkan atau mematikan pembersih vakum Hanya 1 tahap kelajuan disediakan apabila digunaka...

Страница 11: ...optimum Anda tidak boleh mengosongkan tangki debu apabila pembersih telah dipasang dengan lengkap Sentiasa memastikan tangki debu sudah dikeringkan dengan sepenuhnya sebelum ia dipasang kembali pada...

Страница 12: ...Tekan Butang Pembuka Tangki Debu untuk menanggalkan tangki debu dari unit pegang 3 Keluarkan braket penapis muncung dan unit penutup 4 Tanggalkan span penapis muncung Penapis muncung Span penapis mun...

Страница 13: ...injap 7 Pastikan kesemuanya dikeringkan dengan sepenuhnya sebelum ia dipasang kembali 8 Masukkan tangki debu ke dalam unit pegang sehingga kedengaran bunyi klik Pembersihan penapis motor 1 Keluarkan...

Страница 14: ...ukaran Agitator 1 Tekan Butang Pembuka Berus untuk menanggalkan berus dari badan utama 2 Gunakan syiling untuk memutar kunci kepada kedudukan membuka kunci 3 Tanggalkan penutup agitator 4 Gantikan agi...

Страница 15: ...perti biasa dan lancar semasa dikendalikan Lebihan muatan pada motor Litar pintas Periksa sama ada model penyesuai sesalur yang digunakan adalah betul Bersihkan kolar aci agitator Kosongkan dan cuci t...

Страница 16: ......

Страница 17: ...MODEL MVC 14P OR MVC 14P GR USER S MANUAL...

Страница 18: ...ance Do not remove any fixed cover as this may expose dangerous voltages Do not allow any electrical appliance to be exposed to dripping or splashing To protect against electrical shock do not immerse...

Страница 19: ...cord out of reach of children less than 8 years Children should be supervised to ensure that they do not play with the appliance Do not point the tube nozzle or any other accessory at the eyes ears or...

Страница 20: ...ler Any maintenance and repair must be handled by a professional technician Do not try to repair by yourself This appliance should only be used with the power adapter provided Check and ensure the bru...

Страница 21: ...ispose of it please do so according to any local regulations The following items are included Handheld Unit Nozzle Mains Adapter Handle Main Body Nozzle Tube Power Socket Stand Stand with Nozzle Holde...

Страница 22: ...ase Button 4 Main Unit Power Button LED indicator 5 Dust Tank Release Button 6 Dust Tank 7 Filter 8 Brush Release Button 9 Brush 10 Locking Screw 11 Power Socket 12 Power Socket Stand 13 Nozzle 14 Noz...

Страница 23: ...Preparation Before Use Connecting Handle to Main Body 1 2 Installing the Unit Stand 1 GB...

Страница 24: ...2 3 Connecting to the Brush GB...

Страница 25: ...Cleaner 1 2 When charging the red light will illuminate When charged the green light will illuminate Always unplug from the mains socket when no vacuum cleaner is charging GB Power Socket Power Socket...

Страница 26: ...re are 2 speed levels Cleaning as Handheld Cleaner 1 Press the Main Unit Release Button to release the handheld unit from the cradle 2 Insert the nozzle together with the nozzle tube into the opening...

Страница 27: ...when the cleaner is fully assembled Always make sure the dust tank is completely dry before installing back to the main unit A damp dust tank will create electrical hazard Filters should be cleaned r...

Страница 28: ...out the nozzle filter bracket and shroud assembly 4 Remove the nozzle filter sponge Nozzle filter sponge Nozzle filter 2 Press the Dust Tank Release Button to remove the dust tank from the handheld u...

Страница 29: ...r drying thoroughly Motor filter 7 Make sure to dry all of them thoroughly before re assembling 8 Re attach the dust tank to the handheld unit until a click is heard 5 Throw away the dirt from the dus...

Страница 30: ...ush from the main body 2 Use a coin to turn the lock to the unlock position 3 Remove the agitator cover 4 Take out the agitator Pull off the agitator shaft collar Remove any dust or hairs that are tan...

Страница 31: ...and smoothly during operation Overloading of the motor Short circuit Check if using the correct mains adapter model Clean the agitator shaft collar Empty and wash the dust tank Consult technical supp...

Страница 32: ......

Отзывы: