background image

Quick guide P9-0101-Q

 5 of 16

Version 1.0.0/2011 

Medema Production A/S

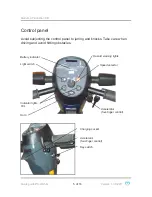
Control panel

Avoid subjecting the control panel to jarring and knocks. Take care when 
driving and avoid hitting obstacles.

Battery indicator

Light switch

Indicator lights,
 R/L

Horn

Speed selector

Hazard warning lights

Accelerator
(four-fi nger control)

Charging socket

Accelerator
(four-fi nger control)

Key switch

Содержание Mini Crosser Nordic

Страница 1: ...P9 0101 Q ver 1 0 0 March 2011 GB Quick guide Mini Crosser E medemagroup...

Страница 2: ...Quick guide P9 0101 Q 2 of 16 Version 1 0 0 2011 Medema Production A S...

Страница 3: ...tents Quick guide to the Mini Crosser Nordic 4 Introduction 4 Control panel 5 Seat rotation 7 Steering column 8 Charging 9 Serial number 11 Driving the Mini Crosser E 11 Getting in and out 11 When dri...

Страница 4: ...that you read the User Manual carefully As a new user you should pay particular attention to the section entitled Driving the Mini Crosser Nordic Note This Quick Guide is to be regarded as a supplemen...

Страница 5: ...d subjecting the control panel to jarring and knocks Take care when driving and avoid hitting obstacles Battery indicator Light switch Indicator lights R L Horn Speed selector Hazard warning lights Ac...

Страница 6: ...brake and parking brake It can be secured in locked position Also available as a foot brake Accelerator See picture below Activate the arm at the front slowly and the Mini Crosser will start to move...

Страница 7: ...lever back The seat can be rotated 90 to either side When the lever is released it engages with the seat and holds it in place at 45 intervals The release lever is normally mounted on the right but ca...

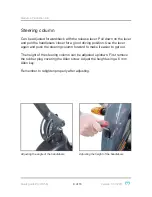
Страница 8: ...for a good driving position Use the lever again and push the steering column forward to make it easier to get out The height of the steering column can be adjusted up down First remove the rubber plu...

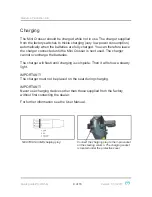
Страница 9: ...ni Crosser is next used The charger cannot overcharge the batteries The charger will flash until charging is complete Then it will show a steady light IMPORTANT The charger must not be placed on the s...

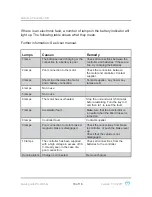
Страница 10: ...onnection Contact supplier say how many lamps are lit 4 lamps Not in use 5 lamps Not in use 6 lamps The motor has overheated Stop the unit and wait 3 5 minutes before restarting Turn the key to 0 and...

Страница 11: ...d be followed Make sure that the Mini Crosser E is off switch turned to 0 when getting in and out otherwise the Mini Crosser could start if the accelerator was touched inadvertently Make sure that the...

Страница 12: ...Reduce speed immediately if you feel you are losing control Always use the indicators when changing direction Check that lights and indicators are working before driving off Use your lights when driv...

Страница 13: ...ing How long do the lights stay green How quickly are cars approaching etc Electromagnetic compatibility If the Mini Crosser starts making involuntary movements or if the brakes are released turn the...

Страница 14: ...he key switch Please note that this will cause very sharp braking The rear wheels will lock Must not be used in the normal course of driving Electric safety brake if the brake is somehow disengaged on...

Страница 15: ...Quick guide P9 0101 Q 15 of 16 Version 1 0 0 2011 Medema Production A S Own notes...

Страница 16: ...medemagroup...

Отзывы: