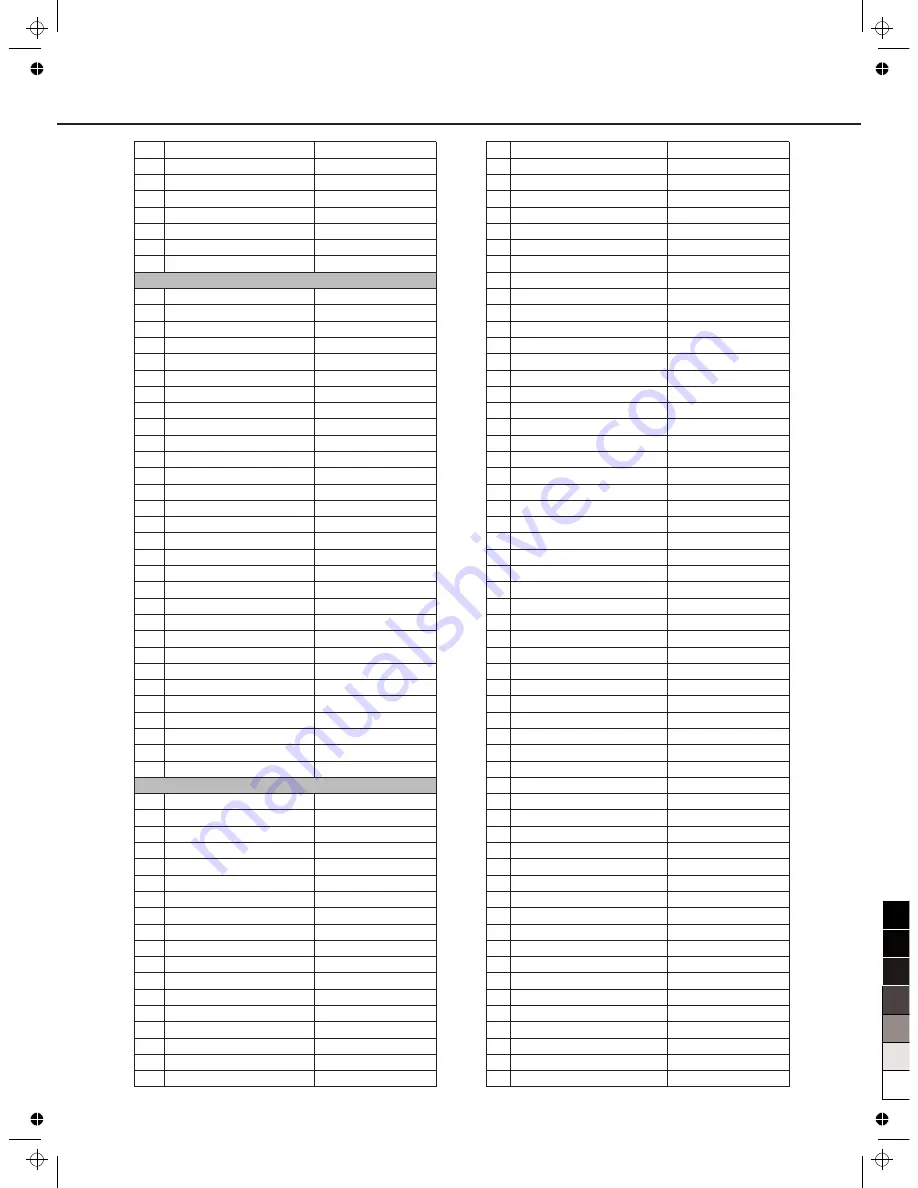
Medeli GRAND1000 Скачать руководство пользователя страница 74

Voice List

74

341

342

343

344

345

346

347

348

349

350

351

352

353

354

355

356

357

358

359

360

361

362

363

364

365

366

367

368

369

370

371

372

373

374

375

376

377

378

379

380

381

382

383

384

385

386

387

388

389

390

391

392

393

394

395

396

Sweet Soprano Sax

Alto Sax 2

Soft Alto Sax

Super Alto Sax

Sax Band

Tenor Sax 2

Baritone Sax 2

Soft Baritone Sax

Oboe

English Horn

Bassoon

Clarinet

Piccolo

Flute

Recorder

Pan Flute

Blown Bottle

Shakuhachi

Whistle

Ocarina

Oboe 2

Sweet Oboe

English Horn 2

Analog Horns

Woodwinds

Bassoon 2

Clarinet 2

Piccolo 2

Flute 2

Sweet Flute

Recorder 2

Sweet Pan Flute

Pan Flute 2

Dark Pan Flute

Blown Bottle 2

Shakuhachi 2

Whistle 2

Ocarina 2

Lead 1 (square)

Lead 1a (square 2)

Lead 1b (sine)

Lead 2 (sawtooth)

Lead 2a (sawtooth 2)

Lead 2b (saw + pulse)

Lead 2c (double sawtooth)

Lead 2d (sequenced analog)

Lead 3 (calliope)

Lead 4 (chiff)

Lead 5 (charang)

Lead 5a (wire lead)

Lead 6 (voice)

Lead 7 (fifths)

Lead 8 (bass + lead)

Lead 8a (soft wrl)

Pad 1 (new age)

Pad 2 (warm)

Sweet Soprano Sax

Alto Sax 2

Soft Alto Sax

Super Alto Sax

Sax Band

Tenor Sax 2

Baritone Sax 2

Soft Baritone Sax

Oboe

English Horn

Bassoon

Clarinet

Piccolo

Flute

Recorder

Pan Flute

Blown Bottle

Shakuhachi

Whistle

Ocarina

Oboe 2

Sweet Oboe

English Horn 2

Analog Horns

Woodwinds

Bassoon 2

Clarinet 2

Piccolo 2

Flute 2

Sweet Flute

Recorder 2

Sweet Pan Flute

Pan Flute 2

Dark Pan Flute

Blown Bottle 2

Shakuhachi 2

Whistle 2

Ocarina 2

Square Lead

Square Lead 2

Sine Lead

Sawtooth

Sawtooth 2

Sawtooth&Pulse

Double Sawtooth

Sequenced analog

Calliope

Chiffer Lead

Charang Lead

Wire Lead

Voice Lead

Fifths Lead

Bass&Lead

Soft wrl

New age Pad

Warm Pad

Flute & Woodwind

Lead & Pad

397

398

399

400

401

402

403

404

405

406

407

408

409

410

411

412

413

414

415

416

417

418

419

420

421

422

423

424

425

426

427

428

429

430

431

432

433

434

435

436

437

438

439

440

441

442

443

444

445

446

447

448

449

450

451

452

453

454

Pad 2a (sine pad)

Pad 3 (polysynth)

Pad 4 (choir)

Pad 4a (itopia)

Pad 5 (bowed)

Pad 6 (metallic)

Pad 7 (halo)

Pad 8 (sweep)

Square

Slow Square Lead

Sine Solo

Square Lead

Thick Square

Corrie

Quint

2Oscillators Lead

Wavy Sawtooth

Super Analog

Big Lead

Bauble Lead

PWM 4th

PWM 4th Soft

Synth Calliope Soft

Chiffer Lead 2

Chiffer Lead 3

Charang 2

Wire Lead 2

Charang 3

Soft Vox

5th SawWave 2

Fifth Lead Soft

Fifth Lead

Massiness

Delayed Lead 2

Delayed Lead 3

New Age Pad 2

New Age Pad 3

Slow Square

New Year Pad

Warm Pad 2

PWM Pad

Warmly Pad

Horn Pad

Poly Synth 2

Click Pad

Analog Pad

Poly Pad

Poly Synth 3

Space Voice

Bowed Pad 2

Bowed Pad 3

Metallic Pad 2

Pan Pad 1

Pan Pad 2

Halo Pad 2

Halo Pad 3

Sweep Pad 2

Dipolar Pad

Sine pad

Poly Synth

Choir Pad

Itopia Pad

Bowed Pad

Metallic Pad

Halo Pad

Sweep Pad

Square

Slow Square Lead

Sine Solo

Square Lead 3

Thick Square

Corrie

Quint

2Oscillators Lead

Wavy Sawtooth

Super Analog

Big Lead

Bauble Lead

PWM 4th

PWM 4th Soft

SynCalliope Soft

Chiffer Lead 2

Chiffer Lead 3

Charang 2

Wire Lead 2

Charang 3

Soft Vox

5th SawWave

Fifth Lead Soft

Fifth Lead 2

Massiness

Delayed Lead 2

Delayed Lead 3

New Age Pad 2

New Age Pad 3

Slow Square

New Year Pad

Warm Pad 2

PWM Pad

Warmly Pad

Horn Pad

Poly Synth 2

Click Pad

Analog Pad

Poly Pad

Poly Synth 3

Space Voice

Bowed Pad 2

Bowed Pad 3

Metallic Pad 2

Pan Pad 1

Pan Pad 2

Halo Pad 2

Halo Pad 3

Sweep Pad 2

Dipolar Pad

0

5

25

75

95

100

aw_GRAND1000_Manual_G06_120912Part3

2012

9

12

 12:33:48

Содержание GRAND1000

Страница 1: ...DIGITAL GRAND PIANO 0 5 25 75 95 100 aw_GRAND1000_Manual_G06_120912Part1 2012 9 12 12 35 39...

Страница 2: ...AC outlet of voltage other than that for which your instrument is intended Unplug the Power Cord when not using the instrument or during electrical storms Connections Before connecting the instrument...

Страница 3: ...rophone 15 Connecting a Computer 15 Connecting External MIDI Devices 15 Quick Start Basic Operations Selection Operation 16 Soft Keyboard Operation 16 Setting Operation 17 Playing the Demos 18 Playing...

Страница 4: ...ption of Control Buttons 45 Adjusting the Tempo 46 Using the Metronome 46 One Touch Setting 47 Saving Deleting or Renaming the User Style 47 26 Contents Advanced Use Song Playing Various Songs Operati...

Страница 5: ...cation 70 Appendices Voice List 71 Style List 77 Song List 78 Demo List 78 Chord List 79 MIDI Implementation List 80 70 Introduction Quick Start Advanced Use Appendices 5 0 5 25 75 95 100 aw_GRAND1000...

Страница 6: ...TTON Enter the SONG SELECT interface 9 STYLE SELECT BUTTON Enter the STYLE SELECT interface 10 TEMPO TAP BUTTON Change the tempo by tapping out the tempo with this button 11 TEMPO TEMPO BUTTONS Adjust...

Страница 7: ...E function on or off 38 STORE BUTTON Save the panel setups to one of the performance memorys 26 27 28 30 31 32 34 38 39 40 41 39 M1 M6 BUTTONS PERFORMANCE MEMROY Recall the panel setups from one of th...

Страница 8: ...this name will call up the Song Selection display 3 Performance Display the currently selected performance name Pressing this name will call up the Performance Selection display Main Display 1 2 3 4...

Страница 9: ...emble the stand get a Philip s screwdriver not supplied Make sure you have the following parts which are supplied into package Part List A Pedal component B Right leg component C Left leg component D...

Страница 10: ...in the horizontal before you initial assembly the piano Make sure the bottom surface of carton is up Then open the box take off the foams which used for protected piano body 10 Setup Guide 0 5 25 75...

Страница 11: ...t before screwing Fix the Right leg component B and Rear leg component D to Piano body E with Hexagonal bolt G according finished assembly in left leg component How to screwing the hexagonal bolt Put...

Страница 12: ...ing D Then reserved the Pedal component with two copper poles I and use the hexagonal bolt G to tightly settled it with the piano body according finished assembly in left leg component fix the other s...

Страница 13: ...loor cause damaged or broke any leg components or pedal component Then moved the carton box and all package goods You can enjoy play the piano now Caution carefully reverse the piano avoid damaged orb...

Страница 14: ...fi units for external amplification For monaural output use the L MONO jack Note To avoid damaging the speakers please ensure that the volume has been set to the minimum level before connecting the po...

Страница 15: ...ices MIDI IN Receive MIDI message from an external MIDI device MIDI OUT Transmits MIDI message generated by the instrument MIDI THRU Simply relays the MIDI message received at MIDI IN Note To avoid da...

Страница 16: ...ow You can select your desired page by pressing the cursor button on LCD 4 File Selecting Select the desired file by pressing the file name on the current page Using the Soft Keyboard When you name or...

Страница 17: ...3 ways below 1 Press your desired parameter on LCD to select it 2 Use the DATA DIAL to select your desired parameter 3 Press the or button to select your desired parameter The selected parameter will...

Страница 18: ...ause the demo Press the PAUSE button to pause the demo playing or continue playing the demo Stop the demo Press the PLAY STOP button to stop the demo playback Adjust the tempo of the demo playback Pre...

Страница 19: ...e Selection display 2 Press the cursor button on LCD to select your desired voice page 3 Press the voice NAME to select the desired voice on the current page display You can also select the user voice...

Страница 20: ...le details see Style There are 2 methods to call up the Style Selection display Start a style 1 Press the A B C button the specified left hand section of the keyboard becomes the Auto Accompaniment se...

Страница 21: ...re are 2 methods to call up the Song Selection display Playback a Song 1 The LED of PLAY STOP will light up 2 Press the PAUSE button to pause the playing song Press the PAUSE button again to continue...

Страница 22: ...e Recording Display or press the RECORD SONG button to stop recording and call up soft keyboard display The LED of RECORD SONG will be turned off 4 Enter the new name and press OK to save the new user...

Страница 23: ...ll light up 3 Press the RECORD AUDIO button again to stop recording your performance and call up soft keyboard display The LED of RECORD AUDIO will be turned off 3 Enter the name and press OK to save...

Страница 24: ...rt 2 Press the USB DISK button to display the folders and files under the root directory of USB device Press the USB tab on each selection display such as voice style song performance enter the releva...

Страница 25: ...u can download SMF MIDI files to the keyboard as user songs or upload the user songs You can upload user styles to the computer as a backup or download them to the keyboard You can upload user voices...

Страница 26: ...or the R1 part If you want to select the user voice press the User to select the USER display or press the USB to select the USB display Press the cursor button on LCD to select your desired voice pag...

Страница 27: ...it point selected Use the DATA DIAL the or the button or press the key directly to set your desired split point 5 Play the keyboard with your hands Pressing SPLIT POINT on main display or pressing Spl...

Страница 28: ...the button simultaneously to set the default value 440 0Hz Transpose This function allows the overall pitch of the instrument to be transposed up or down by a maximum of one octave in semitone increme...

Страница 29: ...r the OCTAVE button to set the relative octave ranging from 1 1 3 Press the OCTAVE button and the OCTAVE button simultaneously to set the default octave 0 Scale Tune Scale tune allows each individual...

Страница 30: ...third interval more in tune It was especially popular from the 16th century to the 18th century Handel among others used this scale Werckmeister The main feature of this scale is that each key has its...

Страница 31: ...nd operate according to the above steps Adding Effects to Voices There are three effects Arpeggiator Harmony Chopper You can apply various effects to your voice Pressing EFFECT on main display or pres...

Страница 32: ...ecify the timing resolution of the arpeggio The notes of the arpeggio will be played ate the interval you specify 1 16 3 1 16 1 8 3 1 8 1 4 3 1 4 Press the Resolution 1 16 button to call up a pop up b...

Страница 33: ...he KEY SYNC button to switch this function ON OFF ON The arpeggio pattern will start playing once a note is played on the keyboard OFF The arpeggio pattern will always play according to the tempo 8 Oc...

Страница 34: ...d for each step 10 Fixed Note With this Fixed Note setting the arpeggio pattern will always play the specified pitches regardless of the note numbers received from the keyboard Press the Configure Fix...

Страница 35: ...city If you play a melody with your right hand at a velocity less than the setting value the Harmony part will not be added to the notes Chopper If you turn the chopper on it automatically adds choppi...

Страница 36: ...sound of the instrument 3 Press the button on the Effect display to call up the Global Effect Setting display 4 Press the Type relevant button ex Hall to call up a pop up box showing the reverb types...

Страница 37: ...e adjustable range of frequency 5 Press the or button or use the DATA DIAL the or the button to adjust the data 6 Press the relevant button ex Gain low 6dB to call up a pop up box showing the adjustab...

Страница 38: ...of the edited voice Adjust the chorus level of the edited voice 0 127 0 127 Effect Envelope Determines how quickly the sound reaches its maximum level after the key is played The lower the value the...

Страница 39: ...oice 3 Press the Menu button to display the relevant buttons on the current display 4 Press SAVE TO USER to call up soft keyboard display enter the new name and press OK to save as a new user voice to...

Страница 40: ...You can sound different rhythms for each Style Keep in mind however that not all Styles contain rhythm channels Piano category 1 Select your desired style 2 Press the A B C button to turn auto accomp...

Страница 41: ...the or the button to adjust the data 4 Adjust the keyboard volume by pressing the relevant button and operating according to the above steps 5 Press the EXIT button to exit the Mixer Display Note If...

Страница 42: ...two sections for playing Voices LEFT and RIGHT 1 3 1 Pressing SPLIT POINT on main display or pressing Split on voice selection display will call up the Split Setting display 2 Set the Split Point Cho...

Страница 43: ...te is the root of the chord this is the chord s root position using other chord notes for the lowest note results in inversion The root is the central sound of the chord which supports and anchors the...

Страница 44: ...and can be looked up using the Chord Dictionary function Chord Dictionary If you know the name of a chord but don t know how to play it you can use the Chord Dictionary function 1 Holding down A B C...

Страница 45: ...Simply press one of the MAIN A B C D buttons as you play and the selected ll in section plays automatically the relevant LED of MAIN flashes When the ll in is finished accompaniment shifts to the Mai...

Страница 46: ...multaneously to reset the tempo The number in the display indicates how many quarter note beats there are in one minute The range is between 30 and 280 3 Press the EXIT button to close the Tempo displ...

Страница 47: ...d when you select the Main Section The relevant O T S LED will light up to hint One Touch Setting 1 Press USER or USB tab on Style Selection display to call up the relevant display for user styles 2 S...

Страница 48: ...select playing mode in Global Setting menu Details see Global Setting Style Song USB tab USB tab Operations for Song Playback PLAY STOP Start or stop playing back the song When the song is playing th...

Страница 49: ...e of volume 3 Press the or button in screen or use the DATA DIAL the or the button to adjust the data 4 Adjust the keyboard volume by pressing the relevant button and operating according to the above...

Страница 50: ...playing back the Song 3 Press the PLAY STOP button to start playback The position indicator moves through the score indicating the current position Operation for Score Display Left On Off Turn on or...

Страница 51: ...has been assigned in the song data KEY SIGNATURE This lets you enter key signature changes in the middle of a song at the stopped position This menu is useful when the selected song contains no key s...

Страница 52: ...sly to set the default value 0 4 Press the OCTAVE button or the OCTAVE button to set the octave value the range of parameter is from 1 1 Press these two buttons simultaneously to set the default value...

Страница 53: ...Metronome adjustment 3 Press the close button icon to return to piano setting display Envelope 1 Press the Envelope icon on piano setting display to call up the Envelope Setting display 2 Same operati...

Страница 54: ...ormance Recording the RIGHT2 RIGHT3 and LEFT parts Pressing the ch mute button and selecting the relevant part or pressing the relevant part button directly to turn on the relevant part and record the...

Страница 55: ...g Display If the current song is user song this user song is called up for new recording If the current song is preset song a blank song New Song is called up for recording 2 Set the desired channels...

Страница 56: ...wing the adjustable range of pan values Use the DATA DIAL the or the button to adjust the pan Press the Quantize button to call up a pop up box showing the quantize accuracy Use the DATA DIAL the or t...

Страница 57: ...di song or playing a audio file from USB device you can t start audio recording 1 Press USER or USB tab on Song Selection display to call up the relevant display for user songs 2 Select your desired u...

Страница 58: ...the Global Setting display will call up the Style and Song Setting display Press Chord Velocity Control ON to turn it on orange font display This function let you control the style volume by your play...

Страница 59: ...2 only effect to the current part The group 3 lets you control a group of user assignable functions Group 1 Group 2 Group 3 Reverb Attack Assign1 Chorus Release Assign2 Pressing Knob tab on the Contr...

Страница 60: ...ess the Assign button again to finish assigning Now Press the pad to play the assigned percussion Assign PLAY CHORD function to the pad You can assign the pad to PLAY CHORD function 1 Press the Chord...

Страница 61: ...in Releasing the pedal immediately stops damps any sustained notes UP DOWN Determine whether the pitch change is raised or lowered RANGE Determine the range of the pitch change in semitones 0 12 The p...

Страница 62: ...ta Press the Soft Thru button to switch the Soft Thru function ON or OFF Press the EXIT button to exit to Global Setting display Utility Pressing Utility on the Global Setting display will call up the...

Страница 63: ...eration Press the config2 tab to call up the relevant setting display Setting the Date and Time Press the relevant button to display a pop up box Use the DATA DIAL or Press the and buttons to select y...

Страница 64: ...rmance by the GrandSuite software Recalling a Performance Memory Settings Press one of the Performance Memory buttons M1 M6 In this example the panel settings stored in the memory 3 of performance ban...

Страница 65: ...e settings will be lost Registering the Performance Memory Settings 1 Set up the panel controls such as Voice Style effect and so on as desired 2 Press and hold the STORE button then press one of the...

Страница 66: ...l memory 5 Press SAVE TO USB to display a pop up box you can save a single performance file prf or save a packing performance file tpf to the USB device memory Press OK button to call up soft keyboard...

Страница 67: ...lug the USB device and do not turn off the instrument power Doing so may corrupt the data on either or both devices Executing a file Press the Execute button to executing the operation for the selecte...

Страница 68: ...which is formatted by the instrument Note The format operation overwrites any previously existing data Proceed with caution Press the button to display the relevant buttons on the current display Pres...

Страница 69: ...IDI THRU port to other MIDI instrument MIDI IN port The message that the MIDI IN port receives will be auto sent to the MIDI THRU port so that one MIDI instrument can control many MIDI instrument at t...

Страница 70: ...for the voice R1 Specifications Keyboard 88 keys Display 7 TFT 800 x 480 color touch screen Polyphony 128 Voice 672 including 256 GM2 instrument voices and 17 drum kits Effect Reverb Chorus Master EQ...

Страница 71: ...ase EP 1 Clavi Pulse Clavi Fusion EP Club EP Jazz EP Phase EP 2 Tremolo EP 1 Funk EP 1 Modern EP 1 PIANO 71 E PIANO 56 57 58 59 60 61 62 63 64 65 66 67 68 69 70 71 72 73 74 75 76 77 78 79 80 81 82 83...

Страница 72: ...r 2 DistortionGtr 2 Feedback Guitar 2 5th Distortion Octave DistGtr Stereo DistGtr Guitar Harmonics 2 Acoustic Bass Finger Bass Finger Slap Bass Pick Bass Fretless Bass Slap Bass 1 Guitar Bass 169 170...

Страница 73: ...lus 6th Hit Euro Hit 284 285 286 287 288 289 290 291 292 293 294 295 296 297 298 299 300 301 302 303 304 305 306 307 308 309 310 311 312 313 314 315 316 317 318 319 320 321 322 323 324 325 326 327 328...

Страница 74: ...Lead Bass Lead Soft wrl New age Pad Warm Pad Flute Woodwind Lead Pad 397 398 399 400 401 402 403 404 405 406 407 408 409 410 411 412 413 414 415 416 417 418 419 420 421 422 423 424 425 426 427 428 42...

Страница 75: ...ar Pass Car Crash Siren FX Effects 512 513 514 515 516 517 518 519 520 521 522 523 524 525 526 527 528 529 530 531 532 533 534 535 536 537 538 539 540 541 542 543 544 545 546 547 548 549 550 551 552 5...

Страница 76: ...lesta Celesta 2 Birght Celesta Celesta Sine Reecho Bell Celes MusicBox Glockenspiel l Glockenspiel 2 Glockenspiel Sine Glocken Celes Music Box Music Box 2 Music Box 3 Toy Box Music Box Harp Vibraphone...

Страница 77: ...1 Pop Ballad 2 EP Ballad New R B Ballad Rock New Wave Ska Pop Rock 2 Slow Rock 70 s Rock Roll Folk Rock Soft Rock Old Rock Easy Rock New Shuffle Rock Hip Hop Rock Roll 1 Rock Shuffle Rock Roll 2 Tango...

Страница 78: ...March March US March Musette French Musette Mazurke Enka Ballad Laendler Hawaiian Sirtake Dangdut 6 8 Flipper New Age Tarantella Scottish Norteno Pianist 1 Pianist 2 Pianist 3 Jazz 1 Jazz 2 Jazz Pub...

Страница 79: ...pended fourth One plus two plus five Abbreviation M 6 M7 M7 11 9 M7 9 6 9 aug 7aug M7aug m m6 m7 m7b5 m 9 m7 9 m7 11 mM7 mM7 9 dim dim7 7 7sus4 7 9 7 11 7 13 7b5 7 b9 7 b13 7 9 sus4 sus2 Normal Voicin...

Страница 80: ...80 21 108 MIDI Implementation List 0 5 25 75 95 100 aw_GRAND1000_Manual_G06_120912Part3 2012 9 12 12 33 50...

Страница 81: ...Grand1000_G06 0 5 25 75 95 100 aw_GRAND1000_Manual_G06_120912Part3 2012 9 12 12 33 50...

Отзывы: