background image

Drum Kit

Preset, User and iKit Drum Kits

Preset drum kit: 

kits that are preset on the module. Changes of kit 

parameters cannot be saved to a preset drum kit.

User drum kit: 

kits parameters are changeable and can be saved on 

the module.

iKit drum kit:

 unique kits of this digital drum. The iKit feature will 

dramatically enhance the sensitivity of the snare when you play with 

low velocity.

The module provides 99 drum kits, including 50 preset drum kits 

(no.1~50), 49 user drum kits (no. 51~99). In addition, there are 5 

individual iKit drum kits for iKit feature.

Notes:

1. 

In iKit mode, it affects only the sensitivity of the snare when you play 

    with low velocity. You can play the other triggers as in a normal drum 

    kit.

2. 

In iKit mode, these parameters of snare head are not changeable: 

    voice, pitch and decay etc. But you can adjust the other parameters 

    as desired.

3. 

In iKit mode, the Trigger menu is not available. Trigger parameters 

    are not editable.

4.

 In iKit mode, it requires proper grounding when connecting devices 

    to the AUXIN and OUTPUT jacks.

You can edit the parameters of a drum kit, and then save it to a user 

drum kit. Please refer to

 Drum Kit List

 for details.

Selecting a Drum Kit

1. 

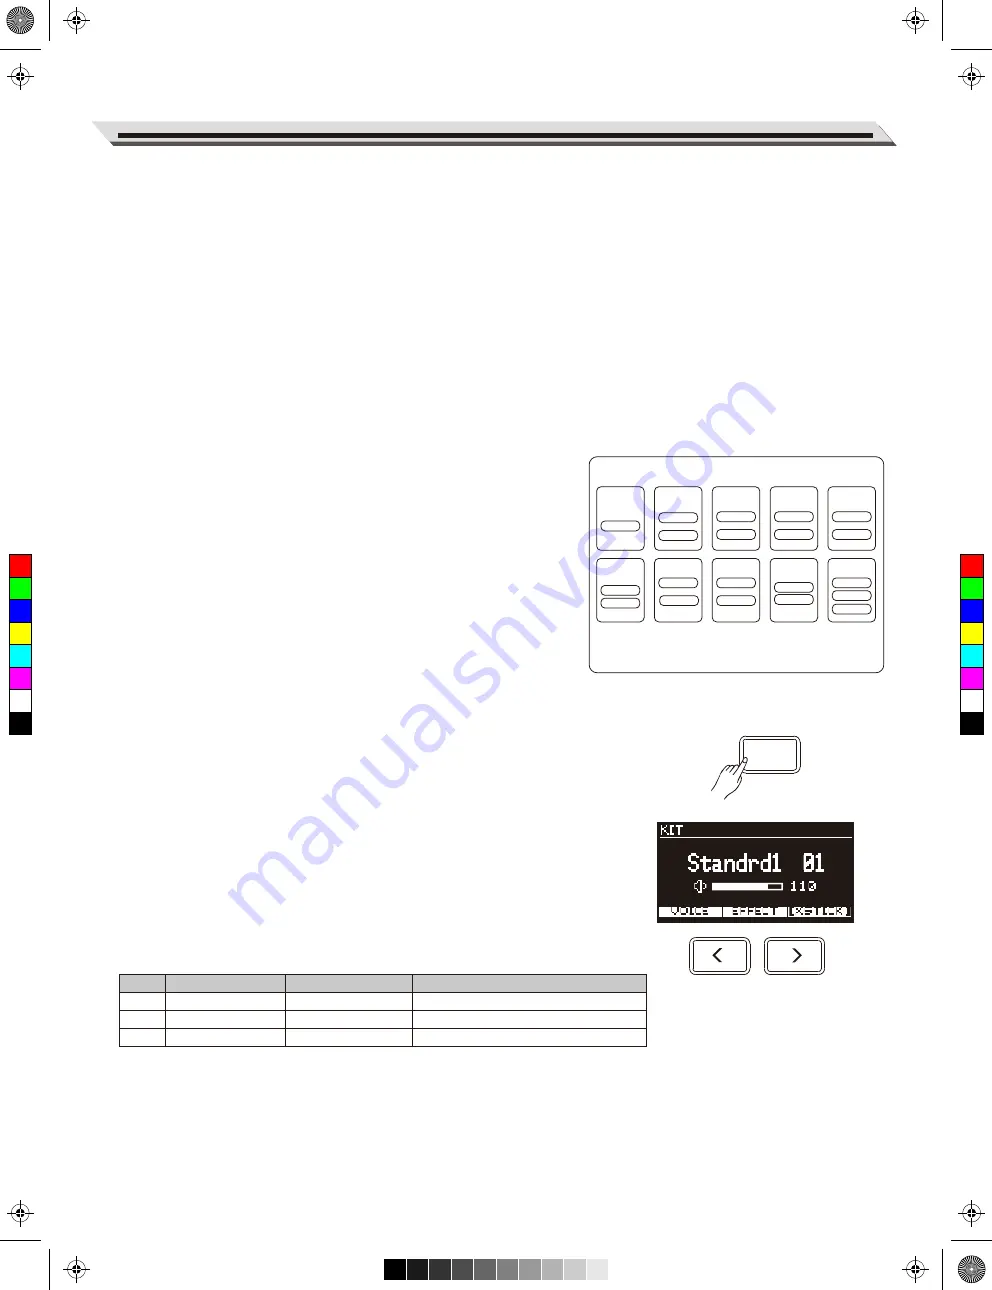
Press the [KIT] button to enter KIT menu. The LCD displays the 

     current kit number and kit volume. 

     Press the [KIT] button again to enter iKIT menu. Pressing the [KIT] 

     button will toggle between KIT menu and iKIT menu.

2. 

In KIT/iKIT menu, use the [<]/[>] buttons or the data dial to select a 

     desired drum kit.

3. 

In KIT/iKIT menu, press the [

] button to select the volume item, 

     then use the[<]/[>] buttons or the data dial to adjust the volume.

Functions of [F1]~[F3] buttons in KIT/iKIT menu

11

KIT xx

KICK

Head

SNARE

Head

Rim

TOM1

Head

Rim

TOM2

Head

Rim

TOM3

Head

Rim

TOM4

(Option)

Head

Rim

HI-HAT

Head

CRASH1

Head
Edge

Edge

Edge

CRASH2

(Option)

Head

RIDE
Head

Bell

Edge

Drum kit setting:

 kit volume, Reverb, EQ.

Voice setting: 

Volume, Pan, Head tuning, Reverb, Decay, 

Pad Song and so on.

Button
[F1]
[F2]
[F3]

Parameter on LCD
VOICE
EFFECT
XSTICK

Parameter Name
Voices in current kit
Drum kit effect
Cross stick

Description
Edit voice parameters.
Edit drum kit effects, only for kit mode
Switch cross stick on or off.

After entering the relevant sub-menu, use the [

]/[

] buttons to select 

a parameter to edit, then use the data dial or [<]/[>] buttons to adjust the 
settings.

The structure of a drum kit:

KIT

C

M

Y

CM

MY

CY

CMY

K

AW_DD638DX_manual_G01_180529.pdf   11   18/5/30   11:05

Содержание DD638DX

Страница 1: ...AUX IN PHONES CLICK UP DOWN F1 F2 F3 EXIT MENU CLICK COACH SONG KIT iKIT HI HAT CRASH 1 CRASH 2 RIDE KIT SONG KICK SNARE TOM 1 TOM 2 TOM 3 TOM 4 C M Y CM MY CY CMY K AW_DD638DX_manual_G01_180529 pdf 1...

Страница 2: ...Do not connect it to an AC outlet of voltage other than that for which your instrument is intended Unplug the AC power adaptor when not using the instru ment or during electrical storms Connections B...

Страница 3: ...ng the Click on or off 15 Editing Click Parameters 15 Song Playing Preset Songs 16 Playing USB Songs 16 Playing Along with a Song 17 Recording MIDI Recording and MP3 Recording 17 Prepare and Start Rec...

Страница 4: ...ck songs MIDI WAV and MP3 format stored on a USB flash drive Or play along with background music transmitted from AUX IN and record your performance in real time and save it to a USB flash drive Downl...

Страница 5: ...ess to return to previous menu 7 MENU Button In kit mode press to enter KIT menu In song mode press to enter SONG menu 8 CLICK Button Press to start stop the click edit the click setting 9 COACH Butto...

Страница 6: ...ty of Pad Strike Display the velocity force at which the pad is struck 4 External Device Indicate a USB flash drive is correctly connected 5 Prompt to Move Cursor Up Down Prompt to press the buttons t...

Страница 7: ...zone trigger with choke HI HAT dual zone trigger PEDAL HI HAT Note 1 Use the cables provided to connect the pads to the trigger input jack on the rear panel of the module make sure each pad is connect...

Страница 8: ...PHONES knobs clockwise while striking the pads until you get an appropriate volume level Turning off the power 1 Turn the volume level of the module and the connected audio device to minimum 2 Turn o...

Страница 9: ...as desired 1 Press the KIT button to enter KIT menu Then press the F1 VOICE button to enter VOICE menu 2 Strike the pad that you want to edit The LCD will display the pad name 3 Press the buttons to...

Страница 10: ...ely after hitting the crash ride will mute the crash ride sound Hi Hat Hi Hat Pedal Change Press down the pedal to different positions the pad voice will change along when striking the Hi Hat pad This...

Страница 11: ...to a user drum kit Please refer to Drum Kit List for details Selecting a Drum Kit 1 Press the KIT button to enter KIT menu The LCD displays the current kit number and kit volume Press the KIT button a...

Страница 12: ...dial or buttons to select a desired voice 4 Adjust the volume Press the buttons to select the volume item then use the data dial or buttons to adjust the volume 5 Parameters and their range Notes 1 F...

Страница 13: ...hen use the data dial or buttons to change the setting 3 Parameters and their range Voice Parameter Pitch Pan Decay Reverb Midi Note Pad Ptn Min Velocity Strainer Description Pitch Pan Decay Reverb le...

Страница 14: ...o enter SAVE menu 4 Press the buttons to select a user kit where the edited data will be saved Note If you press EXIT at this stage it will quit without saving and return to VOICE menu 5 Press F3 ENTE...

Страница 15: ...meters for each trigger 2 After editing if you do not save it the edited data will be lost when you select a different drum kit or turn off the module 3 After editing if you do not save the edited kit...

Страница 16: ...splay the current tempo When tempo is displayed use the data dial or buttons to adjust the tempo from 30 to 280 Song Groups Playing USB Songs You can playback song files MP3 WAV and MIDI stored on a U...

Страница 17: ...buttons to change the tempo value 3 Press the CLICK to turn the click on or off 17 MIDI Recording and MP3 Recording The module supports MIDI recording and MP3 recording MIDI recording will record you...

Страница 18: ...ing During recording you can press F3 STOP or EXIT to stop recording and enter RENAME menu Button operation in RENAME menu NOTE 1 MP3 recording does not support RENAME and the recorded song will be au...

Страница 19: ...lect Quiet Count Quiet Count parameters and their range Press the buttons to select a parameter then use the data dial or buttons to change the setting 2 Press the button to start the practice It will...

Страница 20: ...ith changing beats It will play the first two measures of a beat type and then shift to a different beat type Beat indicator on LCD will blink to indicate that it will change to this beat type in the...

Страница 21: ...l blink and CHANGE will appear on LCD indicating it will change to this beat type in the next measure During practice you can press F3 TEMPO to edit the tempo 3 Press the button again to stop the prac...

Страница 22: ...USB menu 2 Press the buttons or F1 F2 buttons to select Song Folder then press F3 ENTER to enter FOLDER menu 3 Press the buttons or F1 F2 buttons to select a folder then press F3 ENTER to confirm Loa...

Страница 23: ...ted The user voices in user kits will be replaced by MUTE voices 5 The loaded voices will be placed between the preset voices and the Hihat Combination voices starting from no 651 with a voice number...

Страница 24: ...nare volume Note Pressing the button will not affect the current volume The relevant volume will change only when you move the slider Volume Sliders 24 Upper Group corresponding to the upper LED KICK...

Страница 25: ...value gradually while striking the pad 3 Repeat step2 until you get an appropriate level Adjust the disturbance between head and rim shot Only for Snare and Tom When the value is set to 0 it plays onl...

Страница 26: ...e Crash2 Bow Crash2 Edge Open Hihat MIDI 49 55 57 52 46 Trigger Close Hihat Open Hihat Edge Close Hihat Edge Pedal Hihat Splash MIDI 42 26 22 44 21 Curve Normal Exp 1 Exp 2 Log 1 Log 2 Loud Descriptio...

Страница 27: ...ited data will be lost after power off Option parameters and their range Settings 27 Parameter Soft Through Local Control GM Mode Prog Change RX Prog Change TX Range ON OFF ON OFF ON OFF ON OFF ON OFF...

Страница 28: ...ers Note Do not turn off the power when factory reset is in progress If power supply is accidentally disconnected execute factory reset again otherwise it may corrupt the internal data and cause malfu...

Страница 29: ...00 notes per song Tempo 30 280 Display 64 x 128 dots graphic LCD with backlit Connectors TRIGGER INPUT DB25 Type TRIGGER IN TOM4 CRASH2 PHONES 1 4 AUX IN 1 8 USB MIDI USB TO DEVICE MIDI IN MIDI OUT OU...

Страница 30: ...10 11 12 13 14 15 16 17 18 19 20 21 22 23 24 25 Kit Name iStandard iAcoustic iFunk iRock iBrush No 1 2 3 4 5 Kit Name Beatbox 2 Power Teckno Dance Metal Pop World Ska Lo Fi R B Electronic Magic House...

Страница 31: ...K SNARE Brush Snare Rim 1 Brush Snare 2 Brush Snare Rim 2 Live Snare Live Snare Rim Orchestra Snare Orchestra Snare Rim Reggae Snare Reggae Snare Rim Old School Snare Old School Snare Rim R B Snare R...

Страница 32: ...127 128 129 130 131 132 133 134 135 136 137 138 139 140 141 142 143 144 145 146 147 148 149 150 151 152 153 154 155 156 157 158 159 160 161 Brush Tom 5 Rim Brush Tom 6 Brush Tom 6 Rim Funk Tom 1 Funk...

Страница 33: ...Bell 22 Big Band Ride 22 Big Band Ride Edge 22 Big Band Ride Bell Old School Ride Old School Ride Edge Old School Ride Bell 808 Ride Electronic Ride Electronic Ride Edge Electronic Ride Bell Dance Ri...

Страница 34: ...a 2 Low Conga High Bongo Low Bongo High Timbale 1 High Timbale 2 High Timbale 3 High Timbale 4 High Timbale 5 Low Timbale 1 Low Timbale 2 Low Timbale 2 Rim Low Timbale 3 Low Timbale 4 High Agogo Low A...

Страница 35: ...0 551 552 553 554 555 556 557 558 559 560 561 562 563 564 565 566 567 568 569 570 571 572 573 574 575 576 577 578 579 580 581 582 583 584 585 586 587 588 589 590 591 592 593 594 595 596 597 FX Orchest...

Страница 36: ...41 42 43 44 45 46 47 48 49 50 Ska Classic Rock Hardcore Hip Hop Vintage Dance Pop Nu Metal Salsa2 Eu Hip Hop Bossa Nova2 Fusion 5 8Beat Pop Jazzy Funk Swing Big Band Raggae 2 60 s Pop Vintage Funk Tra...

Страница 37: ...Agogo Cabasa Maracas Short Whistle Long Whistle Short Guiro Long Guiro Claves Hi Wood Block LowWood Block Mute Cuica Open Cuica Mute Triangle Open Triangle Shaker Jingle Bell Bell Tree Castanets Mute...

Страница 38: ...Acoustic Pedal Hi hat Acoustic Tom 2 Acoustic Open Hi hat Acoustic Tom 1 Acoustic Crash 1 Acoustic Ride Acoustic Ride Bell Acoustic Crash 2 Brush Set BANK40 Brush Kick Brush Snare 1 Brush Snare 2 Bru...

Страница 39: ...GM Backing Voice List 39 C M Y CM MY CY CMY K AW_DD638DX_manual_G01_180529 pdf 39 18 5 30 11 05...

Страница 40: ...Entry Volume Pan Expression Sustain Pedal Portamento ON OFF Sostenuto Pedal Soft Pedal Reverb Program Chorus Program Reverb Level Chorus Level All Sound Off Reset All Controllers All Notes Off START a...

Страница 41: ...oading user voice is successful Loading user voice is failed Factory reset is successful Formatting USB flash drive is successful Please wait patiently USB flash drive Data is under processing There a...

Страница 42: ...DD638DX_G01 C M Y CM MY CY CMY K AW_DD638DX_manual_G01_180529 pdf 42 18 5 30 11 05...

Отзывы: