2
Set Up the Stand
Wing
N
ut
1
Wing
N
ut
2
7
8
7.Attach the pad mounts to the mount h olders on
the Center Pipe (1), Right Cross Pipe, and firmly
tighten the respective wing nuts 1.
8.Insert the two cymbal holders into the holders on
the Center Pipe (1) Clamp, attach the hi-hat holder
to mount holders on the Cymbal Rod Clamp, and
firmly tighten the respective wing nuts .
Note:
Loose n o r tighten the wing nuts on the mount
holder as shown partial enlargement.
Move the moun t holder s as needed, and firmly
tighten the respective wing nuts 2.
Note:
Loosen or tighten the wing nuts on the mount
holder as shown partial enlargement.
Right C
ross P
ipe
Cymbal
R
od
C
lamp
Center P
ipe
(1)
Wing N
ut
5
6
4
Left
C
ross P
ipe
Pillar
(
L1
)
3
2
1
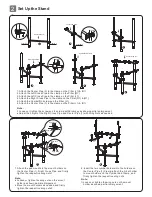
1.Attach the Center Pipe (2) to the clamp on the Pillar (L1) & (R1)
2.Attach the Left Cross Pipe to the clamp on the Pillar (M1)
3.Attach the Left Cross Pipe to the clamp on the Pillar (L1)
4.Attach the Right Cross Pipe to the clamp on the Pillar (R1) & (M1)
5.Attach the Cymbal Rod clamp on the Pillar (L1)
6.Attach the Center Pipe (1) to the clamp on the Pillar (L1) & (R1)
Note:
Loosen or tighten the screws on the clamp with drum key as shown partial enlargement.
A
djust the height of the Right Cross Pipe and Center Pipe (1) with Wing Nuts as needed.
Pillar
(
R1
)
Center Pipe (2)
Pillar
(
M1
)
Wing
N
ut
1
Wing
N
ut
2
Wing N
ut
0
5
25
75
95
100
aw_DD620_Setup Manual_G01_150923_with kick peda
2015
9
23
11:47:57


