background image

Local

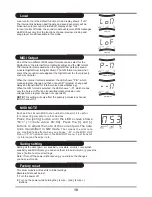
Local control on is the default function mode, display shows: "LoN".
The internal link between pad triggers and sound generator will be
broken when local control is turned off, display show: "LoF".
In local control off mode, the sound module will receive MIDI messages
via MIDI input only. But the functions of panel preview, clicking and
song player are still available in this mode.

Local On

Local Off

One of the two different MIDI output formats can be select for the
Digital Drum: the internal format (default setting) and the GM format.
The internal format is used when the Digital Drum works as sound
module (Digital Drum to Digital Drum); The GM format is used when
some other sound module applied (the Digital Drum to other product), 
such as computer. 

When the internal format is selected, the LED shows: "P-N", which
means program change and then note-on/off' (program change will
always be transmitted for internal voice bank addressing).
When the GM format is selected, the LED shows: "--N", which means
only the 'note-on/off' will be transmitted (GM percussion note
arrangement, program change not supported!).

NOTE

: This setting will only affect the primary percussion channel 

(MIDI channel 10).

Internal format

GM format

Saving setting

Setting all the data (gain, rim sensitivity, crosstalk, velocity curve splash 
sensitivity and MIDI Note), you can save them into built-inmemory, press the
[ save ] button to store all settings.

Note: If turn off the power without saving, you will lose the changes
you have just made.

Factory reset

This drum module will reset its to initial settings.
Beware all data will be lost.

1.

 Turn the power off.

2.

 Turn on the power while holding the [ tempo - ] and [ tempo + ]

    Buttons

18

 MIDI NOTE 

Each pad has its own MIDI note number to transmit.It is useful

 for connecting computer or other devices. 

Press  the  [utility]  button  until  the  LED  screen  shows 
“N××”.(  ××=note  value:  00~99).  Press  the  [+]  and  [-] 
buttons  to  adjust  the  note  of  the  current  pad.The  note 
to  be  transmitted  in  GM  mode.

  That  means  the  midi  note 

you  modified  take  effect  when  you  choose  “--N”  in  the  MIDI  OUT 
menu, if “P-N” option shown in the MIDI OUT menu, it just transmit
 its internal and fixed pc/note;

MIDI Output

Содержание DD506

Страница 1: ...DIGITAL DRUM Instruction Manual ...

Страница 2: ... and Transport Cleaning Electrical Interference Never apply excessive force to the controls connectors or other parts of the instrument Always unplug cables by gripping the plug firmly but not pulling on the cable Disconnect all cables before moving the instrument Physical shocks caused by dropping bumping or placing heavy objects on the instrument can result in scratches and more serious damage C...

Страница 3: ... source Mute a drum part Adjust the song s tempo Play with a click voice Use the lighting guide function Create a User Drum Kit Set a drum voice Adjust the volume of the pad Adjust the pan of the pad Adjust the tuning of the pad Set a user drum kit voices Utility Pan sensitivity Rim sensitivity Crosstalk Velocity curve Splash sensitivity Local MIDI output MIDI note Saving setting Factory reset Spe...

Страница 4: ...tart stop button Start or stop song playing song volume button Display the song number accompaniment volume drum volume local external 3 digit LED display Display the parameters of current menu mode voice volume button Display the voice number volume pan and pitch value kit button Display the drum kit number or reverb setting utility button This button is used to enter or switch utility menu pages...

Страница 5: ...ine output Aux in jack Connect with external sound source Power supply jack DC in 9V Connect an AC adaptor to this jack Power switch Turn the power on off MIDI IN and OUT connector Connect with external sound module Rear Panel Side Panel USB Port Connect to computer Phones jack Connect a pair of stereo headphones to this jack Connect the headphones will not mute the output jacks 5 ...

Страница 6: ...edal is stepped When the pedal is released it functions as a closed hi hat 2 The valid striking area of a cymbal pad ride crash or hi hat is near the edge of the pad which is different from other pads Caution To prevent electric shock and damage to the device make sure the power is switched OFF on the drum and all related device before making any connection Setup Connect the pads and the pedal to ...

Страница 7: ...minimum volume level before switching the power ON 2 Make sure the power is switched OFF when connecting drum module with external devices Connect the power supply jack An optional set of stereo headphones can be connected with the PHONES jack located on the side of the drum module Adjust the volume to a comfortable level Connect headphones Connect a CD player etc Aux In jack 1 When you want to li...

Страница 8: ... percussion channel MIDI channel 1 8 11 16 Melody voice channels LOCAL mode From a MIDI point of view the module is composed of two devices A controller transmitting data the pads and Hi Hat control pedal via an internal trigger to MIDI converter A sound generator receiving MIDI data the sound module In normal operation Local ON default mode those two devices are connected together internally allo...

Страница 9: ...il a comfortable volume level is reached Switch the power ON Set the main volume Head shot Hit only the head of pad Playing the pads Head Head Rim shot When playing the snare you must strike both the head and rim of the pad Head Rim Cymbal Bow or Edge shots Strike the bow of the pad to produce bow sounds And the edge sounds will be heard if you strike the edge of the pad Bow Edge Bow shot Edge sho...

Страница 10: ...or button the display shows CXX XX metronome volume 00 to 16 press the press the or button again to adjust the volume Play with a metronome Beat indicator Beat indicator 1 In the kit number page press the kit button to enter the global reverb mode the LED shows the current reverb status roN for reverb on of roF for reverb off 2 Press the or buttons to turn or of off the global reverb effect 3 Pres...

Страница 11: ... song during playback by pressing the start stop button Note The pad s indicator can be lighted off by pressing kick button 1 Press the song volume button until AXX is displayed XX accompaniment volume 00 to 32 2 Press or buttons to adjust the volume of song accompaniment It will be restored to default value on the next power on Select a song Listen to the song Adjust the accompaniment volume Song...

Страница 12: ...the song The drum part in the song will be muted 3 To cancel the drum mute function press drum off button again The drum off indicator light goes off The drum mute function can be used during song playing Mute a drum part Drum off indicator Local machine External sequencer In song source selection page the LED will show the current selected song source There re two choices local machine 50 song in...

Страница 13: ...hting guide function provides you a valuable lesson to practice or learn the drum kit with playing the preset song 1 Select the song number you want to practice 2 Press drum off button 3 Press start stop button to start song play 4 Strike the pad in accordance with the lighting of pad s indicators During song playing you can change the Tempo speed Use the lighting guide function Press the kick lig...

Страница 14: ...ected press the rim button to select the snare rim or strike the rim of the snare pad When the cymbal pad crash or ride is selected press the rim button to select the edge shot Set a drum voice Voice indicator This unit allows you to adjust the volume of every voices in the kit that let you control the individual level volume of the pads or bass drum 1 Press the voice volume button to select the v...

Страница 15: ...r lights and display shows the current value of lighting pad 2 Press the PAD button or hit the percussion pad you want to adjust 3 Press the or buttons to adjust the tuning of the current pad 4 Repeat step 2 and 3 to adjust the level of other pad Note P 8 left 0 center P8 right Adjust the tuning of the pad Once completing to your own drum kit you have to save them in the unit otherwise your drum k...

Страница 16: ... pad is hit forcefully 4 Repeat step 2 and 3 for to set the voice for another pad or bass drum Note If turn off the power without save you will lose the changes you have just made Pad sensitivity Rim sensitivity gain of dual triggers snare crash and ride can be adjusted to balance the head rim velocities Display shows rEX X rim sensitivity level 1 to 8 1 Press the utility button until display show...

Страница 17: ...e loudness the dynamic curve 1 Press the utility button until display shows CUX the curve number is indicated X curve number 1 to 6 2 Press pad button or hit the pad you want to set The pad indicator light 3 Press or buttons to adjust the setting 4 Repeat step 2 and 3 for to set the voice for another pad or bass drum Loudness Loudness Loudness Loudness Loudness Loudness Striking force Striking for...

Страница 18: ...ows N which means only the note on off will be transmitted GM percussion note arrangement program change not supported NOTE This setting will only affect the primary percussion channel MIDI channel 10 Internal format GM format Saving setting Setting all the data gain rim sensitivity crosstalk velocity curve splash sensitivity and MIDI Note you can save them into built inmemory press the save butto...

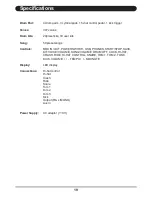
Страница 19: ...0preset kits 30 user kits 50 preset songs MIDI IN OUT POWER SWITCH USB PHONES START STOP SAVE KIT VOICE VOLUME SONG VOLUME DRUM OFF CLICK HI HAT CRASH RIDE HI HAT CONTROL SNARE TOM 1 TOM 2 TOM3 KICK VOLUME TEMPO MIDI NOTE LED display Hi hat control Hi hat Crash Ride Snare Tom 1 Tom 2 Tom 3 Kick Output R L MONO Aux in AC adaptor 9V Specifications 19 ...

Страница 20: ...tandard Ride21 Rim Rock Ride21 Rim 1969s Ride Rim Pop Ride Rim Ska Ride Rim HI HAT PERCUSSION 251 252 253 254 255 256 257 258 259 260 261 262 263 264 265 266 267 268 269 270 271 272 273 274 275 276 277 278 279 280 281 282 283 284 285 286 287 288 289 290 291 292 293 294 295 296 297 298 299 300 301 302 303 304 305 306 307 Standard Hi hat Standard Hi hat 2 Rock Hi hat Pop Hi hat Brush Hi hat 1969s Hi...

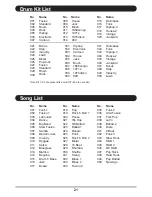
Страница 21: ...Pop Latin Ballad 2 Disco 8 Beat Funk 3 Slow Rock R B 1 R B 2 6 8 R B Pop Rock Hard Rock Pop Ballad New Age No Name No Name No Name 001 002 003 004 005 006 007 008 009 010 011 012 013 014 021 022 023 024 025 026 027 028 029 030 Fusion Standard Room Rock Hiphop Electronic Cartoon House Jazz Brush 1969songo 1971s 1976disco 909 M box Step Industry Lowfi Metal Pop rock Fusion Standard Room Rock 031 032...

Страница 22: ...ogo Low Agogo Cabasa Maracas Short Whistle Long Whistle Short Guiro Long Guiro Claves Hi Wood Block Low Wood Block Mute Cuica Open Cuica Mute Triangle Open Triangle Shaker Jingle Bell Belltree Castanets Mute Surdo Open Surdo Room Low Tom 2 Room Low Tom 1 Room Mid Tom 2 Room Mid Tom 1 Room Hi Tom 2 Room Hi Tom 1 Rock Hi Tom 1 El Hi Tom 1 808Hi Tom 1 808Hi Tom 1 Brush Hi Tom 1 Brush Mid Tom 1 Brush ...

Страница 23: ...me 10 X Pan 11 X Expression 64 X Sustain Pedal 65 X Portamento ON OFF 66 X Sostenuto Pedal 67 X Soft Pedal 80 X Reverb Program 81 X Chorus Program 91 X Reverb Level 93 X Chorus Level 120 X All Sound OFF 121 X Reset All Controller 123 X All Notes OFF Program Change System Exclusive X System Song Position X Common Song Select X Tune X System Clock Real Time Commands Aux Local ON OFF X All Notes OFF ...

Страница 24: ...DD506 _G06 ...

Отзывы: