Medeli DD401 Скачать руководство пользователя страница 17

Practicing in Coach Mode

Change UP

In change up type, you can choose one rhythm group to practice with. 
Maintain good timing as you play along with up to three different 
practice rhythms that change every two measures. And the display will 
flash for times when the rhythm is ready to change. The rhythm type 
changes in circle.

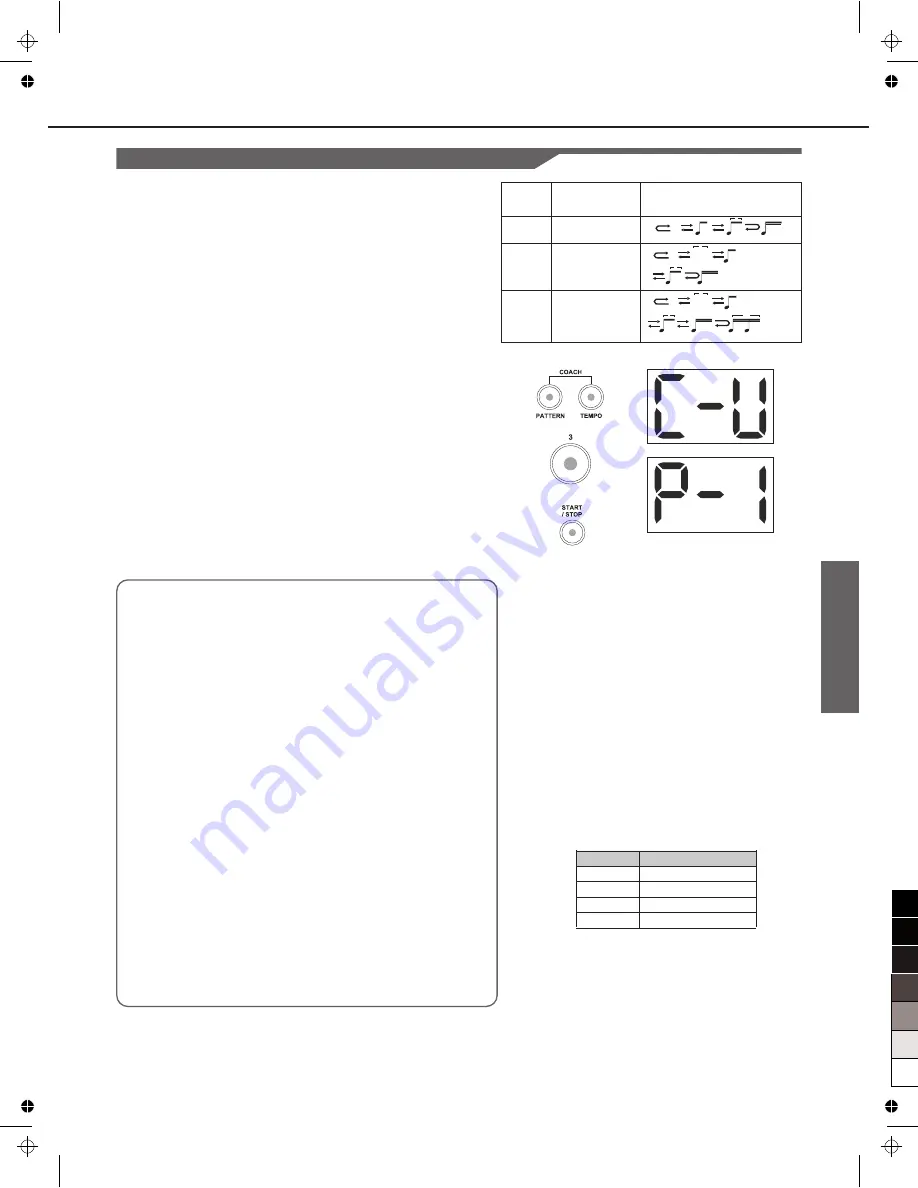
If the digital drum is not yet in change up mode, press the [3] button to 
enter this type.

You can practice like this:

1. 

Press the [START/STOP] button to enter the CHANGE UP 

     preparation. The LED of the [START/STOP] button starts flashing.

2. 

Press numeric button [1] ~ [3] to choose one rhythm group. It will 

     display like this:
        

3. 

Press the [START/STOP] button to start current change up practice.

     It will display current rhythm type. 
     Your hitting accuracy will be indicated by the six LEDs on the bottom 
     of the drum module

4. 

Press the [START/STOP] button to stop practice.


After one cycle, you can see your score on the 3 digit LED, and your 

     can hear a comment according to your performance.

Score
0~29
30~59
60~79
80~100

Comment
OK
GOOD
VERY GOOD
EXCELLENT

17

h

q

q

qq

3

qqq

qqq

3

h q

q

qq

3

qqq

qqq

3

h q

q

qq

3

qqq

qq qq

6

Rhythm 
Group 

P-1

P-2

P-3

Display

2-4-8-3-16

2-4-3-8-3-16

2-4-3-8-3-16-6

Description

Scoring Rule: 

1. 

While you are playing, and the LED 3 and LED 4 light up: Plus 3 


    points to your score.

2.

 While you are playing, and the LED 2 or  LED 5 lights up: Plus 2 

    points to your score.

3.

 While you are playing, and the LED 1 or LED VARIATION lights 

     up: Plus 1 point to your score.

4. 

While you are playing, and none of the LEDs lights up: Minus 1 

     point to your score.

5. 

While the rhythm is playing, if you haven't hit the pad:

     no change to your score.
    (This scoring rule  uses a percentage grading system.)

So, try your best and do not make any mistake as you can while 
you are practicing. Good luck!

Comment:

If you get the score from 0 to 29, you will hear the comment “OK!”.
If you get the score from 30 to 59, you will hear the comment 
“GOOD!”.
If you get the score from 60 to 79, you will hear the comment 
“VERY GOOD!”.
If you get the score from 80 to 100, you will hear the comment 
“EXCELLENT!”.

0

5

25

75

95

100

aw_DD401_Manual_G02_130717

2013

7

17

 10:54:09

Содержание DD401

Страница 1: ...VOLUME 0 5 25 75 95 100 aw_DD401_Manual_G02_130717 2013 7 17 10 54 04...

Страница 2: ...ther location PRECAUTIONS PLEASE READ CAREFULLY BEFORE PROCEEDING Please keep this manual in a safe place for future reference Power Supply Please connect the designated AC adaptor to an AC outlet of...

Страница 3: ...e 11 Switching the Click on off 11 Adjusting the Click Volume 11 Adjusting the Click Tempo 11 Selecting the Click Voice 11 Setting the Time Signature 12 Setting the Interval 12 Playing Back Pattern Ab...

Страница 4: ...ION Buttons Enter the Kit mode and choose a kit Choose a coach type in the Coach Mode 4 Rear Panel 10 This stereo jack is used to connect the headphones to this unit 11 AUX IN Jack 1 8 This stereo inp...

Страница 5: ...HI HAT PEDAL Using the provided cables to connect with kick pedal snare tom1 tom3 ride crash hi hat and hi hat pedal These pads and pedals are all mono input and velocity sensitive Note For details o...

Страница 6: ...yer or other audio source to the stereo AUX IN jack on the rear panel The input signal is mixed with the drum signal allowing you to play along Connecting a Computer By connecting a computer to the US...

Страница 7: ...techniques and dynamics All the pads are velocity sensitive and some voices change timbre depending on the striking force Hi Hat The Hi Hat sounds varies from open to closed in response to how far the...

Страница 8: ...k volume and select the click sound in the CLICK menu 1 Press the CLICK button to start the metronome Press the CLICK button again to stop the metronome 2 Press and hold the CLICK button and then pres...

Страница 9: ...pads following with the metronome The 6 LEDs on the bottom of the drum module will show your hitting accuracy Note 1 You can set the beat type 3 4 4 4 etc before start practicing refer to the Setting...

Страница 10: ...lect kit 1 5 by pressing the numeric button 1 5 3 When the VARIATION button s back LED in green you can select kit 6 10 by pressing the numeric button 1 5 Each drum kit has its own volume value and it...

Страница 11: ...page The display will show 0 32 The default value is 25 2 Press the or button to adjust the volume 11 Adjusting the Click Tempo Press the TEMPO button use the or button to adjust the value of current...

Страница 12: ...eously the interval page will be selected 2 Press the or button to change the current interval There are 6 types you can choose 2 4 8 16 3 and 6 the default value is 4 Notes If the length of the inter...

Страница 13: ...er increase rapidly while holding down the button it decreases rapidly Adjusting the Pattern Volume 1 Double click the PATTERN button and then the pattern volume page will be selected 2 Use the or but...

Страница 14: ...ode starting and your hitting accuracy will be indicated by 6 LEDs on the bottom of the drum module GOOD On the Beat If the time point of your hitting is just on the standard beat both of the 3 and 4...

Страница 15: ...tton to select beat check type 2 Select your desired time signature and interval Press and hold the CLICK button and then click the 2 button to call up the time signature page Pressing the or button t...

Страница 16: ...se G 2 type Set time signature and interval you want to practice Please refer to the Setting the metronome chapter for metronome parameter settings 4 Press the START STOP button to start gradual up do...

Страница 17: ...to your performance Score 0 29 30 59 60 79 80 100 Comment OK GOOD VERY GOOD EXCELLENT 17 h q q qq 3 qqq qqq 3 h q q qq 3 qqq qqq 3 h q q qq 3 qqq qq qq 6 Rhythm Group P 1 P 2 P 3 Display 2 4 8 3 16 2...

Страница 18: ...ton again to stop practicing For example Practice in 001 1 Select the Follow Me Press the PATTERN and TEMPO buttons simultaneously to select Coach mode Press the 4 button to select follow me type Pres...

Страница 19: ...by pressing or button Select drums you want to open or mute by pressing the 1 5 or VARIATION button 4 Press the START STOP button to start practicing 5 Press the START STOP button again to stop practi...

Страница 20: ...back data and metronome notes are not transmitted Recording Your Performance to an External Sequencer 1 If you are using a software sequencer on a computer you can simply connect the USB port of the d...

Страница 21: ...10 Preset Kits General MIDI Kits 5 GM Kits Sequencer 30 patterns 12 drum loops Resolution 192 ticks per quarter note Tempo 30 280 Display 3 digit LED Connectors 25 Pin Trigger Input Jack Phones Jack...

Страница 22: ...Kit List PRESET KIT Acoustic Funk JazzBrush Rock 808 909 FX Mix Marimba Indian Percussion NO 1 2 3 4 5 6 7 8 9 10 22 0 5 25 75 95 100 aw_DD401_Manual_G02_130717 2013 7 17 10 54 09...

Страница 23: ...ymbal 1 Ride Bell Tambourine Splash Cymbal Standard Cowbell Standard Crash 2 Vibra slap Ride Cymbal Hi Bongo Low Bongo Mute Hi Conga Open Hi Conga Low Conga High Timbale Low Timbale High Agogo Low Ago...

Страница 24: ...GM Backing Instrument List 24 0 5 25 75 95 100 aw_DD401_Manual_G02_130717 2013 7 17 10 54 10...

Страница 25: ...Loop Loop Loop Loop Loop Loop Loop Loop Loop Loop Loop Loop Loop Loop Loop 25 No 16 17 18 19 20 21 22 23 24 25 26 27 28 29 30 Name Fusion3 Pop Shuffle Mambo Pop Bossa 3 4 Jazz Rock Pop Funk Big Band1...

Страница 26: ...umber 1 2 3 4 5 6 7 8 9 10 11 12 Name Loop 1 Loop 2 Loop 3 Loop 4 Loop 5 Loop 6 Loop 7 Loop 8 Loop 9 Loop 10 Loop 11 Loop 12 Loop List 26 0 5 25 75 95 100 aw_DD401_Manual_G02_130717 2013 7 17 10 54 10...

Страница 27: ...MIDI Implementation Chart 27 0 5 25 75 95 100 aw_DD401_Manual_G02_130717 2013 7 17 10 54 10...

Страница 28: ...DD401_G02 0 5 25 75 95 100 aw_DD401_Manual_G02_130717 2013 7 17 10 54 10...

Отзывы: