background image

Playing the Styles

The instrument features 200


styles


in


a


variety


of


different


musical


genres

Try


selecting


some


of


the


different


styles (Refer to


Style List

)


and


play


with


the


auto


accompaniment

.

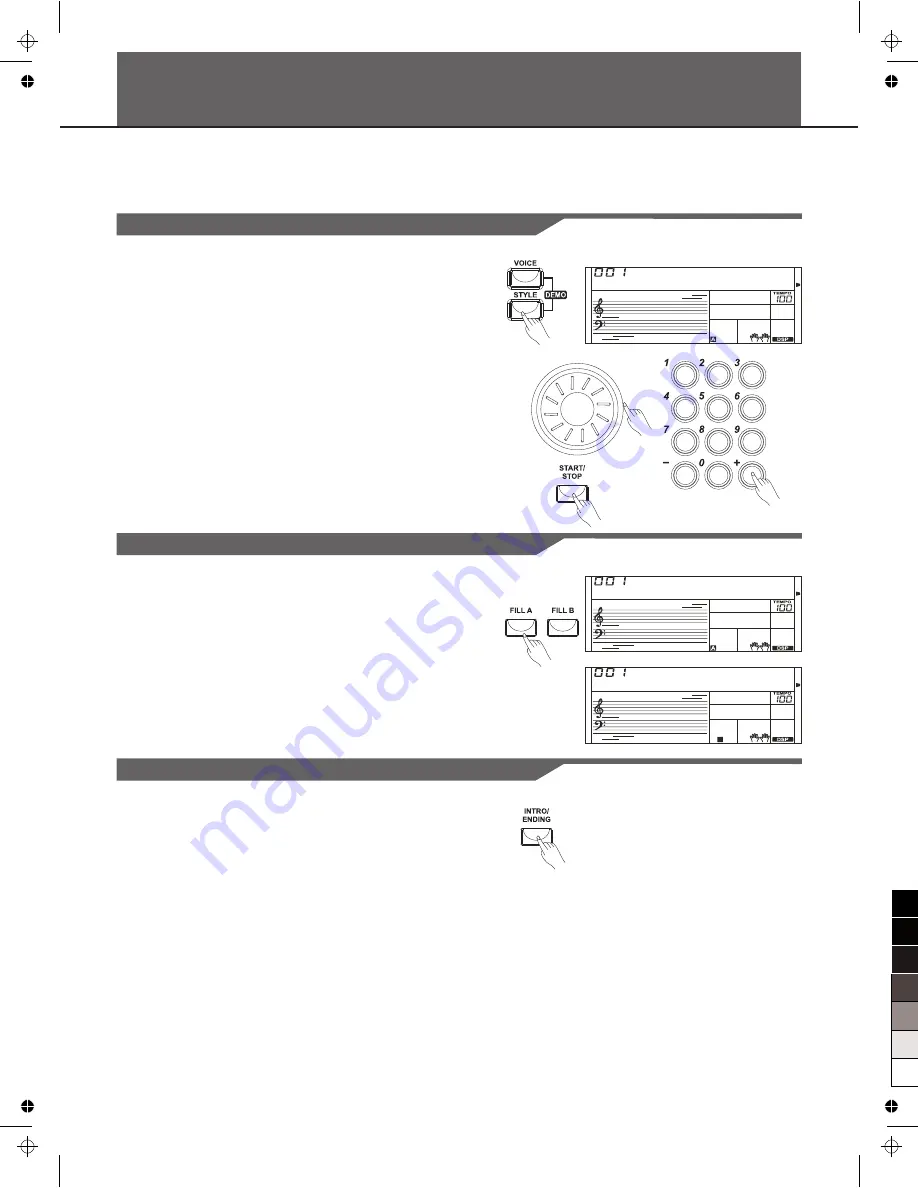
Selecting a style

11

1.

 Press the [STYLE] button.

     Enter the


STYLE


mode

LCD


shows “STYLE”

the style number


     and


the


style


name.

2.

 Use the data dial, the number keys

the


[+] button, the [-] button


to


     select


the


style


you


want


to


play.

3. 

Press the [START/STOP] button to start the rhythm tracks of the 

     auto accompaniment.

8Beat1

STYLE

Playing a Fill

The fill section


let


you


add


dynamic


variations


and


breaks


in the rhythm 

of the accompaniment, to make


your


performance sound even more 

professional. When the fill


is finished, it leads smoothly into the 

selected main section

 (

A

B

).

Note:

Hold down the FILL-IN A/B button when the style is playing, the


selected FILL pattern repeats continuously until button is


released.

Press FILL-IN A/B when style stop, it will change to the normal


section, 

the icon A/B on LCD will be lightened.

8Beat1

STYLE

8Beat1

STYLE

B

Intro/Ending

The intro section is used for the beginning of the song.


When


the


intro


finishes playing, accompaniment shifts to the main section.


The ending 

section is used for the ending of the song. When the ending is


finished, 

the auto accompaniment stops automatically. The


length of the ending 

differs depending on the selected style.

1.


Press the [STYLE] button.

2.

 Select a style

3

.


Turn


the


Chord Mode on.

4

.


Turn


SYNCHRONIZED


START


on

.

5

.


Press the 

[

INTRO

/

ENDING

],  

the “A” or “B”


flashes on LCD, the 

    style is ready to play.

6

.


As soon as you play a chord with your left hand, the auto


    accompaniment starts. When the playback of the intro is


finished, it 

    automatically leads into main A or B section.

7

.


Press the [INTRO/ENDING] again will lead it into the


ending section. 

    When the ending is finished, the auto


accompaniment automatically 

    stops.

Note:

Press [FILL A] or [FILL B] before the ending finished will lead it into 
main A or main B section.

0

5

25

75

95

100

AW_M15_Manual_G05_111206

2011

12

6

 14:47:47

Содержание AW M15

Страница 1: ...ELECTRONIC KEYBOARD 0 5 25 75 95 100 AW_M15_Manual_G05_111206 2011 12 6 14 47 39...

Страница 2: ...service personnel Disconnect all cables before moving the instrument 2 THE FCC REGULATION WARNING for USA This equipment has been tested and found to comply with the limits for a Class B digital devic...

Страница 3: ...Octave 10 Playing the Styles Selecting a style 11 Playing a Fill 11 Intro Ending 11 Sync Start 12 Fade In Out 12 Accompaniment Volume 12 Tempo 12 Auto Bass Chord 13 One Touch Setting 14 Memory Memory...

Страница 4: ...on and off 4 INTRO ENDING Play the Intro or Ending 5 FILL A MAIN A Play the Fill in and change to MAIN A 6 FILL B MAIN B Play the Fill in and change to MAIN B 7 FADE IN OUT Turn the Fade In or Fade Ou...

Страница 5: ...crease the value 30 NUMBER KEYS Select the number or adjust the parameters 1 RECORD 2 PLAY 3 SUSTAIN 4 TOUCH 5 VOICE STYLE DEMO SONG 6 MEASURE 7 BEAT 8 TEMPO 9 STROE M1 M4 ONE TOUCH SETTING 10 DUAL DS...

Страница 6: ...cabinet 3 Replace the compartment cover making sure that it locks firmly in place Caution Do not mix old and new batteries Always use same types of batteries Always remove the batteries from the unit...

Страница 7: ...ker system is automatically shut off when a pair of head phones is plugged into this jack Note Do not listen with the headphones at high volume for long periods of time Doing so may cause hearing loss...

Страница 8: ...exit the demo mode Note In the DEMO mode all buttons except START STOP TEMPO TEMPO DSP VOLUME POWER ON OFF will not be available 1 Press the VOICE button Enter the VOICE mode LCD shows VOICE R1 the v...

Страница 9: ...Sustain When the Sustain feature is ON all notes played on the keyboard would have a longer sustain Press the SUSTAIN button to turn the SUSTAIN effect ON or OFF Note When you step on the sustain ped...

Страница 10: ...se value 3 Press the TRANSPOSE and TRANSPOSE buttons simultaneously to reset the transpose to 0 Transpos Transpose Octave Octave function determines the relative octave setting for the keyboard played...

Страница 11: ...A B when style stop it will change to the normal section the icon A B on LCD will be lightened 8Beat1 STYLE 8Beat1 STYLE B Intro Ending The intro section is used for the beginning of the song When the...

Страница 12: ...from the Accompaniment Volume set value to 0 in about 8 seconds and the style stops The keyboard volume will change from default value to 0 at the same time 8Beat1 STYLE FADE 8Beat1 STYLE FADE Accompa...

Страница 13: ...t key and the other keys on the left of it are accompaniment keys SINGLE FINGERING Single finger accompaniment makes it simple to produce beautifully orchestrated accompaniment using major seventh min...

Страница 14: ...T S button to turns on the One Touch Setting for current style LCD show O T S 1 2 Press one of the ONE TOUCH SETTING buttons M1 M4 Voice match the selected style can be instantly recalled with just a...

Страница 15: ...ter you turned off the power Mem Stor SquarLd1 Chord Dictionary Chord dictionary is essentially a built in chord book that help you to check the Chord notes 1 Press the CHORD DICT button to enter this...

Страница 16: ...me Press the TEMPO TEMPO button to change the tempo of the metronome Selecting the Beat Hold down METRO button will enter in Beat Set Mode LCD show Beat and beat value Press number keys 0 and 2 9 and...

Страница 17: ...has a grading system to help you to know well about your progress 1 In Song mode press the LESSON button to enter the lesson mode or switch the lesson mode 2 Press the START STOP button to start learn...

Страница 18: ...the A B C and play the chords on the left of the keyboard 3 Press the RECORD button again to stop recording The record flag disappears 4 Press the PLAY button to play the notes you recorded The play f...

Страница 19: ...specified for the various parts MIDI messages can be divided into two groups Channel messages and System messages What s MIDI MIDI Terminals MIDI Connection The electronic keyboard is equipped with a...

Страница 20: ...ence To prevent this turn off the mobile phone or use it further away from the instrument You may be trying to start accompaniment by playing a key in the right hand range of the keyboard To start the...

Страница 21: ...Clean Guitar Soft Clean Guitar Chord Clean Guitar Muted Guitar Stereo Muted Guitar Chord Muted Guitar Overdriven Guitar Distortion Guitar Guitar Harmonics Acoustic Bass 1 Acoustic Bass 2 Acoustic Bass...

Страница 22: ...2 Ocarina 1 Ocarina 2 Trumpet2 TrumpetD TrumpetW Trmbone1 Trmbone2 Tuba1 Tuba2 MuteTrp1 MuteTrp2 Horn1 Horn2 5thHorn Brass SynBras1 SynBras2 SynBras3 SynBras4 SynBras5 SynBrasO SprnSax1 SprnSax2 AltoS...

Страница 23: ...eat 1 1 8 Beat 2 1 8 Beat 3 1 8 Beat 4 1 60 s 8 Beat 1 8 Beat Ballad 1 8 Beat Rock 1 16 Beat 1 1 16 Beat 2 1 16 Beat Pop 1 Ragtime Dixeland QuickStp Country1 Country2 PopCntry CtryRock CtryFolk 3 4Ctr...

Страница 24: ...oogie 1 Country Blues 1 Country Quick Step 1 Bluegrass 1 Bossa Nova 1 1 Bossa Nova 2 1 Rhumba 1 Pop Rhumba 1 Cha Cha 1 Pop Cha Cha 1 Tango 1 CtryShf1 C Bogie1 C Blues1 CtryStp1 Bluegra1 Bossa1 1 Bossa...

Страница 25: ...WithGame WayHome Parting YankeeD RedRiver ROCK 1 FOLK No 51 52 53 54 55 56 57 58 59 60 61 62 63 64 65 66 67 68 69 70 71 72 73 74 75 76 77 78 79 80 81 82 83 84 85 86 87 88 89 90 91 92 93 94 95 96 97 98...

Страница 26: ...ed seventh dim7 Suspended fourth sus4 Seventh suspended fourth 7sus4 Normal Voicing 1 3 5 1 3 5 7 1 2 3 5 1 3 5 b7 1 3 5 6 b7 or 2 3 5 6 b7 1 b3 b5 b7 1 3 5 6 1 b3 5 1 b3 5 b7 1 b3 5 7 1 b3 5 6 1 3 5...

Страница 27: ...18 114 1 27 0 5 25 75 95 100 AW_M15_Manual_G05_111206 2011 12 6 14 47 49...

Страница 28: ...M15_G05 0 5 25 75 95 100 AW_M15_Manual_G05_111206 2011 12 6 14 47 49...

Отзывы: