background image

TV OUTPUT SETTINGS

Connect the Mede8er to your TV by one of the connection options as shown on page 6 & 7 and change the 
input option on your TV to match the option you selected. If you do not get to see the Mede8er GUI on your 
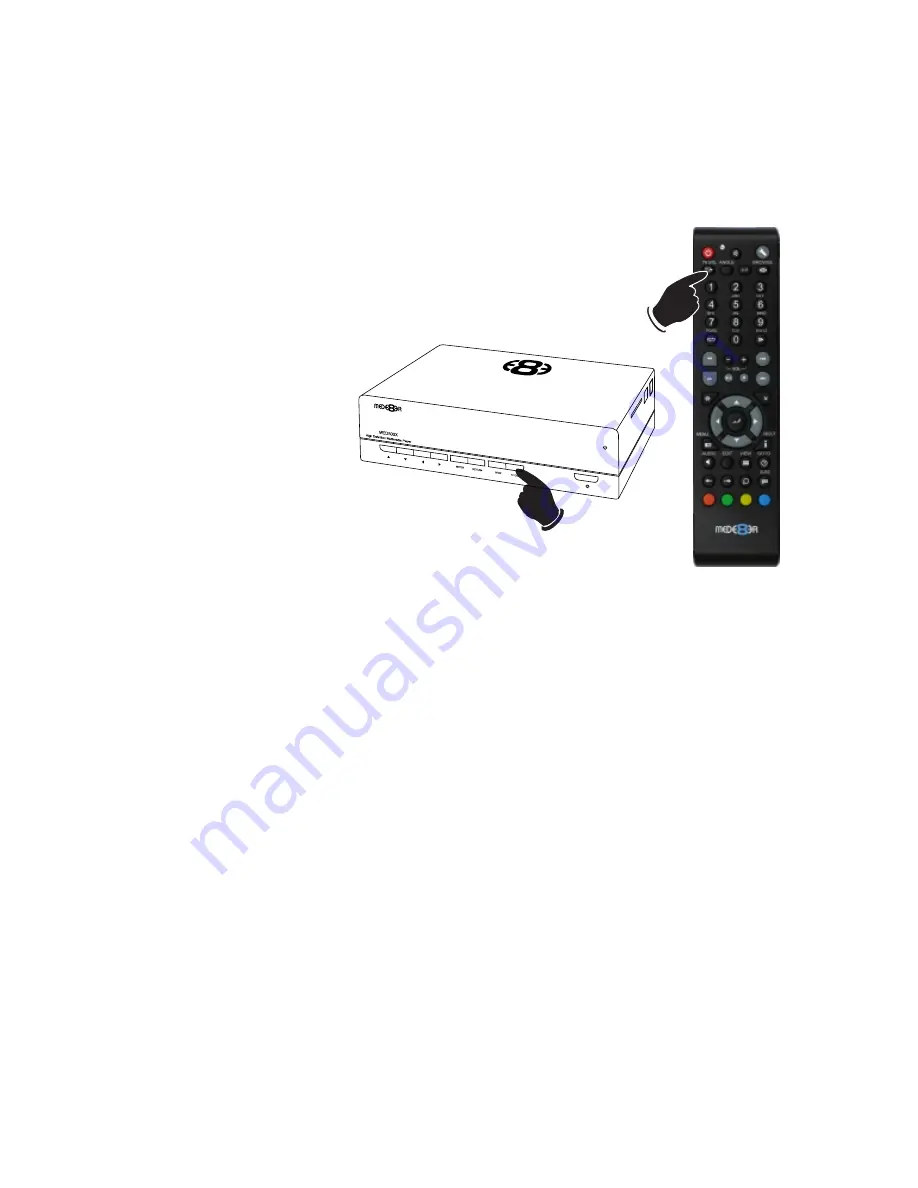
TV you will need to toggle the Mede8er TV output until you get a picture

.

TV SYS Toggle Procedure

The Mede8er has three video output options ie Composite Video 
(yellow RCA connectors, Component Video (Red - Green- Blue 
connectors) and HDMI. Each output option also offers different 
screen resolution settings and these will need to be adjusted to 
match the type of TV used.  

To change the Video Output on the 
Mede8er just press the TV SYS 
button on the remote and it will 
change the Video Output to the 
next available output option. If after 
pressing the TV SYS button you still 
do not get a picture then after a 
short pause press the TV SYS 
again until you see the Mede8er GUI on 
your TV. Keep repeating this procedure until you 
see a picture on your TV. 

AUDIO SETTINGS

Surround Sound 

Select “Don’t Care” if you are using 2 CH stereo.  If you are using SPDIF or Co-Axial Digital then 
select “AC3". If you are using HDMI Audio to amplifier then select “True HD”   

HDMI Downmix (2 channel)

Use this setting if you are connecting the Mede8er directly to the HDMI input on your TV. The 
sound will be downmixed to 2 channel stereo. 

HDMI Passthrough

Use this setting if you are connecting to the HDMI input of a Home Theatre Amplifier. The audio will be 
passed through as Bitstream or LPCM and the amplifier will do the multichannel decoding.  

SPDIF Downmix (2 channel)

Use this setting to connect to a Amplifier via Toslink optical cable or Co-Axial Digital RCA cable. 
The sound will be downmixed to 2 channel stereo.  

SPDIF Passthrough 

Use this setting to connect to amplifier via Toslink optical cable or Co-Axial Digital RCA cable. 
The sound will be passed through as Bitstream or LPCM and the amplifier will do the 
multichannel decoding.

Once you see the Mede8er GUI on your TV then you must enter the Video Setup 
mode and adjust the Video settings to match the screen size resolution of your 
TV.

Page7

Содержание MED500X2

Страница 1: ...High Definition Multimedia Player MED500X2 Quick Start Guide TM...

Страница 2: ...ote Functionality Home Network Samba Server Wired Network Connection and Setup Wireless Network Setup Firmware Update Web Browser Home Page Home Page Strip Media Library Media Library Continued Media...

Страница 3: ...uct and to protect it from overheating put the product in a position and location that will not interfere with its proper ventilation For example do not place the product on a bed sofa or similar surf...

Страница 4: ...12Volt 2 Amp input RJ45 Lan connector Coax Digital Audio Out Optical Audio Out Cooling Fan Composite Video Out Analogue Audio Out L R SD Card USB Host USB Slave Status Led USB Host Port HDMI connector...

Страница 5: ...ir vents Secure the hard drive with the four screws provided Connect the hard drive power connector and the red SATA data connector from the player to the hard drive diagram c Re fit the hard drive co...

Страница 6: ...nel to stereo AUDIO IN L R VIDEO IN HDMI Coax Digital Connect LAN cable to router or switch Optical Digital HDMI RJ45 Network Coax Digital Toslink Connection to a TV or Amplifier For digital audio con...

Страница 7: ...mains outlet and plug the DC Jack into the DC IN at the rear of the MED500X2 DO NOT USE ANY AC DC ADAPTER AND ONLY USE THE ONE SUPPLIED otherwise you may cause damage to the unit Press the On Off butt...

Страница 8: ...e a picture on your TV AUDIO SETTINGS Surround Sound Select Don t Care if you are using 2 CH stereo If you are using SPDIF or Co Axial Digital then select AC3 If you are using HDMI Audio to amplifier...

Страница 9: ...Hard Drive Format protection just enable Pin Protection option in the Setup menu WARNING FORMATTING THE HARD DRIVE WILL ERASE ALL DATA Formatting USB CONNECTION TO PC You can transfer files to and fro...

Страница 10: ...our Videos you can intuitively navigate and change certain function without the need to continually look at the remote control During Video Playback excluding DVD files you can use the navigation butt...

Страница 11: ...Server and stream content to other Mede8er s on your home network The Samba function is enabled or disabled in the System menu under Network Should the Samba stop working for any reason we suggest yo...

Страница 12: ...or either automatic or manual IP setup Follow the on screen instructions to complete the network setup If you connect to a wired Ethernet network using DHCP Mede8er automatically detects your network...

Страница 13: ...on cable base WIRELESS NETWORK CONNECTION Plug the MED10WFB into the USB extension base that was supplied with your Mede8er Plug the USB cable into one of the USB host ports on the side of the Mede8er...

Страница 14: ...all information about Video Files and allow you other functionality such as search most viewed and recently added MUSIC DATABASE SEARCH The Music Database Search page will display all information abou...

Страница 15: ...can be accessed at any time by pressing the Home Page button on the remote The Home Page Strip will appear at the bottom of the page and allow you to make your selection using the Left Right Navigatio...

Страница 16: ...designed so that the view can be easily changed on the fly 11 10 9 8 5 6 7 4 3 2 1 Movie View Music View Picture View List View Preview View 1 Media Icons 2 File Name 3 Focus Bar 4 Scroll Bar 5 Folde...

Страница 17: ...iew of the Media Library press the View button on the remote and the Media Library strip will light up Now you can navigate with the Left Right Navigation buttons on your remote and select the view yo...

Страница 18: ...he advanced functionality you will need to scan your movie collection with Y2M YAMJ to Mede8er or Thumbgen in order to create the required xml files Movie Rating stars out of 5 Movie rating x out of 1...

Страница 19: ...information tags and images then these will be displayed on the right hand side in the preview window area OFF Repeat and Shuffle off Repeat Track Repeat the current track Repeat All Repeat all tracks...

Страница 20: ...be ready to go You can easily download DVD cover art for your picture or you can use the free program like YAMJ to Mede8er to make your folder jpg and about jpg pictures that will contain additional c...

Страница 21: ...a watched video indicator feature To enable this function go to Setup Misc Watched Indicator and switch it on Mede8er will mark the Video file with a eye icon once more than 10 of a video has been wat...

Страница 22: ...Hard Drive is connected It is important to let the scanner complete the scan if you intend to use this function Progressive scans take less time than the original scan as only new information is adde...

Страница 23: ...he first time you must enter the default factory pin ie 0000 then the Pin Code change screen will open Now enter you new personal 4 digit code by pressing the numbers on your remote Once you have ente...

Страница 24: ...Title info Audio codec Video codec Chapter info Current time Search time Total time Search time indicator Repeat status Time bar GOTO SEARCH The GOTO Search allows you to easily jump to a specific tim...

Страница 25: ...ide screen aspect videos on a 16 9 TV Zoom XY The Zoom XY allows you to stretch the picture horizontally and vertically independent of each other This zoom function is designed to correct videos encod...

Страница 26: ...deo file and must be named to be exactly the same name as the video file eg Cloudy With A Chance Of Meatballs 2009 720p BluRay HebDub x264 WiKi mkv Cloudy With A Chance Of Meatballs 2009 720p BluRay H...

Страница 27: ...Media Library To Copy Delete Move or Rename a single file just focus on the file that you require to perform the action on and press the Edit button on the remote control Select the option you require...

Страница 28: ...the left screen A that you want to perform the action on and press the Play Pause button to select and add the files to the File List B Once you have selected all the files you require then press the...

Страница 29: ...The page will re arrange into a image grid that is optimized for image thumbnail viewing You can now navigate your pictures as normal and zoom the images to full screen by pressing the Enter button on...

Страница 30: ...me 03name 04name 05name 06name 07name 08name 09name 10name 11name up Autoplay Operation On power up the Mede8er will look for the autoplay folder and if found it will automatically play the contents o...

Страница 31: ...elect the NFS tab on the Media Library screen To Add Modify or Delete a NFS shortcut press the Menu button and the Menu screen will open Select Add NFS Client and a ADD nfs Dialogue screen will open F...

Страница 32: ...Page31...

Страница 33: ...711 2667501 Email sales mede8er com Sanji Electronics Pty Ltd 106 16th Rd Midrand Gauteng South Africa www mede8erforum com For more information or support please visit www mede8er eu support or call...

Отзывы: