background image

TV OUTPUT SETTINGS

Connect the Mede8er to your TV by one of the connection options as shown on page 6 & 7 and change the 
input option on your TV to match the option you selected. If you do not get to see the Mede8er GUI on your 
TV you will need to toggle the Mede8er TV output until you get a picture

.

TV SYS Toggle Procedure

The Mede8er has three video output options ie Composite Video 
(yellow RCA connectors, Component Video (Red - Green- Blue 
connectors) and HDMI. Each output option also offers different 
screen resolution settings and these will need to be adjusted to 
match the type of TV used.  

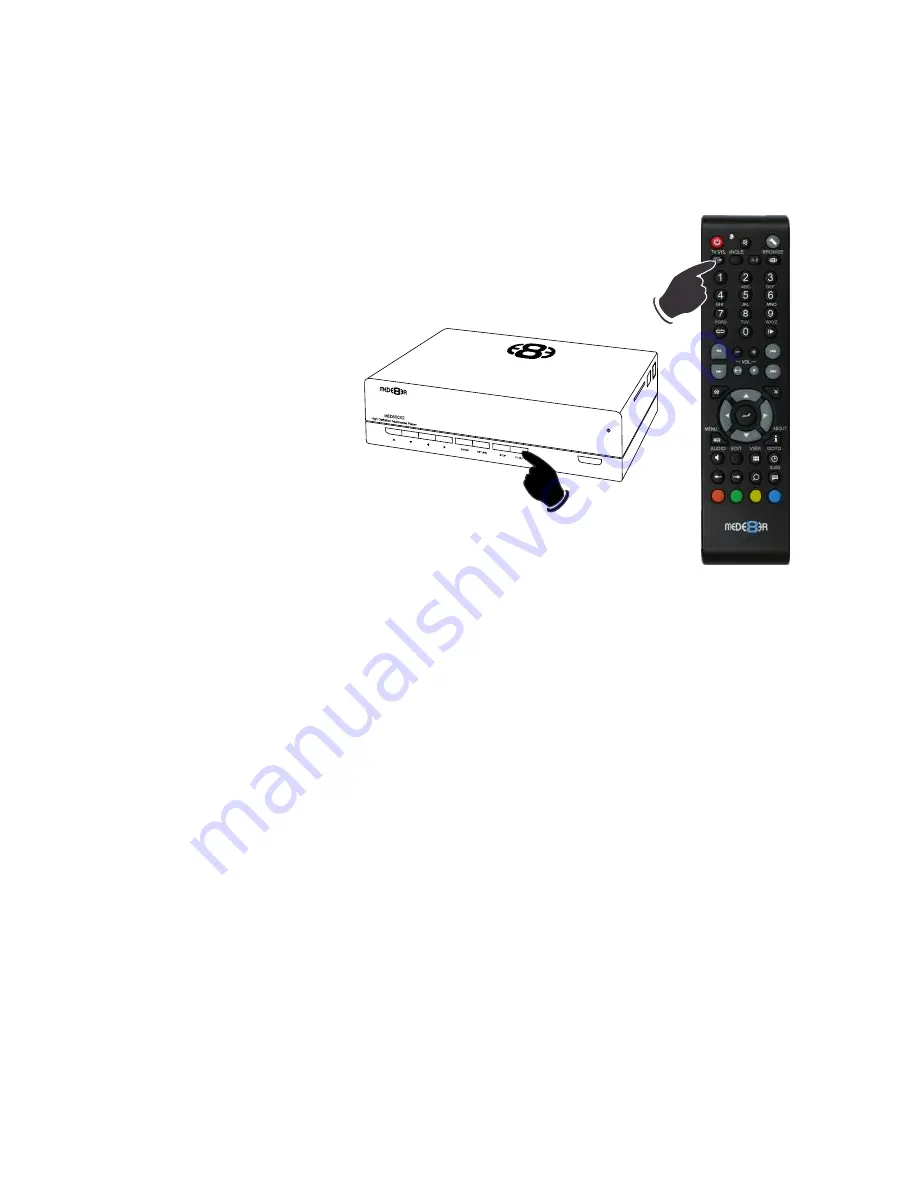
To change the Video Output on the 
Mede8er just press the TV SYS 
button on the remote and it will 
change the Video Output to the 
next available output option. If after 
pressing the TV SYS button you still 
do not get a picture then after a 
short pause press the TV SYS 
again until you see the Mede8er GUI on 
your TV. Keep repeating this procedure until you 
see a picture on your TV. 

AUDIO SETTINGS

Surround Sound 

Select “Don’t Care” if you are using 2 CH stereo.  If you are using SPDIF or Co-Axial Digital then 
select “AC3". If you are using HDMI Audio to Aamplifier then select “True HD”   

HDMI Downmix (2 channel)

Use this setting if you are connecting the Mede8er directly to the HDMI input on your TV. The 
sound will be downmixed to 2 channel stereo. 

HDMI Passthrough

Use this setting if you are connecting to the HDMI input of a Home Theatre Amplifier. The audio will be 
passed through as Bitstream or LPCM and the amplifier will do the multichannel decoding.  

HDMI LPCM MULTI CH


Use this setting for content that has a 6 channel AAC soundtrack.   

SPDIF Downmix (2 channel)

Use this setting to connect to a Amplifier via Toslink optical cable or Co-Axial Digital RCA cable. 
The sound will be downmixed to 2 channel stereo.  

SPDIF Passthrough 

Use this setting to connect to amplifier via Toslink optical cable or Co-Axial Digital RCA cable. 
The sound will be passed through as Bitstream or LPCM and the amplifier will do the 
multichannel decoding.

Once you see the Mede8er GUI on your TV then you must enter the Video Setup 
mode and adjust the Video settings to match the screen size resolution of your 
TV.

Page7

Содержание MED450X2

Страница 1: ...High Definition Multimedia Player MED500X2 User Manual Based on Firmware V2 0 0 21 November 2011 TM...

Страница 2: ...etwork Samba Server Wireless Network Setup Firmware Update Web Browser Home Page Media Library Media Library Continued Media Library Metadata Display Adding Custom Backdrops Skins XML Search Jukebox X...

Страница 3: ...ion of the product and to protect it from overheating put the product in a position and location that will not interfere with its proper ventilation For example do not place the product on a bed sofa...

Страница 4: ...OVERVIEW Component Video Out DC 12Volt 2 Amp input RJ45 Lan connector Coax Digital Audio Out Optical Audio Out Cooling Fan Composite Video Out Analogue Audio Out L R SD Card USB Host USB Slave Status...

Страница 5: ...ive with the four screws provided Check that the Hard Drive has the correct jumper setting Connect the hard drive power connector and the red SATA data connector from the player to the hard drive diag...

Страница 6: ...to stereo AUDIO IN L R VIDEO IN HDMI Coax Digital Connect LAN cable to router or switch Optical Digital HDMI RJ45 Network Coax Digital Toslink Connection to a TV or Amplifier For digital audio connect...

Страница 7: ...mains outlet and plug the DC Jack into the DC IN at the rear of the MED500X2 DO NOT USE ANY AC DC ADAPTER AND ONLY USE THE ONE SUPPLIED otherwise you may cause damage to the unit Press the On Off butt...

Страница 8: ...ound Sound Select Don t Care if you are using 2 CH stereo If you are using SPDIF or Co Axial Digital then select AC3 If you are using HDMI Audio to Aamplifier then select True HD HDMI Downmix 2 channe...

Страница 9: ...RNING FORMATTING THE HARD DRIVE WILL ERASE ALL DATA Formatting Page8 USB CONNECTION TO PC You can transfer files to and from the Mede8er via fast USB2 0 or USB3 0 transfer Use the included Blue USB ca...

Страница 10: ...Setup Functions Browser Functions Edit Functions Menu Edit A B Page9 Favourites Shortcut button Web Browser Toggle Scroll Bars Hyperlink select Web Browser Toggle Address Bar Start dBase Scan USB Key...

Страница 11: ...or either automatic or manual IP setup Follow the on screen instructions to complete the network setup If you connect to a wired Ethernet network using DHCP Mede8er automatically detects your network...

Страница 12: ...work and then select the My_Shortcuts icon Now press the Menu button and select Add New Shortcut option Fill in the fields User Name Password IP Address Host Machine and select OK NOTE In order to bro...

Страница 13: ...amba stop working for any reason we suggest you re boot the Mede8er ie Disconnect the DC Jack at the rear and re connect and press the on off button on the front panel You can browse your Mede8er in W...

Страница 14: ...hroughput with WEP or WPA2 PSK TKIP as the unicast cipher and your data rate will drop to 54 Mbps 802 11g which is normal Please try other encryption methods WPA PSK or choose to configure an unsecure...

Страница 15: ...ut Video Files and allow you other functionality such as search most viewed and recently added MUSIC DATABASE SEARCH HDD USB only The Music Database Search page will display all information about your...

Страница 16: ...can be accessed at any time by pressing the Home Page button on the remote The Home Page Strip will appear at the bottom of the page and allow you to make your selection using the Left Right Navigatio...

Страница 17: ...matically save the View of the folder when you change the View manually The next time you enter the same folder it will automatically change to the saved View Auto View mode requires that the X2 has w...

Страница 18: ...e next icon Repeat pressing the View button until the icon you require is selected and then wait and the X2 will automatically change the Media Library view to one one you have selected You can also u...

Страница 19: ...ge of the advanced functionality you will need to scan your movie collection with Y2M YAMJ to Mede8er or Thumbgen in order to create the required xml files Movie Rating stars out of 5 Movie rating x o...

Страница 20: ...store Default Background The skin option is community driven and we are expecting some unique designs to become available and these will be available for download from the Mede8er forum and website To...

Страница 21: ...y you must focus on the Root Folder of your library and press the Menu button and then select the Scan Folder option The X2 will start the scan process and Scan all folders and sub folders in order to...

Страница 22: ...tered by Latest ie the date you added the movie to your collection or in Alphabetic order This is a global setting and will be stored in memory After selecting this option you must then do a XML Searc...

Страница 23: ...he Music Album Folder and the X2 will use it if it does not find any embedded art in the music files Suggested size of the embedded art is 250 x 250pixels OFF Repeat and Shuffle off Repeat Track Repea...

Страница 24: ...be ready to go You can easily download DVD cover art for your picture or you can use the free program like YAMJ to Mede8er to make your folder jpg and about jpg pictures that will contain additional...

Страница 25: ...video WATCHED INDICATOR Mede8er is equipped with a watched video indicator feature To enable this function go to Setup Misc Watched Indicator and switch it on Mede8er will mark the Video file with a...

Страница 26: ...Hard Drive is connected It is important to let the scanner complete the scan if you intend to use this function Progressive scans take less time than the original scan as only new information is adde...

Страница 27: ...he first time you must enter the default factory pin ie 0000 then the Pin Code change screen will open Now enter you new personal 4 digit code by pressing the numbers on your remote Once you have ente...

Страница 28: ...the folders contents in its normal native structure irrespective of the folder level depth You can also easily remove a Favourite Link at any time should you wish to do so Page27 Using the Favourites...

Страница 29: ...overs Locking and Unlocking Favourites To password protect a Favourite link just press the Menu button on the remote control and the Menu dialogue screen will open Select the Lock option and the link...

Страница 30: ...the Goto Screen will appear on the top of the screen Now press the Left Right Navigation button to select the function you require such as Time Title or Chapter Once the function is selected press the...

Страница 31: ...ide screen aspect videos on a 16 9 TV Zoom XY The Zoom XY allows you to stretch the picture horizontally and vertically independent of each other This zoom function is designed to correct videos encod...

Страница 32: ...s the Subtitle button on the remote during video play Subtitle Select Subtitle Position Subtitle Size Subtitle Time Sync Subtitle Language Subtitle Colour CUSTOM FONTS You can easily customize the GUI...

Страница 33: ...Media Library To Copy Delete Move or Rename a single file just focus on the file that you require to perform the action on and press the Edit button on the remote control Select the option you require...

Страница 34: ...ers on the left screen A that you want to perform the action on and press the Play Pause button to select and add the files to the File List B Once you have selected all the files you require then pre...

Страница 35: ...optimized for image thumbnail viewing The X2 supports full Slideshow functions and you must enable the Slideshow option in the Setup Menu You can now navigate your pictures as normal and zoom the ima...

Страница 36: ...ically play the contents of the autoplay folder The contents will be played with the Repeat All as default If a USB Drive is plugged into the Mede8er it will auto scan for the Autoplay folder and if f...

Страница 37: ...ing up NFS shortcuts on the Mede8er Select the NFS tab on the Media Library screen To Add Modify or Delete a NFS shortcut press the Menu button and the Menu screen will open Select Add NFS Client and...

Страница 38: ...ow navigate to the torrent file on your PC and then select Upload The torrent file will be uploaded to the Mede8er and a progress bar will be displayed on the Transmission screen b Manage Torrent Down...

Страница 39: ...utput settings Settings for 7 1 or 5 1 Surround Sound Set the Aspect Ratio size of the TV Set the Pixel Size Resolution Size of the TV 24HZ Frame Rate Enable this function if your TV supports 1080p 24...

Страница 40: ...mail sales mede8er com Sanji Electronics Pty Ltd 68 Kyalami Boulevard Kyalami Business Park Kyalami Gauteng South Africa www mede8erforum com For more information or support please visit www mede8er e...

Отзывы: