6
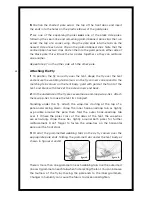
Position the shortest pole across the top of the front door, and insert
the ends into the holes on the plastic elbows of the gold poles.
7
Lay one of the equal-length poles
over
one of the black side poles,
following the seam line and remaining gold-ribboned pole clips that run
across the top of a corner wing. Plug the pole ends into the tabs on the
nearest side of each door. Clip on the gold-ribboned clips. Note that the
centre ribbon has two clips. Fasten them to the gold pole on either side of
the black pole: this will lock the two poles together so they can reinforce
one another.
Repeat Step 7 on the other side with the other pole.
Attaching the Fly
1
To position the fly correctly over the tent, drape the fly over the tent
and ensure the webbing tab colours on the fly corners correspond to the
matching tab colours on the tent body: gold with gold at the front of the
tent, and black with black at the side corners and back.
2
On the underside of the fly are several hook-and-loop wrap-ties. Attach
these wrap-ties to make the tent its strongest.
Standing under the fly, attach the wrap-ties starting at the top of a
pole and working down. Wrap the inner hook-and-loop tab as tightly
as possible around the pole, then fold the outer hook-and-loop tab
over it. Where the poles cross at the sides of the tent, the wrap-ties
are extra-long. Wrap these ties tightly around both poles for further
reinforcement. Don’t forget to fasten the wrap-ties on the horizontal
pole over the front door.
3
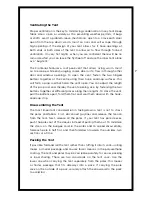
Fit all of the grommetted webbing tabs on the six fly corners over the
appropriate pole ends, folding the grommet tabs under the tent body as
shown in figures A and B.
There is more than one grommet on each webbing tab. Use the outermost
(loosest) grommet on each tab when first erecting the tent. You can increase
the tautness of the fly by moving the pole ends to the inner grommets.
Changes in humidity can cause the fabric to slacken and tighten.
figure A
figure B
Содержание Frontenac
Страница 10: ......


