background image

- 6 -

4.

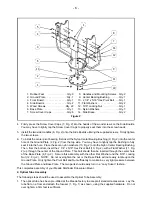
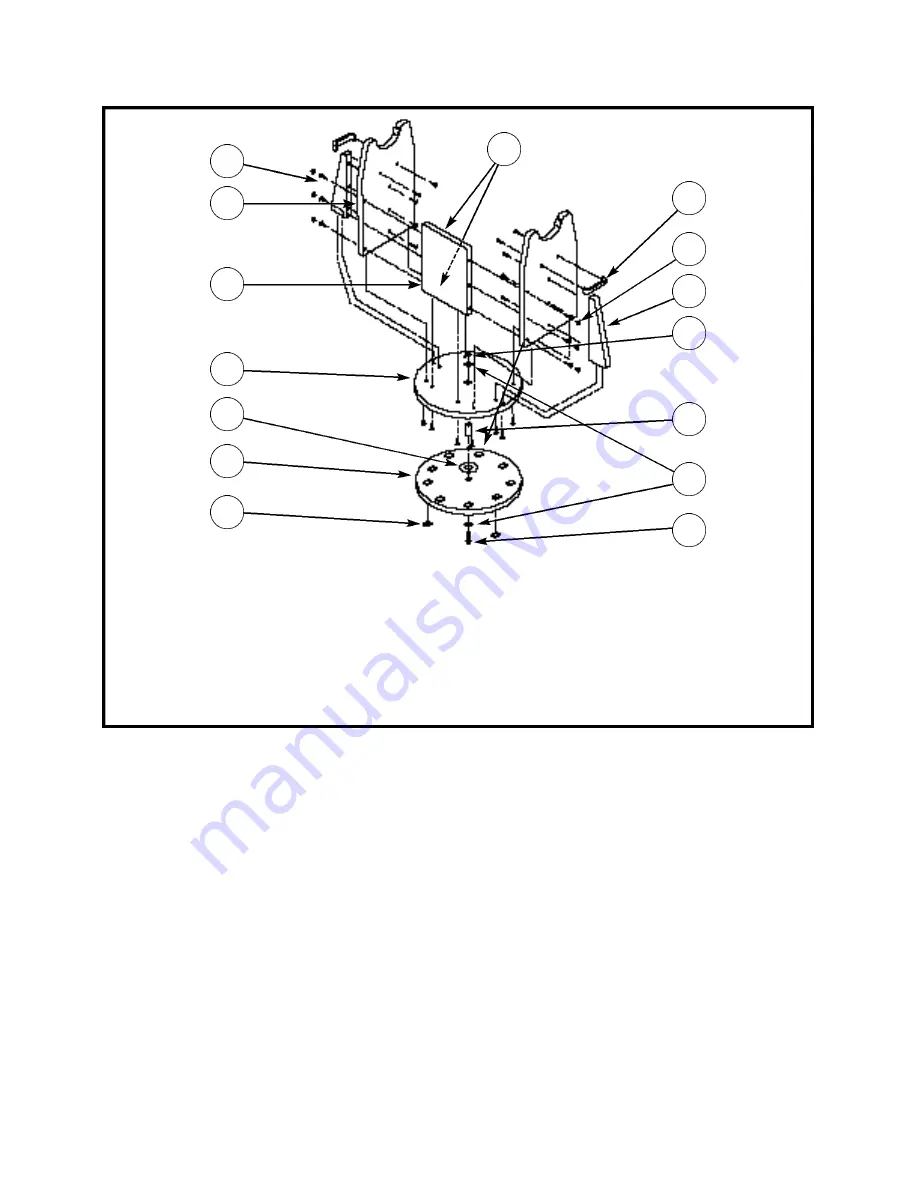
Firmly press the Screw Cover Caps (7, Fig. 2) into the heads of the wood screws on the Side Boards.
You may have to lightly tap the Screw Cover Caps to properly seat them into the screw heads.

5.

Install the two side Handles (8, Fig. 2) onto the Side Boards utilizing the supplied screws.  Firmly tighten
the two screws.

6.

To install the center pivot bearing, first insert the Nylon Center Bearing Bushing (9, Fig. 2) into the center
hole of the Ground Plate (2, Fig. 2) from the top side.  You may have to lightly tap the Bushing to fully
seat it into the hole.  Place the seven nylon washers (13, Fig. 2) onto the Nylon Center Bearing Bushing.
Then, from the bottom, insert the 2 1/4" x 5/16" Hex Pivot Bolt (10, Fig. 2), with a Flat Washer (11, Fig.
2) up through the center of the Ground Plate.  This bolt should then be inserted through the center hole
of the Base Plate (6, Fig. 2).  Secure this assembly with the other Flat Washer and the 5/16" Locking
Nut (12, Fig. 2).  NOTE:  Do not overtighten the nut or the Base Plate will not easily rotate upon the
Ground Plate.  Only tighten the Pivot Bolt and Nut sufficiently to maintain a very light pressure between
the Ground Plate and Base Plate.  The two parts should easily turn in a “Lazy Susan” fashion.

This completes assembly of your Meade Starfinder Dobsonian Mount.

2. Optical Tube Assembly

The following steps should be used to assemble the Optical Tube Assembly:

1.

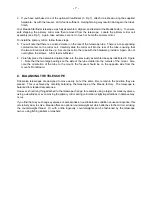
The optical tube has been pre-drilled at the Meade factory to accept all standard accessories.  Lay the
tube flat on a floor and attach the focuser (1, Fig. 1) as shown, using the supplied hardware.  Do not
over tighten; a firm feel is sufficient.

1. Rubber Feet  . . . . . . . . . . . . . . .Qty. 9
2. Ground Plate . . . . . . . . . . . . . . .Qty. 1
3. Front Board . . . . . . . . . . . . . . . .Qty. 1
4. Side Boards  . . . . . . . . . . . . . . .Qty. 2
5. Wood Screws  . . . . . . . . . . . . .Qty. 22
6. Base Plate  . . . . . . . . . . . . . . . .Qty. 1
7. Screw Cover Caps  . . . . . . . . . .Qty. 6

8. Handles and Mounting Screws  .Qty. 2
9.  Center Bearing Bushing . . . . . . .Qty. 1

10. 2 1/4" x 5/16" Hex Pivot Bolt  . . .Qty. 1
11. Flat Washers . . . . . . . . . . . . . . .Qty. 2
12. 5/16" Locking Nut  . . . . . . . . . . .Qty. 1
13. Nylon Washers  . . . . . . . . . . . . .Qty. 7
14. Side Brace  . . . . . . . . . . . . . . . .Qty. 2

Figure 2

1

2

3

6

13

4

5

11

1

8

14

7

10

12

9

Содержание Starfinder 16

Страница 1: ...Meade Instruments Corporation Instruction Manual 16 Meade Starfinder Dobsonian Telescope ...

Страница 2: ...pplies to the original purchaser only and is non transferable Meade products purchased outside North America are not included in this warranty but are covered under separate warranties issued by Meade international distributors RGA Number Required Prior to the return of any product or part a Return Goods Authorization RGA number must be obtained from Meade by writing or by calling 949 451 1450 Eac...

Страница 3: ...Optical Tube Assembly 6 C Balancing the Telescope 7 D Aligning the Viewfinder 8 E Collimation of the Optical System 8 F Tips On Using a Dobsonian Telescope 9 G Magnifying Power 10 H Seeing Conditions 10 I Observing Guidelines 11 J Care of Optics and Main Tube 11 K Optional Accessories 12 ...

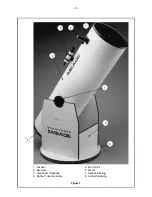
Страница 4: ... 4 1 2 6 8 5 4 3 7 1 Focuser 2 Eyepiece 3 Viewfinder Optional 4 Optical Tube Assembly 5 Mirror Cell 6 Mount 7 Altitude Bearing 8 Azimuth Bearing Figure 1 ...

Страница 5: ...Never touch its reflective surface or place the mirror where it could be damaged Save all original packing materials if it is ever necessary to ship the telescope these materials will help to assure that no shipping damage will occur B ASSEMBLY AND SET UP Assembly of your Meade Starfinder Dobsonian telescope should only take a few minutes and require simple hand tools A phillips screwdriver pliers...

Страница 6: ...nd the 5 16 Locking Nut 12 Fig 2 NOTE Do not overtighten the nut or the Base Plate will not easily rotate upon the Ground Plate Only tighten the Pivot Bolt and Nut sufficiently to maintain a very light pressure between the Ground Plate and Base Plate The two parts should easily turn in a Lazy Susan fashion This completes assembly of your Meade Starfinder Dobsonian Mount 2 Optical Tube Assembly The...

Страница 7: ...ssembled optical tube into the previously assembled base as illustrated in Figure 1 Note that the two large bearings on the side of the tube cradle into the cutouts of the mount Also note the orientation of the tube to the mount the focuser should be on the opposite side from the mount s Front Board C BALANCING THE TELESCOPE Dobsonian telescopes are designed to move easily but at the same time rem...

Страница 8: ...rs of the viewfinder are precisely centered on the object already centered in the main telescope With this collimation accomplished objects located first in the wide field viewfinder will then be centered in the main telescope s field of view E COLLIMATION OF THE OPTICAL SYSTEM Precise collimation or alignment of your telescope s optical system is essential for good performance All Meade telescope...

Страница 9: ...e the telescope in the proper direction This may take a little practice at first but you ll soon get the hang of it 2 If the diagonal mirror is not centered within the circle formed by the bottom edge of the focuser drawtube rotate the diagonal mirror holder about its support bolt When the mirror is centered tighten the lock nuts 7 Fig 3 on the long bolt against the central hub of the 4 vane syste...

Страница 10: ...r power the atmospheric steadiness is not sufficient to support high powers at the time you are observing Keep in mind that a bright clearly resolved but smaller image will show far more detail than a dimmer poorly resolved larger image Because of certain characteristics of the human eye in particular eye pupil diameter and because of optical considerations inherent in the design of the telescope ...

Страница 11: ...pe is an acquired skill Celestial observing will become increasingly rewarding as your eye becomes better trained to the detection of subtle nuances of resolution J CARE OF OPTICS AND MAIN TUBE With the reasonable care due any fine instrument your Meade telescope will last a lifetime If the eyepieces become dirty try cleaning them with a camel s hair brush or compressed air If you must wipe the su...

Страница 12: ...f any given eyepiece The Telenegative Amplifier is inserted into the focuser and accepts all standard 1 25 O D eyepieces It is available in either 2X power or 2X 3X variable power Filters Thirteen color filters are available for significantly increased contrast and resolution of detail on the Moon and planets For example the 80A blue filter effectively enhances the reddish colored detail on the su...

Страница 13: ... 13 NOTES ...

Страница 14: ... 14 NOTES ...

Страница 15: ......

Страница 16: ...Ver 0899 Part no 14 0218 16 Meade Instruments Corporation 6001 OAK CANYON IRVINE CALIFORNIA 92618 5200 U S A 949 451 1450 FAX 949 451 1460 www meade com ...

Отзывы: