Instruction Manual
10", 12", 14” RCX400
™
Advanced Ritchey-Chrétien Telescopes
with AutoStar II
®
Hand Controller and Digital Front Focus
MEADE.COM
Страница 1: ...Instruction Manual 10 12 14 RCX400 Advanced Ritchey Chr tien Telescopes with AutoStar II Hand Controller and Digital Front Focus MEADE COM...
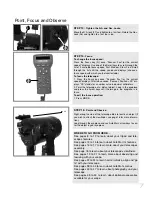
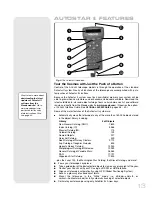
Страница 2: ...list of 4 available focus speeds Fast Medium Slow Fine Scroll through the list until the speed you desire displays Choose a focus speed with which you feel comfortable To focus the telescope 1 Press...
Страница 3: ...raphy 45 Optional Accessories 48 Maintenance 51 Collimation 51 Specifications 54 Appendix A Equatorial Polar Alignment 57 Appendix B Latitude Chart 62 Appendix C How to Create Your Own Guided Tour 63...
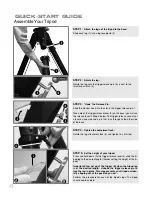
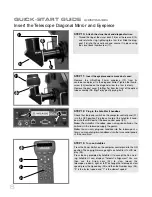
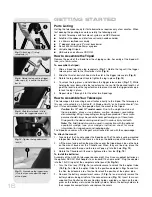
Страница 4: ...r on one side and a pin that runs through to the other side of the base STEP 4 Tighten the adjustment lock Rotate the leg attachment lock 6 and tighten to a firm feel STEP 5 Set the height of your tri...
Страница 5: ...es backwards or mix new and used batteries Do not mix battery types If these precautions are not followed batteries may explode catch fire or leak Improperly installed batteries void your Meade warran...
Страница 6: ...the power switch on the computer control panel 21 is in the OFF position Plug the coil cord of the AutoStar II hand box into the HBX port of the base control panel 22 Note The AutoStar II handbox does...
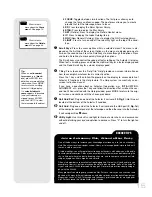
Страница 7: ...s until the image in the eyepiece is in focus To exit the focus operation 1 Press MODE STEP 16 Point and Observe Sight along the side of the telescope tube to locate an object if you wish to attach th...
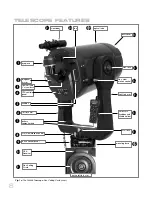
Страница 8: ...or rear cell and 2 visual back OTA control panel left fork arm battery compartments R A slow motion control Base control panel GPS Receiver Dec Setting Circle mounting base R A lock AutoStar II handbo...
Страница 9: ...r bar mechanism Off On USB Port AUX port 12vDC In 12vDC Out HBX port Serial port T handle 2 2 viewfinder objective lens 2 2 2 2 2 2 tripod legs 3 3 3 A C USB Ports H Serial port J Autoguider port K B...
Страница 10: ...This port may be turned on or off with the Aux Port Power option in the Utilities menu On is the default value D USB 2 0 High Speed Port Provides a connection for a USB 2 0 device This port is typica...
Страница 11: ...connection for future Meade acces sories 1 GPS Receiver Receives information transmitted from Global Positioning System satellites See page 25 for more information 1 Declination Dec Setting Circle on...
Страница 12: ...nder A low power wide field sighting scope with crosshairs that enables easy centering of objects in the telescope eyepiece 2 Viewfinder Objective Lens Gathers the light for the viewfinder 2 Viewfinde...
Страница 13: ...alog M 110 Caldwell Catalog 109 Named Objects 227 Herschel Catalog 400 Abell Catalog of Galaxy Clusters 2 712 Arp Catalog of Irregular Galaxies 645 Uppsala Galaxy Catalog 12 940 Morphological Catalog...
Страница 14: ...MODE again to return to the previous menu e GO TO Key Press to slew move the telescope to the coordinates of the cur rently selected object While the telescope is slewing the operation may be abort e...
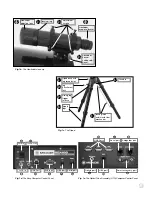
Страница 15: ...ar II handbox 1 Coil Cord Plug one end of the Autostar II coil cord into the HBX port F Fig 1d of the computer control panel of the telescope and the other end into the Autostar II coil cord port See...
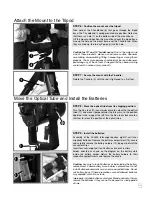
Страница 16: ...rning could result in serious injury or death Note The field tripod also can be used in conjunction with the optional equatorial wedge see your wedge s instruction sheet for more information for long...
Страница 17: ...a firm feel Slide the AutoStar II handbox into the holder 16 Fig 17a You may also snap the handbox into the holder Slide one side of the handbox into the holder and then firmly press the other side of...
Страница 18: ...ook through the viewfinder eyepiece and loosen or tighten as appropriate one or more of the viewfinder adjustment screws see Fig 23 until the viewfinder crosshairs are precisely centered on the object...
Страница 19: ...focus the telescope eyepiece and to control the speed at which you focus J Press the Focus key again to set and adjust up to nine focus presets To change the focus speed 1 Press the Focus key once Foc...
Страница 20: ...one of the presets and refocus your telescope using the Sync On menu Then AutoStar II will then reset all the other presets back to the focus preset positions you previously defined 1 Press the Focus...
Страница 21: ...keys are now activated Press the Arrow keys 5 Fig 2 to slew move the telescope up down right or left 7 Press the Speed key Number key 1 and then a Number key 6 Fig 2 to change the telescope s slew spe...
Страница 22: ...menus You ll need to initialize and align your telescope Moving Through Autostar II s Menus The Autostar II database is organized in levels for quick and easy navigation J Press ENTER 2 Fig 2 to go de...
Страница 23: ...to move the telescope you can change speed at which the telescope moves see SLEW SPEEDS page 21 for more information until the star is vis ible and centered in the eyepiece The alignment star should b...
Страница 24: ...ar II then automatically moves the telescope so that it tracks Saturn or whatever other object you may have chosen i e Saturn remains cen tered in the eyepiece Using the Guided Tour The Guided Tour fe...
Страница 25: ...evel and solid it must have a minimum of three legs Autostar II makes gravitational measurements to make a precise deter mination of true level Finding True North Locating True North is one of the mos...
Страница 26: ...the following exercise cal culates Sunset time so an evening observing session can be planned To Calculate Sunset time 1 Press the MODE key several times until Select Item Object is displayed 2 Press...
Страница 27: ...key again Select Item Date displays Autostar II will now display all the choices that are available with the Setup menu 7 Continue to press the Scroll Down key until Setup Owner Info displays 8 Press...
Страница 28: ...al Site Select Add Delete Edit Owner Info Clone Download Statistics Reset Select Item Event Select Item Guided Tour Select Item Glossary Select Item Utilities Select Item Setup Tonight s Best How Far...
Страница 29: ...y using the Autostar II hot keys Caldwell key 2 Messier catalog 3 Solar System 5 IC 8 and NGC 9 To slew the telescope to catalog objects Enter the catalog number of the object using the Number keys an...
Страница 30: ...tion on upcoming meteor showers such as the Perseids the Leonids etc Also lists the dates of the showers and when they reach maximum Note Meteors are fast moving objects that cover large areas of the...
Страница 31: ...mer press ENTER then choose Set or Start Stop J Set Enter the time to be counted down in hours minutes and seconds then press ENTER J Start Stop Activates the timer set previously Use the Scroll keys...
Страница 32: ...o return the previ ously calibrated home position In other words the telescope is fully aligned accord ing to the setting that were stored in Autostar II s memory during the Calibrate Home procedure S...
Страница 33: ...ed telescopes only After aligning your tel escope select this menu and power down the telescope The alignment set tings level North time alignment stars are stored in Autostar II s memory and are reme...
Страница 34: ...pe set Dec circle to 0 point the optical tube to True North and point the control panel on the base to South during alignment The default setting for this menu is On See Figs 32 and 33 J GPS Alignment...
Страница 35: ...are This is useful if one user has downloaded a new version of Autostar II software from the Meade website www meade com and wants to pass this software along to friends J All Everything user defined...
Страница 36: ...to select this menu directly from Autostar II s keypad Reticle Control Set Intensity displays Press ENTER The Intensity menu allows you to change the intensity of the Reticle Eyepiece Illuminator Use...
Страница 37: ...You will need to know the latitude and longitude of your location to perform this pro cedure 1 Using the Add option choose a site on the list that is closest to your observing site and press ENTER so...
Страница 38: ...Use the Arrow keys as previously described to enter the name of the object you wish to add to the database When you are finished press ENTER 6 Right Asc 00 00 0 displays Use the Number keys to enter...
Страница 39: ...object Satellite orbits change and new satellites including the Space Shuttle are launched Visit the Meade website www meade com approximately once a month to get updated information and instructions...
Страница 40: ...TO to slew the telescope to the landmark 4 Press MODE to exit To perform a Landmark Survey This procedure allows you to perform a tour of the objects entered in the Object Landmark menu option note th...
Страница 41: ...ers displays Press ENTER 3 Edit Parameters Largest mins displays Mins stands for arc minutes Press ENTER 4 Largest mins and a value displays Using the Number keys enter a size in arc minutes Autostar...
Страница 42: ...first verify that INITIALIZE AUTOSTAR II above has been performed How to perform the Easy Align Procedure 1 Alignment Option Screen Following initialization Align Automatic displays 2 Select Alignment...
Страница 43: ...B cable Plug one end into one of the RCX400 USB ports on a computer control panel Plug the other end into a USB port of your PC Next you will install the Autostar Suite software from the CD ROM This s...
Страница 44: ...he Train option overwrites any previous PEC data 1 Select Train from the Dec PEC menu in the Setup Telescope menu and press ENTER 2 Look through the reticle Use the Arrow keys to keep the star centere...
Страница 45: ...r the telescope At an effective focal length of 2000mm or more even small external vibrations can easily ruin an otherwise good photo For best results in photographing celestial objects a wedge and On...
Страница 46: ...d of time Rechargeable Lithium batteries provide power for a longer period than non rechargeable batteries If practical use an AC adapter Avoid short focus eyepieces They present many difficulties for...
Страница 47: ...your own Guided Tours Advanced Image Processing Software including Unsharp Masking Convolution Filtering and many other features Control all AutoStar functions from your PC Talking Telescope software...
Страница 48: ...cations and in Neutral Density as a lunar glare reduction filter Fig 39 Series 5000 5 Element Plossl Eyepieces Fig 40 Series 5000 Super Wide Angle Eyepieces Fig 41 Series 5000 Ultra Wide Angle Eyepie...
Страница 49: ...ns of prime focus photography through all Meade Schmidt Cassegrain models Thread the T Adapter on to the rear cell of your telescope followed by a T Mount for your 35mm camera and the camera body is r...
Страница 50: ...o the eyepiece holder or flip mirror Includes variable LED illumina tion control and batteries Astrometric Eyepiece A high precision 3 element achromatic eyepiece for a wide range of astronomical meas...
Страница 51: ...in the warm indoor air so that the wet optical surfaces can dry unat tended f If your RCX400 is not to be used for an extended period perhaps for one month or more it is advisable to remove the batte...
Страница 52: ...likely need to press more than one Arrow key c You will notice that the star image will move across the field of view of the eye piece If while using the Arrow key the defocused star image moves out o...
Страница 53: ...ve engaged the R A lock and that the power switch on the control panel is on Meade Customer Service If you have a question concerning your RCX400 contact the Meade Instruments Customer Service Departm...
Страница 54: ...nsitivity magnetic declination compensation True level and North electronic sensors 12 f 8 RCX400 Specifications Optical design Advanced Ritchey Chr tien Clear aperture 305mm 12 Focal length 2438mm Fo...
Страница 55: ...nction multi port panels Temperature Control Thermal stabilization fan internal dew heater Alignment Altazimuth or equatorial w optional wedge Pointing Precision 2 arc minutes in GO TO mode Slew Speed...
Страница 56: ...mory 4 MB reloadable Database 180 000 objects Drive Control Smart Mount plus 185 speeds on both axes Autostar II Handbox Specifications Keypad 20 key alphanumeric Display 2 line 16 character LCD Backl...
Страница 57: ...units of hours hr minutes min and seconds sec on a 24 hour clock similar to how Earth s time zones are determined by longitude lines The zero line was arbitrarily chosen to pass through the constella...
Страница 58: ...try searching the adjacent sky area Keep in mind that with the 24mm eyepiece the field of view of the RCX400 is about 0 75 Because of its much wider field the viewfinder may be of significant assistan...
Страница 59: ...star II now prompts you to set the telescope in the polar home posi tion a Using the bubble level of the wedge adjust the tripod legs so that the bubble is level b Set the wedge to your observing lati...
Страница 60: ...s procedure partic ularly if the pole star is not visible sometimes better known as the Drift method 1 Obtain a rough polar alignment as described earlier Place the illuminated reticle eyepiece or eye...
Страница 61: ...der to select any of Autostar II s three polar alignment options you must first select Polar in the Mount option of the Setup Telescope menu Surf the Web One of the most exciting resources for astrono...
Страница 62: ...York New York 41 N Oklahoma City Oklahoma 35 N Ottawa Ontario 45 N Philadelphia Pennsylvania 40 N Phoenix Arizona 33 N Portland Oregon 46 N Salt Lake City Utah 41 N San Antonio Texas 29 N San Diego C...
Страница 63: ...by enter ing the object s R A and Dec coordinates The tour is presented in one of two modes Automatic Mode The title of an object appears on first line and descriptive text scrolls on line 2 Interact...
Страница 64: ...nd description USER ra dec title string description string This command line allows you to access a specific object with your own description Enter USER then the R A and Dec of a desired object and it...
Страница 65: ...tour proceeds on to the next object DEEP SKY name Enter DEEP SKY followed by the name of the desired object in quotes For example DEEP SKY Small Magellanic Cloud CONSTELLATION name Enter CONSTELLATIO...
Страница 66: ...dents would have to manually slew to the last two objects He would then place AUTO SLEW ON before his first required object and AUTO SLEW OFF after the fourth object END To end a tour type the command...
Страница 67: ...the briefest introduction to astron omy If you are interested in pursuing further studies in astronomy a few topics are suggested below that are worth reading up on Try looking up some of these in th...
Страница 68: ...GO TO The telescope slews to the Moon 5 With Moon Overview on Autostar II s display use the Scroll keys to browse through the menus options Five categories of features are available Landing Sites Crat...
Страница 69: ...aining Smart Mount Once training has been completed you will save your model Autostar II allows you to save several models under different names This allows you to for example save one model for a hea...
Страница 70: ...l further refine the pointing of your telescope Save your model after running in update mode otherwise the update will be lost when the telescope is powered off On Load a model from memory see SAVE AS...
Страница 71: ...ssary menu provides an alphabetical listing of definitions and descriptions of common astronomical terms Access directly through the Glossary menu or through hypertext words embedded in Autostar II Se...
Страница 72: ...e size of a house The major division in Saturn s rings called the Cassini Division is easily visible through the RCX400 Titan the largest of Saturn s moons can also be seen as a bright star like objec...
Страница 73: ......
Страница 74: ...product or part a Return Goods Authorization RGA number must be obtained from Meade by writing or calling 949 451 1450 Each returned part or product must include a written statement detailing the natu...