


page 4
STEP 4.)
Attach front rail (K) to the crib.
K. Front Rail
A
A
A
* As your child grows, it is important to lower the
mattress support.
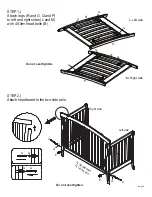
STEP 3.)
Swing out four hangers at corner of the spring frame (U) carefully to avoid scratching the crib finish.
Attach spring frame
FLAT SIDE UP
. Choose the height of the spring frame. Start at the highest level
and adjust accordingly.
Bolt the spring frame (U) to headboards using Allen head bolts (C), washers (F), lock washers (G) and
Allen wrench (H). As the child grows, it is important to lower the spring.
Make sure the spring frame is level.
Do not overtighten.
U.
Spring frame
G
A
A
G
G
G
G
G
A
F
U
G
C


