background image

www.themdsports.com

SOC054_098E

9

(Continúa en la página siguiente.)

(Continued on the next page.)

Español

English

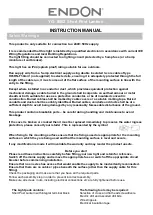
Note: Do NOT tighten Bolt (#35) until FIG. 7.

/ Nota: NO el pestillo (#35) hasta FIG. 7.

Wall / Pared

X 2

P1

X 8

P5

X 1

15

FIG. 6

X 8

32

X 8

35

X 4

14

X 8

37

X 2

2

32

14

P1

2

5

6

2

37

35

6

5

2

P5

Содержание SOC054 098E

Страница 1: ...DO NOT RETURN TO THE STORE Toll Free 877 472 4296 For additional resources and Frequently Asked Questions please visit us at themdsports com ATENCI N Contacto MD Sports Servicio al Cliente NO DEVOLVER...

Страница 2: ...de da os por uso inapropiado alteraci n mal uso abuso da o accidental o negligencia Esta garant a limitada le otorga derechos legales espec ficos y es posible que tenga otros derechos que var an de es...

Страница 3: ...mblaje sin embargo fije un torque bajo y tome una extrema precauci n WARNING Adult Assembly Required WARNING ADVERTENCIA El ensamblaje debe ser realizado por un adulto PELIGRO DE ASFIXIA Este art culo...

Страница 4: ...ce Refuerzo de soporte 26 x2 Playfield Superficie de juego 27 x1 28 29 Handle Mango x8 30 31 17 x2 x16 Side Apron Panel lateral End Apron Panel del fondo Goal Box Bottom Arco Parte inferior Goal End B...

Страница 5: ...orte o rasgue cuidadosamente las cuatro esquinas de la caja para que pueda utilizar la parte inferior de la caja como superficie de trabajo 1 Find a clean level place to begin the assembly of your pro...

Страница 6: ...s los tornillos en este paso X 2 1 X 8 33 X 2 P2 FIG 2 X 2 12 X 2 11 X 6 14 X 24 32 FIG 1 12 11 14 32 32 11 1 33 33 P2 1 FIG 1 Assembly Ensamblaje FIG 1 Note Drive in 4x45mm Screws 33 to secure the co...

Страница 7: ...ed on the next page Espa ol English X 4 31 X 1 4 FIG 3 31 4 1 1 4 1 1 Note Slide the Playfield 4 with the graphics facing down into the grooves of the Side Aprons 1 Nota Deslice el Campo del juego 4 c...

Страница 8: ...www themdsports com SOC054_098E 7 Contin a en la p gina siguiente Continued on the next page Espa ol English X 8 X 2 14 X 2 3 32 X 4 31 FIG 4 3 3 31 31 14 32...

Страница 9: ...legs into a V configuration with the Nuts on the inside of the V Nota Pleque las piernas a la configuraci n V con las Tuercas en el lado interno de la V Note Apply the Glue 13 into the grooves of the...

Страница 10: ...n la p gina siguiente Continued on the next page Espa ol English Note Do NOT tighten Bolt 35 until FIG 7 Nota NO el pestillo 35 hasta FIG 7 Wall Pared X 2 P1 X 8 P5 X 1 15 FIG 6 X 8 32 X 8 35 X 4 14 X...

Страница 11: ...ina siguiente Continued on the next page Espa ol English Note Tighten bolts at this step Nota Apriete los cerrojos en este paso FIG 6 Assembly Ensamblaje FIG 6 X 8 P5 X 1 15 FIG 7 X 8 37 X 8 35 X 4 P3...

Страница 12: ...ABINETE DO NOT HOLD THE TABLE BY THE LEGS NO SOSTENER LA MESA POR LAS PATAS CAUTION Two strong adults are recommended to turn over the table as shown 1 Lift the table off the ground 2 Turn the table o...

Страница 13: ...ntin a en la p gina siguiente Continued on the next page Espa ol English FIG 10 X 2 40 Note Tear off the backside papers underneath the Playfield Ramps Nota Remover los papeles traseros debajo de las...

Страница 14: ...ole EI agujero The Hole EI agujero 20 20 19 19 19 19 28 27 18 18 Note Hole at the end of Rod designates handle location See Arrow Location Below Nota Agujero en el final de Barra se designa la posici...

Страница 15: ...are at each end of the Player Rods before adding Players Nota Haga seguro que 1 B mper de Barra y 1 Arandela de Barra est n en cada final de las Barras de Jugador antes de agregar Jugadores Note Play...

Страница 16: ...13 X 2 16 X 2 10 X 8 30 X 4 33 X 2 36 X 8 29 X 2 9 YOU ARE NOW READY TO PLAY USTED ESTA AHORA LISTO PARA JUGAR Inside Interior 9 10 36 Outside Exterior 30 33 16 29 Note The goalie should be at the le...

Отзывы: