background image


863-669 

© Firma WJG, Braunschweig. Nachdruck oder Vervielfältigung  nur mit ausdrücklicher Genehmigung 

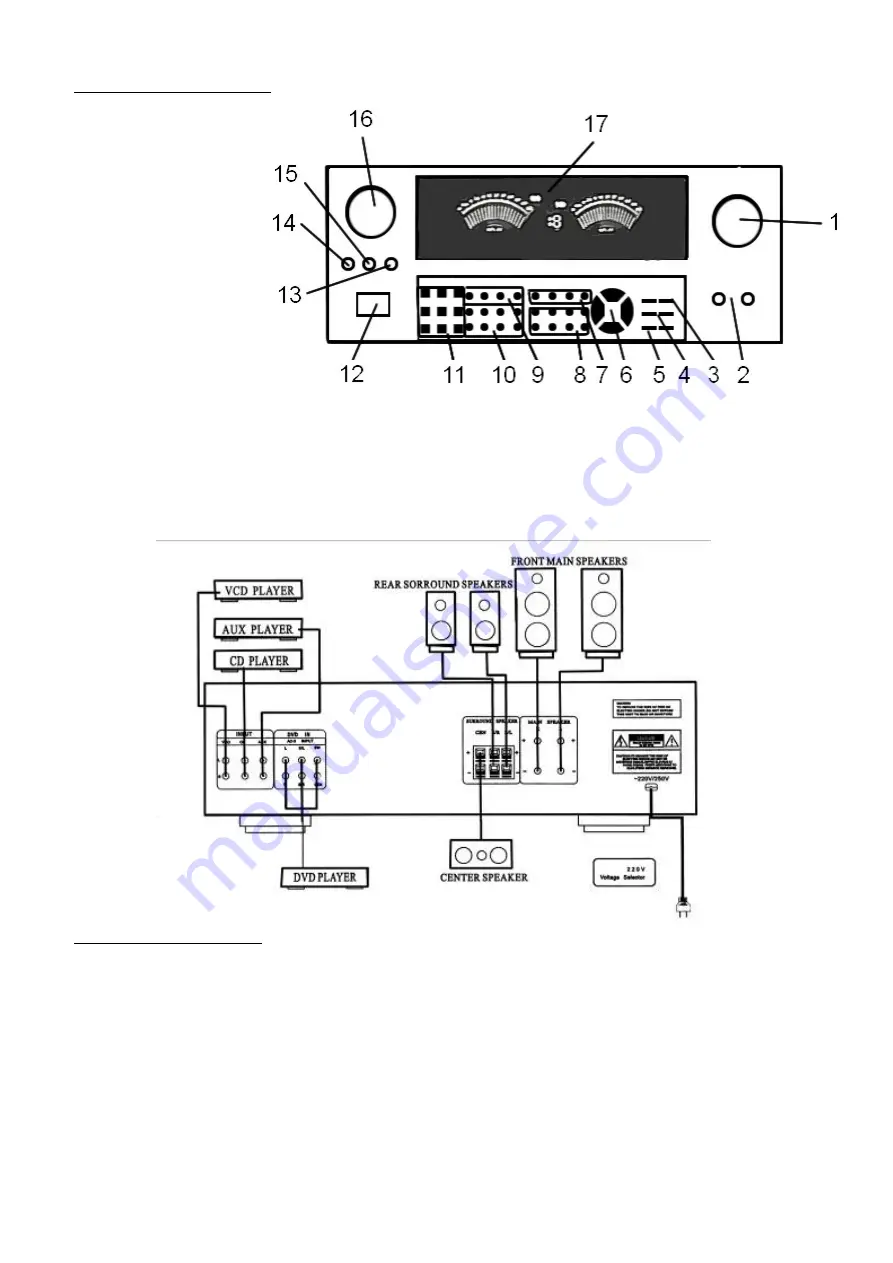
Connectors and Operators 

 
      Frontside: 


1. Volumeknob 

2. Microphoneplugs 

3 .Bass-Adjust 
4 .Treble-Adjust 

5. Balance-Adjust 

6. Input-Selector 

7. Echo-/Delay-Adjust 

8. VFD-Switches 

9. Modeswitch 
    2-channel/3-channel/5-channel 

10. Separate-Volume 

12. DSP-Switches 

13. Power ON Knob 

14. Speech 
15. Auto 

16. Muting 

18. Microphone-Volume 


Rearside: 
 

Loudspeaker  

Connection Figure 1 


230V 

                                                                                                                                              AC-Cord 


Loudspeaker-Connection 


Make sure that you have left (L) and right (R) channels correctly connected. 


Also take care of the right polarity and follow the (+) and (-) label on the unit. 


Do not let the bare speaker wires touch each other or any other metal part, 

      as these could damage the Amplifier. 


When using 2 speaker-systems, the impedance shold not be lower than 8 ohm for each system. 


Otherwise the amplifier may be damaged under high power and long term operation. 


To connect the speakers follow the figure 1 and 2 to operate in the right way. 


Содержание AMP-400SI

Страница 1: ...heitshinweise Bringen Sie das Ger t nicht mit Wasser oder Feuchtigkeit in Verbindung Vermeiden Sie einen Aufstellort mit Staub oder extremer Hitze Decken Sie die K hlschlitze im Geh use nicht ab und s...

Страница 2: ...Stellen Sie sicher dass der Anschluss der linken Boxen L und der rechten Boxen R folgerichtig ausgef hrt ist Ebenso achten Sie auf die richtige Polung der Boxen Anschl sse und um ein gutes Klangergeb...

Страница 3: ...funktionen w hrend des Betriebes diese sind mit den VFD Tasten 8 anw hlbar Wenn Sie einen DVD Player mit 5 1 Ausgang angeschlossen haben k nnen Sie mit den Modus Tasten 9 die gew nschte Raumklangversi...

Страница 4: ...bedienung zur Verf gung Die Funktionen die zus tzlich durch die Fernbedienung erm glicht werden sind hier erkl rt 1 Lautst rkeregler 2 Loudness hebt Bass und H hen bei kleiner Lautst rke an 3 Bassregl...

Страница 5: ...system near to water and humidity Avoid place the system to moisture or excessive heat or direct sun Take care for a good ventilation and do not cover the heat sink slots in the housing Connect the s...

Страница 6: ...phone Volume Rearside Loudspeaker Connection Figure 1 230V AC Cord Loudspeaker Connection Make sure that you have left L and right R channels correctly connected Also take care of the right polarity a...

Страница 7: ...DSP buttons 11 The display has various settings these settings can be choosen by pressing the VFD buttons 8 When you have connected a DVD Player with 5 1 Output you can choose the right mode by pressi...

Страница 8: ...controlled by the attached remote control therefore we explain The additional functions 1 Volume Adjust 2 Loudness raise Bass and Treble at low volume 3 Bass Adjust 4 Treble Adjust 5 Balance Adjust 6...

Отзывы: