


Page 16
For technical questions, please call 1-888-866-5797.
Item 64857
Sa
F
ety
Opera
ti
O
n
Maintenance
in
S
talla
ti
O
n
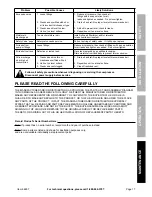
troubleshooting
problem
possible causes
likely Solutions
Compressor does
not start or restart
1� Tank(s) already pressurized�
2� Power cord not plugged
in properly�
3� Incorrect power supply�
4� No power at outlet�
5� Building power supply circuit
tripped or blown fuse�
6� Cord wire size is too small or
cord is too long to properly
power compressor�
7� Compressor needs service�
1� No problem� Compressor will start when needed�
2� Check that cord is plugged in securely�
3� Check that circuit matches compressor requirements�
4� Reset circuit breaker, or have outlet
serviced by a qualified technician�
5� Reset circuit or replace fuse� Check for low voltage
conditions� It may be necessary to disconnect
other electrical appliances from the circuit or
move the compressor to its own circuit�
6� Use larger diameter or shorter extension cord or
eliminate extension cord� See Recommended Wire
Gauge for Extension Cords in Safety section�
7� Have unit inspected by a qualified technician�
Compressor builds
pressure too slowly
1� Incorrect power supply�
2� Crankcase oil overfilled
or oil too thick�
3� Working environment too cold�
4� Safety valve leaking�
5� Loose fittings�
1� Check that circuit matches compressor requirements�
2� Drain oil and refill to proper level with recommended oil�
3� Move compressor to a warmer location�
Check that recommended oil is in crankcase�
4� Listen for air leaking from valve�
If leaking, replace with identical valve with same rating�
DO nOt Seal Or taMper WitH SaFety ValVe.
5� Reduce air pressure, then check all fittings
with a soap solution for air leaks and tighten
as needed� Do not overtighten�
Compressor not
building enough
air pressure
1� Air filter needs cleaning�
2� Check Valve needs service�
3� Compressor not large enough for
job�
4� Loose fittings�
5� Hose or hose connections
too narrow�
6� Crankcase oil too thick�
7� High altitude reducing air output�
1� Check air filter and clean as needed�
2� Have technician clean or replace, as needed�
3� Check if accessory CFM is met by Compressor�
If Compressor cannot supply enough
air flow (CFM), use a larger Compressor�
4� Reduce air pressure, then check all fittings
with a soap solution for air leaks and tighten
as needed� Do not overtighten�
5� Replace with wider hose and/or hose connections�
6� Drain oil and refill to proper level with recommended oil�
7� Higher altitudes require compressors with greater output�
Overheating
1� Air filter needs cleaning�
2� Crankcase oil too thin
or incorrect type�
3� Crankcase oil level too low�
4� Unusually dusty environment�
5� Extension cord used�
6� Unit not on level surface�
1� Check air filter and clean as needed�
2� Drain oil and refill to proper level with recommended oil�
3� Add oil to proper level, check for leaks�
4� Clean filter more often or move unit to cleaner environment�
5� Eliminate extension cord�
6� Reposition unit on a level surface�
Compressor
starts and stops
excessively
1� Loose fittings�
2� Compressor not large
enough for job�
1� Reduce air pressure, then check all fittings
with a soap solution for air leaks and tighten
as needed� Do not overtighten�
2� Check if accessory CFM is met by Compressor�
If Compressor cannot supply enough
air flow (CFM), use a larger Compressor�
Follow all safety precautions whenever diagnosing or servicing the compressor.
Disconnect power supply before service.