background image

English – 37

INTRODUCTION

Dear customer!

Congratulations on your choice to buy a Jonsered product!

Your purchase gives you access to professional help with repairs and service whenever this may be necessary. If the 
retailer who sells your machine is not one of our authorized dealers, ask for the address of your nearest servicing dealer.

It is our wish that you will be satisfied with your product and that it will be your companion for a long time. Think of this 
operator

s manual as a valuable document. By following its

 content (using, service, maintenance etc) the life span and 

the second-hand value of the machine can be extended. If you ever lend or sell this machine, make sure that the 
borrower or buyer gets the operator

s manual, so they will also know how to properly maintain and use it.

Good luck on using your Jonsered machine!

Jonsered has a policy of continuous product development and therefore reserves the right to modify the design and 
appearance of products without prior notice.

Содержание BC2235

Страница 1: ...Manuel d utilisation Operator s manual Lire attentivement et bien assimiler le manuel d utilisation avant d utiliser la machine Please read the operator s manual carefully and make sure you understand the instructions before using the machine ...

Страница 2: ... d un côté quand la lame heurte un objet fixe Ce phénomène est appelé rebond La lame peut amputer un bras ou une jambe Veiller à ce que les personnes et les animaux soient toujours à au moins 15 mètres de la machine Flèches indiquant les limites quant à l emplacement de la fixation de la poignée Toujours porter des gants de protection homologués Utiliser des bottes antidérapantes et stables Destin...

Страница 3: ...a débroussailleuse 15 Harnais standard 16 MANIPULATION DU CARBURANT Sécurité carburant 17 Carburant 17 Remplissage de carburant 18 DÉMARRAGE ET ARRÊT Contrôles avant la mise en marche 19 Démarrage et arrêt 19 TECHNIQUES DE TRAVAIL Méthodes de travail 21 ENTRETIEN Carburateur 26 Silencieux 27 Système de refroidissement 28 Renvoi d angle 28 Filtre à air 28 Bougie 29 Schéma d entretien 30 CARACTÉRIST...

Страница 4: ...pérons que cette machine vous donnera toute satisfaction et qu elle vous accompagnera pendant de longues années N oubliez pas que ce manuel d utilisation est important En suivant les instructions qu il contient utilisation révision entretien etc il est possible d allonger considérablement la durée de vie de la machine et d augmenter sa valeur sur le marché de l occasion En cas de vente de la machi...

Страница 5: ... Bouton d arrêt 9 Blocage de l accélération 10 Œillet de suspension 11 Capot de cylindre 12 Poignée de lanceur 13 Réservoir d essence 14 Commande de starter 15 Pompe à carburant 16 Carter de filtre à air 17 Réglage de poignée 18 Contre écrou 19 Bride de support 20 Bol de garde au sol 21 Toc d entraînement 22 Lame 23 Manuel d utilisation 24 Dispositif de protection pour le transport 25 Goupille d a...

Страница 6: ...amais moins de 15 mètres Effectuez une inspection générale de la machine avant de l utiliser voir le Calendrier de maintenance AVERTISSEMENT Cette machine génère un champ électromagnétique en fonctionnement Ce champ peut dans certaines circonstances perturber le fonctionnement d implants médicaux actifs ou passifs Pour réduire le risque de blessures graves ou mortelles les personnes portant des im...

Страница 7: ...pêcher toute accélération involontaire Une fois le cliquet A enfoncé dans la poignée en tenant celle ci la commande de l accélération B se trouve libérée Quand la poignée est relâchée la commande de l accélération et le cliquet reviennent en position initiale Ce retour en position initiale s effectue grâce à deux ressorts de rappel indépendants Cette position signifie que la commande d accélératio...

Страница 8: ...sateur et l équipement de coupe S assurer que la protection est intacte et qu elle ne présente pas de fissures Remplacer la protection si elle a subi des coups ou si elle présente des fissures Toujours utiliser la protection recommandée prévue pour l équipement de coupe en question Voir Caractéristiques techniques Système anti vibrations La machine est équipée d un système anti vibrations conçu po...

Страница 9: ...isque d incendie est important dans les pays au climat chaud et sec C est pourquoi nous avons équipé certains silencieux de grilles antiflamme Vérifier si le silencieux de la machine est muni d un tel dispositif En ce qui concerne le silencieux il importe de bien suivre les instructions de contrôle de maintenance et d entretien Ne jamais utiliser une machine dont le silencieux est défectueux Vérif...

Страница 10: ...on au risque d incendie AVERTISSEMENT L intérieur du silencieux contient des produits chimiques pouvant être cancérigènes Eviter tout contact avec ces éléments si le silencieux est endommagé AVERTISSEMENT N oubliez pas que Les gaz d échappement du moteur sont très chauds et peuvent contenir des étincelles pouvant provoquer un incendie Par conséquent ne jamais démarrer la machine dans un local clos...

Страница 11: ... mal affûtée augmente le risque de blocage et de rebond ainsi que d endommagement de la lame Inspecter l équipement de coupe afin de détecter d éventuels dommages ou fissures Toujours remplacer un équipement de coupe endommagé Affûtage des lames et couteaux à herbe Voir les instructions d affûtage sur l emballage de l équipement de coupe Les lames et couteaux s affûtent à l aide d une lime plate à...

Страница 12: ...us important lors de l utilisation d une tête de désherbage entièrement automatique N utiliser que l équipement de coupe recommandé Voir le chapitre Caractéristiques techniques En général les petites machines demandent des petites têtes de désherbage et vice versa Cela vient du fait que lors du désherbage au moyen de fils le moteur doit éjecter le fil radialement depuis la tête de désherbage tout ...

Страница 13: ... la protection combinée Lorsque une lame à herbe et la protection combinée sont utilisées le bouclier de protection doit toujours être déposé Insérer la rainure de guidage du bouclier de protection dans la gorge de la protection combinée Accrocher ensuite le bouclier à la protection combinée à l aide des quatre fixations rapides AVERTISSEMENT Lors du montage de l équipement de coupe il est de la p...

Страница 14: ...t du carter Insérer la goupille d arrêt C dans le trou afin de bloquer l axe Placer la lame D le bol de garde au sol E et la bride de support F sur l axe sortant Monter l écrou G Serrer l écrou au couple de serrage de 35 50 Nm 3 5 5 kpm Utiliser la clé à douille du jeu d outils Tenir le manche de la clé le plus près possible du protège lame Serrer l écrou en tournant la clé dans le sens de rotatio...

Страница 15: ...arter de protection la protection combinée A destiné e au travail avec la tête de désherbage les couteaux en plastique REMARQUE Veiller à ce que le bouclier de protection soit monté Emboîter le carter de protection la protection combinée A sur les deux crochets du support de tôle M Plier la protection autour du tube de transmission et serrer avec la vis L du côté opposé au tube de transmission Uti...

Страница 16: ... portée dans le harnais de manière à ce que l équipement de coupe penche légèrement vers l avant par rapport au sol Régler la hauteur à l aide de la courroie au niveau du crochet de suspension du harnais 2 Désherbage Pour le débroussaillage la machine doit être portée dans le harnais de manière à ce que l équipement de coupe soit parallèlle au sol Equilibre correct 1 Déblayage forestier Équilibrer...

Страница 17: ...st important de mesurer avec précision la quantité d huile à mélanger Pour le mélange de petites quantités de carburant la moindre erreur peut sérieusement affecter le rapport du mélange Essence REMARQUE Toujours utiliser une essence de qualité d au moins 87 octanes RON MON 2 mélangée avec de l huile Si la machine est équipée d un pot catalytique voir Caractéristiques techniques n utiliser que de ...

Страница 18: ...en mélanger le carburant en agitant le récipient avant de remplir le réservoir Essence litres Huile deux temps litres 2 1 50 5 0 10 10 0 20 15 0 6 0 30 20 0 40 US gallon US fl oz 1 2 1 2 2 1 2 6 1 2 5 12 7 8 AVERTISSEMENT Le pot d échappement à catalyseur est très chaud pendant et après le service C est également vrai pour le ralenti Soyez attentif au risque d incendie surtout à proximité de produ...

Страница 19: ...étecter d éventuels dommages ou fissures Remplacer la tête de désherbage ou le carter de protection si l un ou l autre a subi des dommages ou présente des fissures Ne jamais utiliser la machine sans protection ou avec une protection défectueuse Tous les carters doivent être correctement montés et sans défaut avant le démarrage de la machine Démarrage et arrêt Démarrage Pompe à carburant Appuyer su...

Страница 20: ...u les chocs électriques si le chapeau de bougie est defecteux Toujours utiliser des gants Ne jamais utiliser une machine dont le chapeau de bougie est defecteux Pour poignée d accélération avec blocage de l accélération au démarrage Pour passer sur la position accélération au démarrage appuyer d abord sur le blocage de la commande d accélération et la commande d accélération puis appuyer sur le bo...

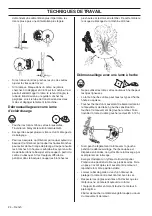
Страница 21: ...Observer la plus grande prudence lors de l abattage des arbres sous tension Avant et après le sciage les arbres sous tension risquent de brutalement retrouver leur position initiale Un mauvais placement de l utilisateur ou de l entaille d abattage peut entraîner un choc avec l arbre pouvant résulter en une chute ou en une perte du contrôle de la machine Ces deux cas de figure sont susceptibles de ...

Страница 22: ...utour de l axe de la lame sous peine de blessures Après l utilisation le renvoi d angle peut être chaud pendant un moment Risque de brûlures au contact AVERTISSEMENT Attention aux objets projetés Toujours utiliser des protections homologuées pour les yeux Ne jamais se pencher au dessus de la protection de l équipement de coupe Des cailloux débris etc peuvent être projetés dans les yeux et causer d...

Страница 23: ...vement décidé Simultanément pousser le tronc à l aide du protège lame Appliquer la lame contre le tronc au niveau de la plage 15 h 17 h de la lame Passer au plein régime avant d apposer la lame sur le tronc Pour que l arbre chute vers la droite la partie inférieure de l arbre doit être amenée vers la gauche Incliner la lame et la déplacer vers le haut à droite Appliquer la lame contre le tronc au ...

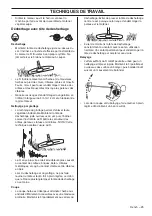
Страница 24: ...ns le bosquet couper les branches les plus hautes et les laisser retomber De cette manière le risque de blocage de la machine diminue Débroussaillage avec une lame à herbe Ne pas utiliser les lames et les couteaux à herbe pour les tiges ligneuses La lame à herbe s utilise pour tous les types d herbe haute ou épaisse Faucher l herbe d un mouvement de balancier latéral le mouvement de droite à gauch...

Страница 25: ...ues et similaires NOTA Cette technique accélère l usure du fil Le fil s use plus vite et doit être déroulé plus souvent au contact de cailloux briques béton clôtures métalliques etc qu au contact d arbres et de clôtures en bois Lors du désherbage et du grattage ne pas faire tourner le moteur tout à fait à plein régime ceci afin que le fil dure plus longtemps et la tête de désherbage s use moins Co...

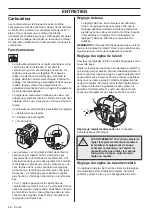
Страница 26: ...ande de l accélération au ralenti Si la vis T est tournée dans le sens des aiguilles d une montre on obtient un régime de ralenti plus haut si elle est tournée dans le sens contraire des aiguilles d une montre on obtient un régime de ralenti plus bas Réglage de base Le réglage de base du carburateur est effectué à l usine Le réglage de base est plus riche que le mélange optimal et doit être mainte...

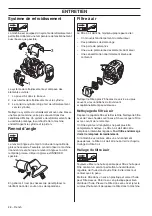
Страница 27: ...e si elles entrent en contact avec un matériau sec et inflammable Certains silencieux sont munis d une grille antiflamme Cette grille doit être nettoyée une fois par semaine si la machine en est équipée Utiliser de préférence une brosse en acier Sur les silencieux sans pot catalytique la grille doit être nettoyée et si nécessaire remplacée une fois par semaine Sur les machines dont le silencieux e...

Страница 28: ... fonctionnement du carburateur Des problèmes de démarrage Une perte de puissance Une usure prématurée des éléments du moteur Une consommation anormalement élevée de carburant Nettoyer le filtre après 25 heures de service ou plus souvent si les conditions de travail sont exceptionnellement poussiéreuses Nettoyage du filtre à air Déposer le capot de filtre et retirer le filtre Nettoyer le filtre ave...

Страница 29: ...égulier toujours commencer par contrôler l état de la bougie avant de prendre d autres mesures Si la bougie est encrassée la nettoyer et vérifier que l écartement des électrodes est de 0 5 mm Remplacer la bougie une fois par mois ou plus souvent si nécessaire REMARQUE Toujours utiliser le type de bougie recommandé Une bougie incorrecte peut endommager le piston le cylindre S assurer que la bougie ...

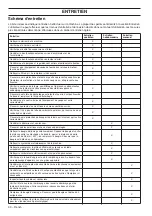
Страница 30: ... assurer que toutes les vis et tous les écrous sont bien serrés X Vérifier qu il n y a pas de fuite de carburant du moteur du réservoir ou des conduits de carburant X S assurer que la protection de transport de la lame est intacte et qu il se fixe correctement X Contrôler le démarreur et son lanceur X S assurer que les amortisseurs ne sont pas endommagés X Nettoyer la bougie d allumage extérieurem...

Страница 31: ...églé en fonction du régime Oui Oui Période de durabilité des émissions selon la commission californienne chargée de la qualité de l air 125 125 Système d allumage Bougie Champion RCJ 6Y Champion RCJ 6Y Écartement des électrodes po mm 0 02 0 5 0 02 0 5 Système de graissage de carburant Contenance du réservoir de carburant pint litres 1 27 0 6 1 27 0 6 Poids Poids sans carburant équipement de coupe ...

Страница 32: ...ents 537 33 16 02 Lame d éclaircissage Scarlet 200 22 Ø 200 22 dents 537 38 77 01 Couteaux en plastique Polytrim Ø 300 mm les lames séparées portent le numéro d article 531 01 77 15 537 33 16 02 537 34 94 02 Tête de désherbage Tap N Go 35 Spin fil Ø 2 4 3 0 mm 537 33 16 02 537 34 94 02 S35 fil Ø 2 4 3 0 mm 537 33 16 02 537 34 94 02 Tap N Go 45 Spin fil Ø 2 7 3 3 mm 537 33 16 02 537 34 94 02 Auto 5...

Страница 33: ...tes les factures prouvant que des mesures de maintenance ont été effectuées Cependant Jonsered ne peut en aucun cas refuser une demande de prise en charge selon les termes de la garantie si les factures ne peuvent pas être produites ou si toutes les mesures de maintenance prescrites n ont pas été effectuées En tant que propriétaire d un petit moteur vous devez néanmoins savoir que Jonsered peut re...

Страница 34: ...ir de carburant conduite et bouchon CE QUI N EST PAS COUVERT PAR LA GARANTIE Aucune défaillance résultant de l abus de la négligence et de l entretien contraire aux instructions n est couverte par la garantie AJOUT OU MODIFICATION DE PIÈCES Des pièces supplémentaires ou modifiées qui ne sont pas acceptées par CARB ou EPA ne doivent pas être utilisées L utilisation de pièces supplémentaires ou modi...

Страница 35: ...be thrown violently to the side when the blade comes into contact with a fixed object This is called blade thrust The blade is capable of amputating an arm or leg Always keep people and animals at least 15 metres from the machine Arrows which show limits for handle positioning Always wear approved protective gloves Wear sturdy non slip boots Only use non metallic flexible cutting attachments i e t...

Страница 36: ... Fuel 49 Fueling 50 STARTING AND STOPPING Check before starting 51 Starting and stopping 51 WORKING TECHNIQUES General working instructions 53 MAINTENANCE Carburetor 57 Muffler 58 Cooling system 58 Bevel gear 58 Air filter 59 Spark plug 59 Maintenance schedule 60 TECHNICAL DATA Technical data 61 FEDERAL AND CALIFORNIA EMISSIONS CONTROL WARRANTY STATEMENT YOUR WARRANTY RIGHTS AND OBLIGATIONS 63 WAR...

Страница 37: ... and that it will be your companion for a long time Think of this operator s manual as a valuable document By following its content using service maintenance etc the life span and the second hand value of the machine can be extended If you ever lend or sell this machine make sure that the borrower or buyer gets the operator s manual so they will also know how to properly maintain and use it Good l...

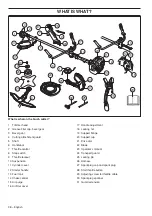
Страница 38: ...r 7 Throttle control 8 Stop switch 9 Throttle lockout 10 Suspension 11 Cylinder cover 12 Starter handle 13 Fuel tank 14 Choke control 15 Air purge 16 Air filter cover 17 Handle adjustment 18 Locking nut 19 Support flange 20 Support cup 21 Drive disc 22 Blade 23 Operator s manual 24 Transport guard 25 Locking pin 26 Harness 27 Spark plug cap and spark plug 28 Start throttle button 29 Adjusting scre...

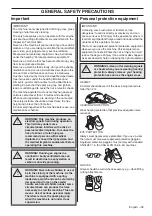
Страница 39: ...metres while working When several operators are working in the same area the safety distance should be at least twice the tree height and no less than 15 metres Do an overall inspection of the machine before use see maintenance schedule WARNING This machine produces an electromagnetic field during operation This field may under some circumstances interfere with active or passive medical implants T...

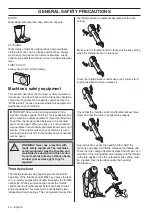
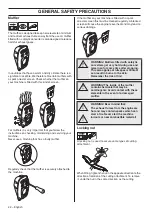
Страница 40: ...the throttle control is locked at the idle setting when the throttle lockout is released Press the throttle lockout and make sure it returns to its original position when you release it Check that the throttle control and throttle lockout move freely and that the return springs work properly See instructions under the heading Start Start the machine and apply full throttle Release the throttle and...

Страница 41: ...of vibration between the engine unit cutting equipment and the machine s handle unit Regularly check the vibration damping units for cracks or deformation Quick release There is an easily accessible quick release fitted at the front as a safety precaution in case the engine catches fire or in any other situation that requires you to free yourself from the machine and harness See instructions under...

Страница 42: ... fitted with a spark arrestor screen this must be cleaned regularly A blocked screen will cause the engine to overheat and may lead to serious damage Locking nut A locking nut is used to secure some types of cutting attachment When fitting tighten the nut in the opposite direction to the direction of rotation of the cutting attachment To remove it undo the nut in the same direction as the cutting ...

Страница 43: ... blade increases the risk of accidents Keep the correct setting on the saw blade Follow our instructions and use the recommended setting tool An incorrectly set saw blade increases the risk of jamming and blade thrust and damage to the saw blade Check the cutting attachment for damage or cracks A damaged cutting attachment should always be replaced IMPORTANT Only use cutting attachments with the g...

Страница 44: ...he recommended trimmer heads and trimmer cords These have been tested by the manufacturer to suit a particular engine size This is especially important when a fully automatic trimmer head is used Only use the recommended cutting attachment See the chapter on Technical data Smaller machines generally require small trimmer heads and vice versa This is because when clearing using a cord the engine mu...

Страница 45: ...ted when using the trimmer head plastic blades and combination guard The guard extension shall always be removed when using the grass blade and combination guard Enter the guard extension guide in the slot of the combination guard Then click the guard extension into position on the guard with the four quick fasteners WARNING When fitting the cutting attachment it is extremely important that the ra...

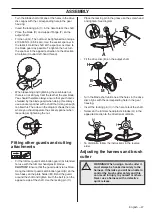
Страница 46: ... in the hole to lock the shaft Place the blade D support cup E and support flange F on the output shaft Fit the nut G The nut must be tightened to a torque of 35 50 Nm 3 5 5 kpm Use the socket spanner in the tool kit Hold the shaft of the spanner as close to the blade guard as possible To tighten the nut turn the spanner in the opposite direction to the direction of rotation Caution left hand thre...

Страница 47: ...Fitting other guards and cutting attachments Fit the trimmer guard combination guard A intended for use with the trimmer head plastic blades CAUTION Ensure that the guard extension is fitted Hang the trimmer guard combination guard A on the two hooks on the plate holder M Bend the guard around the shaft and tighten it with the bolt L on the opposite side of the shaft Use the locking pin C Place th...

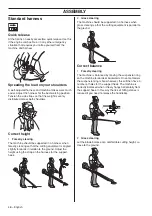
Страница 48: ...utting equipment is angled slightly forwards in relation to the ground Adjust the height using the strap on the harness for the support hook 2 Grass clearing The machine should be supported in a harness when grass clearing so that the cutting equipment is parallel to the ground Correct balance 1 Forestry clearing The machine is balanced by moving the suspension ring on the machine forwards or back...

Страница 49: ...nt of oil to be mixed to ensure that the correct mixture is obtained When mixing small amounts of fuel even small inaccuracies can drastically affect the ratio of the mixture Gasoline CAUTION Always use a quality gasoline oil mixture with an octane rating of at least 87 octane RON MON 2 If your machine is equipped with a catalytic converter see chapter on Technical data always use a good quality u...

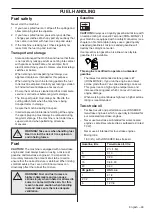
Страница 50: ...in the tank can cause operating problems Ensure that the fuel is well mixed by shaking the container before filling the tank WARNING The catalytic converter muffler gets very hot during and after use This also applies during idling Be aware of the fire hazard especially when working near flammable substances and or vapours WARNING Taking the following precautions will lessen the risk of fire Mix a...

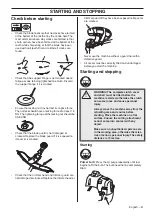
Страница 51: ...xposed to impact or is cracked Check that the trimmer head and trimmer guard are not damaged or cracked Replace the trimmer head or trimmer guard if they have been exposed to impact or are cracked Never use the machine without a guard nor with a defective guard All covers must be correctly fitted and undamaged before you start the machine Starting and stopping Starting Primer bulb Press the air pu...

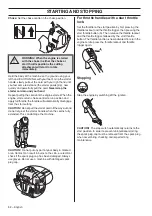
Страница 52: ...can result in burns to the skin or electrical shock if the spark plug cap has been damaged Always use gloves Do not use a machine with damaged spark plug cap For throttle handles with a start throttle lock Set the throttle to the start position by first pressing the throttle lockout and the throttle trigger then pressing the start throttle button A Then release the throttle lockout and the throttl...

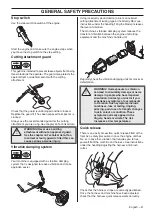
Страница 53: ...he wrong place the tree may hit you or the machine and cause you to lose control Both situations can cause serious personal injury 6 Keep a good balance and a firm foothold Do not overreach Keep proper footing and balance at all times 7 Always hold the machine with both hands Hold the machine on the right side of your body Keep all parts of your body away from the hot surfaces Keep all parts of yo...

Страница 54: ...s injury Stop the engine and cutting equipment before you remove material that has wound around the blade shaft as otherwise there is a risk of injury The bevel gear can get hot during use and may remain so for a while afterwards You could get burnt if you touch it WARNING Watch out for thrown objects Always wear approved eye protection Never lean over the cutting attachment guard Stones rubbish e...

Страница 55: ...the stem from the other side Adjust the cutting pressure to match the size of the stem and the hardness of the wood Small stems require more pressure while large stems require less pressure If the stems are tightly packed adapt your walking pace to suit If the blade jams in a stem never jerk the machine free If you do this the blade bevel gear shaft or handlebar may be damaged Release the handles ...

Страница 56: ...he cord can easily remove grass and weeds up against walls fences trees and borders however it can also damage sensitive bark on trees and bushes and damage fence posts Reduce the risk of damaging plants by shortening the cord to 10 12 cm and reducing the engine speed Clearing The clearing technique removes all unwanted vegetation Keep the trimmer head just above the ground and tilt it Let the end...

Страница 57: ...g The basic carburetor settings are adjusted during testing at the factory The basic setting is richer than the optimal setting and should be maintained for the first few hours the machine is in use The carburettor should then be finely adjusted Fine adjustment should be carried out by a skilled technician CAUTION If the cutting attachment rotates when the engine is idling the idle adjustment scre...

Страница 58: ...ler to inspect the muffler A blocked screen will cause the machine to overheat and result in damage to the cylinder and piston CAUTION Never use a machine with a defective muffler Cooling system To keep the working temperature as low as possible the machine is equipped with a cooling system The cooling system consists of 1 Air intake on the starter 2 Cooling fins on the cylinder 3 Cylinder cover d...

Страница 59: ... Squeeze the excess oil out of the filter inside the plastic bag and pour off the excess before fitting the filter to the machine Never use common engine oil This would drain through the filter quite quickly and collect in the bottom Spark plug The spark plug condition is influenced by Incorrect carburetor adjustment An incorrect fuel mixture too much or incorrect type of oil A dirty air filter Th...

Страница 60: ...sary X Check that the locking nut of the cutting equipment is tighten correctly X Check that nuts and screws are tight X Check that there are no fuel leaks from the engine tank or fuel lines X Check that the transport guard for the blade is intact and that it can be secured correctly X Check the starter and starter cord X Check that the vibration damping elements are not damaged X Clean the outsid...

Страница 61: ...Speed regulated ignition system Yes Yes Emissions Durability Period according to California Air Resources Board h 125 125 Ignition system Spark plug Champion RCJ 6Y Champion RCJ 6Y Electrode gap inch mm 0 02 0 5 0 02 0 5 Fuel and lubrication system Fuel tank capacity US pint litre 1 27 0 6 1 27 0 6 Weight Weight without fuel cutting attachment and guard Lbs kg 15 0 6 8 15 4 7 0 Sound levels see no...

Страница 62: ...3 Ø 300 3 teeth 537 33 16 02 Saw blade Scarlet 200 22 Ø 200 22 teeth 537 38 77 01 Plastic blades Polytrim Ø 300 mm Separate blades have part number 531 01 77 15 537 33 16 02 537 34 94 02 Trimmer head Tap N Go 35 Spin Ø 2 4 3 0 mm cord 537 33 16 02 537 34 94 02 S35 Ø 2 4 3 0 mm cord 537 33 16 02 537 34 94 02 Tap N Go 45 Spin Ø 2 7 3 3 mm cord 537 33 16 02 537 34 94 02 Auto 55 Ø 2 7 3 3 mm cord 537 ...

Страница 63: ...You are responsible for presenting your small off road engine to a Jonsered distribution center or service center as soon as the problem exists The warranty repairs should be completed in a reasonable amount of time not to exceed 30 days If you have any questions regarding your warranty coverage you should contact Jonsered in USA at 1 800 487 5951 in CANADA at 1 800 805 5523 or send e mail corresp...

Страница 64: ...be grounds for disallowing a warranty claim Jonsered will not be liable to warrant failures of warranted parts caused by the use of a non exempted add on or modified part HOW TO FILE A CLAIM If you have any questions regarding your warranty rights and responsibilities you should contact your nearest authorized servicing dealer or call Jonsered in USA at 1 800 487 5951 in CANADA at 1 800 805 5523 o...

Страница 65: ...1 Poly Trim 2 3 4 5 6 7 8 20mm 20mm B A 6 Nm X 10 ...

Страница 66: ... Clic 1 2 3 5 6 7 10 11 8 5 m 28 4 8 4 2 m 14 2 4 2 7 mm 095 106 10 cm 4 6 15 cm S35 ...

Страница 67: ...1 2 4 3 2 4 2 7 mm 095 106 4 25 m 14 4 25 m 14 B 6 15 cm A 6 15 cm S35 5 ...

Страница 68: ...Tap n Go 35 Spin Clic 1 2 3 5 6 7 9 8 5 m 28 4 8 4 3 m 14 2 4 2 7 mm 095 106 10 cm 4 6 15 cm ...

Страница 69: ... Clic 1 2 3 5 6 7 9 10 m 32 4 8 4 3 m 14 2 7 3 3 mm 106 13 10 cm 4 6 15 cm Tap n Go 45 Spin ...

Страница 70: ...2 7 3 3 mm 106 130 15 cm 6 15 cm 6 15 cm 6 15 cm 6 1 2 3 5 6 7 10 11 1 2 1 1 Kw 1 1 Kw 2 7 mm 9 0 m 3 0 mm 7 5 m 3 3 mm 6 0 m 4 8 Auto 55 ...

Страница 71: ...1 2 3 4 5 6 7 8 9 35 50 NM 15 cm 6 Clic 3 5 m 11 7 0 m 23 2 4 3 3 mm 095 130 12 cm 5 Trimmy SII ...

Страница 72: ......

Страница 73: ......

Страница 74: ......

Страница 75: ......

Страница 76: ...Instructions d origine Original instructions z Wc 2 z Wc 2 2016 11 10 1155679 32 ...

Отзывы: