MBL 9007 Скачать руководство пользователя страница 17

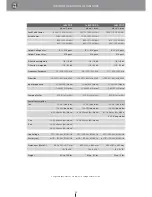
mbl 9011 | mbl 9008 A | mbl 9007

16

3.2 Mains Voltage

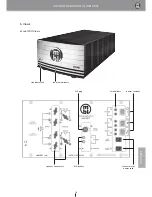
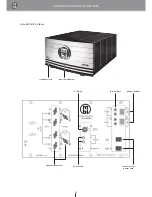
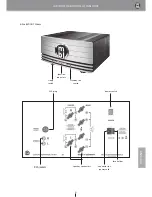
The mbl 9011 is equipped with 4, the mbl 9008 A with 3 and the 9007 with 2 low-dissipation toroidal transformers. They operate 
at 230 Vac or 115 Vac, 50/60 Hz. The rear side indicates the selected mains voltage which has been pre-set by the manufacturer. 
Change this setting only, if you want to use the amp in a country with different mains voltage. A change of the mains voltage is 
done inside the unit by using solder bridges. Always have a qualified service technician or a qualified dealer to do this for you. 
This procedure is not a warranty service.

3.3 Fuses

Caution

: Disconnect the power cord from the electric outlet before checking the fuses!

The fuse holders for the primary fuses are located next to the power switches on the rear side of the amp. The holders take 5 x 
20 mm fine-wire type fuses. Two fuses are needed for each power switch. You must change the value of the fuse, if you use a 
different mains supply (230 Vac/4 AT or 115 Vac/8 AT).

Inside the amp, next to the transformers, are the fuse holders for the secondary fuses. Their value is 10 AT (5 x 20 mm fine-wire 
type), irrespective of the mains voltage.

3.4 First Operation

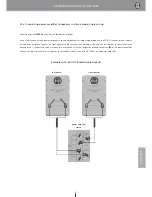
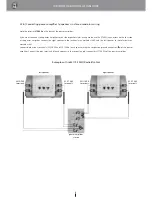
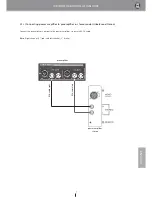
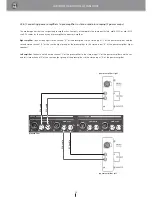
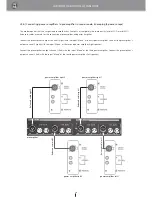
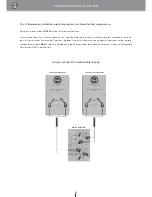
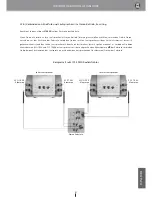
Make all necessary connections (input, output, mains) and press the power switches (on the rear side of the amp). mbl 9011/9008 A: 
Always activate power switch 1 first.

When the amp is switched on, the blue LED´s on the front panel will light. In addition to the blue LED’s a yellow one will be il-
luminated between them.

3.5 Standby Mode and Sleep Mode

To switch “on” and “off” the standby mode press the standby switch on the left side of the amp. When the amp is in standby 
mode the blue LED´s on the front panel are not lighted, only the yellow LED lights. (mbl 9007: the blue LEDs on the front panel 
glow in low intensity).

When the amplifier is in standby mode only the input electronics are held at operating temperature. No music can be heard in 
this mode. We recommend this mode for turning off the amplifier (20 W power consumption). 

mbl 9007

: With the sleep button of the mbl 9007 you can toggle between sleep and standby mode. In sleep mode the blue LED´s 

on the front panel are off, only a yellow LED in the center is on. In this mode the power consumption is reduced to 4 VA.
In both modes no signal appears on the speaker terminals.

Содержание 9007

Страница 1: ...ENGLISH DEUTSCH ...

Страница 2: ...a rack you must ensure sufficient ventilation Minimum clearances of 10 cm 4 inch above the unit and 2 cm 0 8 inch on all sides must be observed The ventilation openings of the unit must not be covered with tablecloths magazines curtains and the like in order not to interfere with the heat dissipation Make sure that no fluid filled vessels glasses vases are put on the device to prevent water from i...

Страница 3: ... 2 3 c Connecting to preamplifier in mono mode 11 2 4 a Connecting to speakers in stereo mode bi amping 2 power amps 12 2 4 b Connecting to preamplifier in stereo mode bi amping 2 power amps 13 2 5 a Connecting to speakers in mono mode bi amping 4 power amps 14 2 5 b Connecting to preamplifier in mono mode bi amping 4 power amps 15 3 Installation 15 3 1 Power Switches 16 3 2 Mains Voltage 16 3 3 F...

Страница 4: ...ier Keep the amplifier away from humidity vibration excessive dust and direct sunlight Do not operate the amplifier near other electric appliances for instance neon lights and motors 2 Connecting Power Amplifier s to Speakers and Preamplifier To connect your power amplifier s properly to your loudspeakers and your preamplifier please refer to the following descrip tions and diagrams Attention The ...

Страница 5: ...onductor of your speaker cable must run together in a common cable A separate routing of the lines would lead to the formation of a magnetic field which would be greater the greater the distance between the lines This would increasingly occur particularly at higher frequencies since the magnetic field is proportional to the square root of the frequency 2 All signal cables between the individual co...

Страница 6: ... connectors on the back of the power amplifier Connect the right speaker to the terminal area marked with R and the left speaker to the terminal area marked with L Connect the minus terminal of each speaker with the respective ground connector of the power amplifier Connect the plus terminal of each speaker to the respective plus connector STEREO of the power amplifier power amplifier stereo right...

Страница 7: ...ect the right speaker to the terminal area marked with R and the left speaker to the terminal area marked with L Connect both minus terminals WOOFER and SYSTEM of each speaker with the respective ground connector of the power amplifier Connect the plus terminals of each speaker to the respective plus connectors STEREO of the power amplifier left speaker right speaker power amplifier stereo WOOFER ...

Страница 8: ...amplifier to preamplifier in stereo mode Unbalanced Stereo Connect the preamplifier s output to the power amplifier s input with RCA cable Note Right channel R red and left channel L white preamplifier RCA cable left RCA cable right power amplifier stereo ...

Страница 9: ... connect two power amplifiers to your loudspeakers in single wiring mode use the MONO connectors of the power amplifiers Connect the plus terminal of each speaker to the respective plus connector of the power amplifier and the minus terminal to the minus connector left speaker right speaker mono power amp left mono power amp right Example with mbl 111 F Radialstrahler Hybrid ...

Страница 10: ...i wiring mode use the MONO connectors of the power amplifiers Connect each loudspeaker to one power amplifier Connect the plus terminals WOOFER and SYSTEM to the respec tive plus connectors and the minus terminals to the minus connectors left speaker right speaker mono power amplifier left mono power amplifier right WOOFER terminals SYSTEM terminals WOOFER terminals SYSTEM terminals Example with m...

Страница 11: ...ifier s input with balanced cable Connect the right channel R of the pre amplifier to the input of the power amplifier for the right speaker Connect the left channel L of the preamplifier to the input of the power amplifier for the left speaker power amplifier 1 right speaker power amplifier 2 left speaker preamplifier Balanced cable left Balanced cable right ...

Страница 12: ...akers in stereo mode use the STEREO connectors of the power amplifiers Connect each loudspeaker to one power amplifier Connect the plus terminals WOOFER and SYSTEM to the respec tive plus connectors and the minus terminals to the ground connectors left speaker right speaker stereo power amplifier left stereo power amplifier right WOOFER terminals SYSTEM terminals WOOFER terminals SYSTEM terminals ...

Страница 13: ...reo channel R of the preamplifier to the stereo input L of the power amplifier and the second stereo channel R of the same output group of the preamplifier to the stereo input R of the power amplifier right speaker Left amplifier Connect one left stereo channel L of the preamplifier to the stereo input L of the power amplifier and the sec ond left stereo channel L of the same output group of the p...

Страница 14: ... WOOFER seperatly to each power amplifier Use the MONO connectors of the power amplifier Connect the minus terminal to the respective minus connector and the plus terminal to the respective plus connector left speaker right speaker left power amplifier WOOFER left power amplifier SYSTEM right power amplifier WOOFER right power amplifier SYSTEM WOOFER terminals SYSTEM terminals WOOFER terminals SYS...

Страница 15: ...with the input Mono of the first power amplifier Connect the preamplifier s output channel 2 right with the input Mono of the second power amplifier right speaker Connect the preamplifier s output channel 1 left with the input Mono of the third power amplifier Connect the preamplifier s output channel 2 left with the input Mono of the fourth power amplifier left speaker preamplifier power amplifie...

Страница 16: ...lification stage Due to the high maximum output power capability when the Boost switches 2 or 2 3 are switched on high current flow in the primary supply area is created Therefore you need a second power cord for the Boost operation Recommended power switch positions for different loudspeaker impedances Power switch Speaker load mono Speaker load stereo Power amplifier Power switch 1 8 O 8 O 4 O m...

Страница 17: ... holders for the secondary fuses Their value is 10 AT 5 x 20 mm fine wire type irrespective of the mains voltage 3 4 First Operation Make all necessary connections input output mains and press the power switches on the rear side of the amp mbl 9011 9008 A Always activate power switch 1 first When the amp is switched on the blue LED s on the front panel will light In addition to the blue LED s a ye...

Страница 18: ...tput is set to 0 V A suitable connection cable can be made on request Your hi fi dealer will be happy to give advice 4 Maintenance Always unplug the unit before cleaning To clean the exterior surfaces of your mbl power amplifier use a dry soft cloth To wipe off fingerprints and other grease spots use a soft wet cloth moistened with a mild detergent dissolved in water Caution The cloth must never b...

Страница 19: ...installing any fuses switch off the power amplifier and disconnect it from the mains circuit No music Check if the standby switch is in the standby position You hear music but something is wrong Check if you plugged in more than one inputs symmetric and RCA Disconnect all inputs that are not in use See also Con necting power amplifier to preamplifier Check if the speakers have been connected corre...

Страница 20: ...mbl 9011 mbl 9008 A mbl 9007 19 XLR plug speaker connectors connectors for power cord RCA jackets fuse holders power switches 6 Views 6 1 mbl 9011 Views standby switch function indicators ...

Страница 21: ...mbl 9011 mbl 9008 A mbl 9007 20 XLR plug speaker connectors connectors for power cord RCA jackets fuse holders power switches 6 2 mbl 9008 A Views function indicators standby switch ...

Страница 22: ...mbl 9011 mbl 9008 A mbl 9007 21 XLR plug speaker connectors connector for power cord RCA jackets fuse holder power switch 6 3 mbl 9007 Views function indicators standby on switch sleep switch ...

Страница 23: ...z Distortion 0 001 4O 1kHz 50W 0 003 4O 1kHz 50W 0 003 4O 1kHz 50W Input Impedance 20 kO XLR Mono 20 kO XLR Mono 20 kO XLR Mono 10 kO RCA Stereo 10 kO RCA Stereo 10 kO RCA Stereo Damping Factor 300 1 kHz 4 O 300 1 kHz 4 O 300 1 kHz 4 O Power Consumption 1 on 20 VA Stand by 20 VA Stand by 20 VA Stand by 100 VA Idle Mode 100 VA Idle Mode 100 VA Idle Mode 600 VA max 4O Mono 600 VA max 4O Mono 600 VA ...

Страница 24: ...ce Line Your MBL dealer will help you to choose the best components for your perfect High End Audio system mbl 1621 A CD Transport mbl 1611 F D A Converter mbl 101 E MKII Radialstrahler mbl 6010 D Preamplifier mbl 9007 Mono Stereo Power Amplifier mbl 101 X treme Radialstrahler System mbl 9011 Mono Stereo Power Amplifier mbl 9008 A Mono Stereo Power Amplifier ...

Страница 25: ...mbl 9011 mbl 9008 A mbl 9007 25 mbl 9011 mbl 9008 A mbl 9007 Endstufen Bedienungsanleitung ...

Страница 26: ...zieren möchten achten Sie unbedingt auf ausreichende Luftzirkulation Über dem Gerät müssen mindestens 10 cm und zu allen Seiten mindestens 2 cm Platz sein Die Lüftungsöffnungen des Gerätes dürfen nicht mit Gegenständen wie Tischdecken Zeitschriften Vorhängen und dergleichen abge deckt werden um die Wärmeabfuhr nicht zu behindern Stellen Sie sicher dass das Gerät vor Spritzwasser geschützt ist und ...

Страница 27: ...n mit Vorverstärker im Mono Betrieb 36 2 4 a Verbinden mit Lautsprechern im Mono Betrieb bi amping 4 Endstufen 37 2 4 b Verbinden mit Vorverstärker im Mono Betrieb bi amping 4 Endstufen 38 2 5 a Verbinden mit Lautsprechern im Mono Betrieb bi amping 4 Endstufen 39 2 5 b Verbinden mit Vorverstärker im Mono Betrieb bi amping 4 Endstufen 40 3 Inbetriebnahme 40 3 1 Netzschalter 41 3 2 Netzspannung 41 3...

Страница 28: ...rch ein Überhitzen beschädigt werden Falls Sie mehrere Endstufen gleichzeitig betreiben wollen stapeln Sie diese niemals übereinander Plazieren Sie die Endstufen auf dafür geeigneten Regalen oder Hifi Racks 2 Verbinden von Endstufe n Lautsprechern und Vorverstärker Um Ihre Endstufe n richtig an Ihre Lautsprecher und Ihren Vorverstärker anzuschließen beachten Sie bitte die folgenden Hin weise und G...

Страница 29: ...Kabel verlaufen Eine ge trennte Führung der Leitungen würde zur Entstehung von magnetischen Feldern führen welche umso stärker wären je größer der Abstand zwischen den Leitungen ist Dies würde besonders bei höheren Frequenzen zunehmend auftreten da sich das magnetische Feld proportional zur Wurzel der Frequenz verhält 2 Alle Signalkabel zwischen den einzelnen Komponenten der Musikanlage müssen ges...

Страница 30: ...Betrieb single wiring anschließen möchten verwenden Sie die Ste reo Anschlüsse auf der Rückseite der Endstufe Verbinden Sie die Minusklemme des jeweiligen Lautsprechers mit der entspre chenden Minusklemme der Endstufe Verbinden Sie die Plusklemme des jeweiligen Lautsprechers mit der entsprechenden Plusklemme STEREO der Endstufe Stereo Endstufe rechter Lautsprecher linker Lautsprecher Beispiel mit ...

Страница 31: ...tsprecher mit dem Anschlussterminal das mit R gekennzeichnet ist und den linken Lautsprecher mit dem Anschlussterminal das mit L gekennzeichnet ist Verbinden Sie beide Minusklemmen WOOFER und SYSTEM des Lautsprechers mit der entsprechenden Minusklemme der Endstufe Verbinden Sie die beiden Plusklemmen des Lautsprechers mit den beiden entsprechenden Plusklemmen Stereo der Endstufe linker Lautspreche...

Страница 32: ...er im Stereo Betrieb Verbinden Sie die Cinchausgänge des Vorverstärkers mit den Cinchausgängen der Endstufe Verwenden Sie dazu ein Cinchkabel Achten Sie dabei auf den rechten Kanal R rot und den linken Kanal L weiß Vorverstärker Stereo Endstufe Cinchkabel links Cichkabel rechts ...

Страница 33: ...ono Betrieb single wiring anschließen möchten verwenden Sie die Mono Anschlüsse auf der Rückseite der jeweiligen Endstufe Verbinden Sie die Plusklemme des jeweiligen Lautsprechers mit der ent sprechenden Plusklemme der jeweiligen Endstufe und die Minusklemmen mit den entsprechenden Minusklemmen linker Lautsprecher rechter Lautsprecher Mono Endstufe links Mono Endstufe rechts Beispiel mit mbl 111 F...

Страница 34: ...Mono An schlüsse der Endstufen Verbinden Sie jeweils einen Lautsprecher mit einer Endstufe Verbinden Sie die Plusklemmen WOOFER und SYSTEM des Lautsprechers mit den entsprechenden Plusklemmen der jeweiligen Endstufe sowie die Minusklemmen mit den entsprechenden Minusklemmen Mono Endstufe links Mono Endstufe rechts linker Lautsprecher rechter Lautsprecher S Y S T E M Klemmen W O O F E R Klemmen W O...

Страница 35: ...Balanced Mono Eingang der jeweiligen Endstufe Der rechte Kanal R des Vorverstärkers wird dabei mit dem Eingang der Endstufe für den rechten Lautsprecher ver bunden und der linke Kanal L des Vorverstärkers mit dem Eingang der Endstufe für den linken Lautsprecher Endstufe 1 rechter Lautsprecher Endstufe 2 linker Lautsprecher Vorverstärker Symmetrisches Kabel links Symmetrisches Kabel rechts ...

Страница 36: ...rwenden Sie die Stereo Anschlüsse der Endstufen Verbinden Sie jeweils einen Lautsprecher mit einer Endstufe Verbinden Sie die Plusklemmen WOO FER und SYSTEM des Lautsprechers mit den entsprechenden Plusklemmen der jeweiligen Endstufe sowie die Minusklemmen mit den entsprechenden Masseklemmen linker Lautsprecher rechter Lautsprecher Stereo Endstufe links Stereo Endstufe rechts WOOFER Klemmen SYSTEM...

Страница 37: ...chten Ausgang R des Vorverstärkers mit dem Stereo Eingang L der Endstufe und den zweiten rechten Ausgang R der gleichen Ausgangsgruppe des Vorverstärkers mit dem Stereo Eingang R der Endstufe rechter Lautsprecher Linke Endstufe Verbinden Sie einen linken Stereo Kanal L des Vorverstärkers mit dem Stereo Eingang L der Endstufe und den zweiten linken Stereo Kanal L der gleichen Ausgangsgruppe des Vor...

Страница 38: ... der jeweiligen Endstufe Verwenden Sie hierfür die Mono Anschlüsse der Endstufen Verbinden Sie die Minusklemmen der Lautspre cher mit den entsprechenden Minusklemmen der Endstufen sowie die Plusklemmen mit den entsprechenden Plusklemmen linke Endstufe WOOFER linke Endstufe SYSTEM rechte Endstufe WOOFER rechte Endstufe SYSTEM linker Lautsprecher rechter Lautsprecher W O O F E R Klemmen W O O F E R ...

Страница 39: ...n 1 rechten Vorverstärkerausgang out1 R mit dem Mono Eingang der ersten Endstufe und den 2 rechten Vorverstärkerausgang mit dem Mono Eingang der zweiten Endstufe Linker Lautsprecher Verbinden Sie den 1 linken Vorverstärkerausgang out1 L mit dem Mono Eingang der dritten Endstufe und den 2 linken Vorverstärkerausgang out2 L mit dem Mono Eingang der vierten Endstufe Vorverstärker Endstufe links 2 End...

Страница 40: ...den Spannungsverstärker Durch die hohe maximale Ausgangsleistung bei zugeschaltetem Netzschalter 2 oder 2 3 entstehen hohe Ströme wodurch ein zweites Netzkabel für den Boost Betrieb benötigt wird Empfohlene Einstellung der Netzschalter für verschiedene Lautsprecherimpedanzen Netzschalter Lautsprecherimpedanz Mono Lautsprecherimpedanz Stereo Endstufe Netzschalter 1 8 O 8 O 4 O mbl 9011 9008 A 9007 ...

Страница 41: ...ärsicherungen Der Wert beträgt unabhän gig von der Netzspannung 10 AT Feinsicherung Typ 5x20mm 3 4 Einschalten der Endstufe Nachdem alle Leitungsverbindungen Eingang Ausgang und Netzanschluss hergestellt sind können Sie die Endstufe durch Betätigen des Netzschalters auf der Rückseite einschalten mbl 9011 9008 A Schalten Sie immer Netzschalter 1 Power zuerst ein Die blauen Kontrolleuchten LED auf d...

Страница 42: ...efertigt werden Ihr HiFi Händler berät Sie diesbezüglich gern 4 Hinweise zur Pflege Trennen Sie vor der Reinigung des Gerätes immer erst den Netzstecker vom Strom Das Gehäuse und vor allem die Frontplatte sollten zur Reinigung nur mit einem weichen angefeuchteten Tuch eventuell einer milde Seifenwasserlösung abgewischt werden Auf keinen Fall Reinigungs oder Lösungsmittel verwenden Achtung Der zur ...

Страница 43: ...n die Netzstecker Es ist keine Musik zu hören Sehen Sie nach ob der Standby Schalter in der Standby Position steht Erst wenn die blauen LEDs leuchten ist die Endstufe funktionsbereit Es ist Musik zu hören doch irgendetwas scheint nicht zu stimmen Überprüfen Sie ob nur ein Eingang benutzt wird Symmetrisch oder Cinch und nicht mehrere Eingänge beschaltet sind Ziehen Sie die nicht benötigten Eingänge...

Страница 44: ...11 mbl 9008 A mbl 9007 44 Symmetrischer Eingang Lautsprecherklemmen Netzbuchsen Cincheingänge Sicherungshalter Netzschalter 6 Übersichtsgrafiken 6 1 mbl 9011 Übersichtsgrafiken Standby Schalter Kontroll LEDs ...

Страница 45: ...mbl 9011 mbl 9008 A mbl 9007 45 Symmetrischer Eingang Sicherungshalter Netzschalter Netzbuchsen Cincheingänge Lautsprecherklemmen 6 2 mbl 9008 A Übersichtsgrafiken Kontroll LEDs Standby Schalter ...

Страница 46: ...9011 mbl 9008 A mbl 9007 46 Symmetrischer Eingang Netzschalter Sicherungshalter Netzbuchse Lautsprecherklemmen Cincheingänge 6 3 mbl 9007 Übersichtsgrafiken Kontroll LEDs Standby an Schalter Sleep Schalter ...

Страница 47: ...z DC 200 320 kHz DC 200 320 kHz Klirrfaktor 0 001 4O 1kHz 50W 0 003 4O 1kHz 50W 0 003 4O 1kHz 50W Eingangsimpedanz 20 kO XLR Mono 20 kO XLR Mono 20 kO XLR Mono 10 kO RCA Stereo 10 kO RCA Stereo 10 kO RCA Stereo Dämpfungsfaktor 300 1 kHz 4 O 300 1 kHz 4 O 300 1 kHz 4 O Leistungsaufnahme 1 an 20 VA Stand by 20 VA Stand by 20 VA Stand by 100 VA Idle Mode 100 VA Idle Mode 100 VA Idle Mode 600 VA max 4...

Страница 48: ...L Reference Line Ihr MBL Händler berät Sie gerne bei der Wahl der Komponenten für Ihr perfektes High End Audio System mbl 1621 A CD Laufwerk mbl 1611 F D A Wandler mbl 101 E MKII Radialstrahler mbl 6010 D Vorverstärker mbl 9007 Mono Stereo Endstufe mbl 101 X treme Radialstrahlersystem mbl 9011 Mono Stereo Endstufe mbl 9008 A Mono Stereo Endstufe ...

Страница 49: ...iebsanleitungen sind urheberrechtlich geschützt Das Kopieren Vervielfältigen Übersetzen oder Umsetzen in irgendein elektronisches Medium oder maschinell lesbare Form im Ganzen oder in Teilen ohne vorherige schriftliche Genehmigung von MBL ist nicht erlaubt Ansprüche gegenüber MBL in Anlehnung an die in dieser Betriebsanleitung beschriebenen Produkte richten sich ausschließlich nach den Bestimmunge...

Отзывы: