background image

4

1. Scope of Delivery

The mbl 111F Radialstrahler Hybrid is delivered in three shipping boxes. In the two smaller ones you will fi nd:


2 x woofer units


4 x copper jumpers


2 x cover plate

In the other box (solid case) you will fi nd:


2 x tweeter-midrange sections complete with cover grille 


operating instructions


fi nal production protocol 


Allen wrench 


8 x special spikes and spike nuts


8 x spikes, spike nuts and brass washers


warranty card 

2. Unpacking

Set all the boxes on the fl oor with the arrows on the edge of the box pointing up. (Fig. 1)
First, you should take the woofer units out of their packaging (the smaller boxes). This works best, if you open the 
top of the box and then carefully turn it upside down and pull off  the box upwards. Remove the foam plastic and 
put it back into the box, open the cotton bag at the bottom and turn the woofer units back over, so they are in an 
upright position. Place the woofer units approximately where you want to set the speakers.

Open the solid case on the front (Fig.1). Remove the board lying on the top and the tube-shaped cardboard.
The mbl 111F tweeter/midrange section is screwed to the board you can see at the bottom. Lift the section and the 
wooden board out of the box and lay it carefully on its back so that the wooden board can hang freely (Fig.2). Use 
the enclosed Allen wrench to unscrew all four Allen screws.

Fig. 1: Opening the wooden case

Fig. 2: Lifting the HT/MT section and the wooden board

Содержание 111F Radialstahler Hybrid

Страница 1: ......

Страница 2: ......

Страница 3: ...eaker we took care of even the smallest detail to become per fect Each system is measured and recorded in all technical details to fulfill the highest demands on sound quality The Radialstrahler is a State of the Art advanced technology product which is outstanding in sound quality and appearance This multi directional speaker is a breakthrough to a new world of music enjoyment you will get a 3 di...

Страница 4: ...p to 122 F Avoid extreme variations in temperature Do not touch the diaphragms of the speaker KETI CE Marking This product conforms to the requirements of the EMC directive and low volt age directive Your MBL component complies with the household power and safety requirements in your area Warranty Please pay attention to the details given in the warranty card which accompa nies the unit Warranty i...

Страница 5: ...10 5 1 Single wiring 10 5 2 Bi wiring 11 6 Connecting speaker to power amplifier 11 a Stereo amplifier single wiring 12 b Stereo amplifier bi wiring 13 c Stereo amplifier bi amping 14 d Mono amplifier single wiring 2 power amplifiers 15 e Mono amplifier bi wiring 2 power amplifiers 16 f Mono amplifier bi amping 4 power amplifiers 18 7 Maintenance 18 7 1 Removing the cover of the tweeter midrange s...

Страница 6: ...This works best if you open the top of the box and then carefully turn it upside down and pull off the box upwards Remove the foam plastic and put it back into the box open the cotton bag at the bottom and turn the woofer units back over so they are in an upright position Place the woofer units approximately where you want to set the speakers Open the solid case on the front Fig 1 Remove the board...

Страница 7: ...bass place the systems directly on a solid ground without using spikes To achieve a tighter bass with more impact screw the spikes in the speaker s feet so that the speaker stands on the spikes To protect your floor it is recommended to use the enclosed brass washers In case that the floor is covered with a thick carpet the speaker does not stand firmly Due to this reason the bass may sound uncont...

Страница 8: ...pecial spikes in the bottom plate of the tweeter midrange section tweeter midrange section connecting cable woofer section Screw the spikes in the speaker s feet The front of the tweeter midrange section must point to the same di rection as the front of the woofer section ...

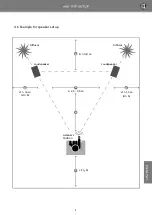
Страница 9: ...of no vibrating windows If possible set up the speakers on the longer wall Shelves or hi fi racks located between the speakers also at the wall should not be higher than the midrange driver of the speaker approx 1 meter 40 4 3 Speaker positioning Transfer your room dimensions longer and shorter side of the room on a handmade drawing note the example given on page 9 Set the speakers on the drawing ...

Страница 10: ...the listener s position c should be at least 0 8 meter 32 If the calculated data do not fit to your room change the distance b 4 5 Setup and fine tuning After you figured out the speaker s position install your hi fi system and set up the speakers For a fine tuning move the speakers If you have chosen the optimal configuration you can screw the spikes in the speaker s feet depending on what type o...

Страница 11: ...9 4 6 Example for speaker setup a b c d c c b a 2 5 3 5 m d 1 5 m d b b 0 8 m Diffusor Diffusor Listener s Position Loudspeaker Loudspeaker d d 1 5 m d b e ...

Страница 12: ...To operate the speakers in bi wiring mode connect the tweeter midrange section HT MT and the woofer section TT of each speaker separately Note Especially if you use more than one power amplifier bi wiring is recommended 5 1 Single wiring To operate the speakers in single wiring mode use the included copper jumpers to con nect tweeter midrange driver HT MT and woofer TT Now you can use single wirin...

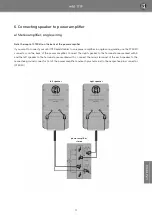
Страница 13: ...single wiring mode use the STEREO connectors on the back of the power amplifier Connect the right speaker to the terminal area marked with R and the left speaker to the terminal area marked with L Connect the minus terminal of the each speaker to the respective ground connector of the power amplifier and each plus terminal to the respective plus connector STEREO power amplifier stereo right speake...

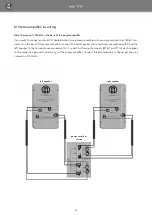
Страница 14: ...O con nectors on the back of the power amplifier Connect the right speaker to the terminal area marked with R and the left speaker to the terminal area marked with L Connect both minus terminals MT HT and TT of each speaker to the respective ground connector of the power amplifier Connect the plus terminals to the respective plus connectors STEREO left speaker right speaker power amplifier stereo ...

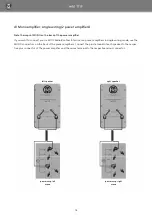
Страница 15: ...your mbl 111F Radialstrahler to two stereo power amplifiers in bi amping mode use the STEREO connectors on the back of the power amplifiers Connect the plus terminals MT HT and TT to the respec tive plus connectors and the minus terminals to the ground connectors right speaker left speaker power amp right stereo power amp left stereo ...

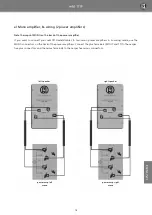
Страница 16: ...Radialstrahler to two mono power amplifiers in single wiring mode use the MONO connectors on the back of the power amplifiers Connect the plus terminal of each speaker to the respec tive plus connector of the power amplifier and the minus terminal to the respective minus connector left speaker right speaker power amp left mono power amp right mono ...

Страница 17: ...r mbl 111F Radialstrahler to two mono power amplifiers in bi wiring mode use the MONO connectors on the back of the power amplifiers Connect the plus terminals MT HT and TT to the respec tive plus connectors and the minus terminals to the respective minus connectors right speaker left speaker power amp right mono power amp left mono ...

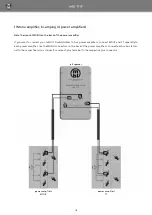
Страница 18: ...bl 111F Radialstrahler to four power amplifiers connect MT HT and TT seperatly to each power amplifier Use the MONO connectors on the back of the power amplifiers Connect each minus termi nal to the respective minus connector and each plus terminal to the respective plus connector power amp 1 left MT HT power amp 2 left TT left speaker ...

Страница 19: ...17 power amp 1 right MT HT power amp 2 right TT right speaker ...

Страница 20: ...To clean the magnet housing of the tweeter and the midrange driver use a soft cloth or shaving brush Cabinet and Cover plate Clean the piano finish cabinet as well as the cover plate with a gentle suds then dry with a soft cloth Clean the satin finish cabinet with a cloth moistened with lukewarm water then dry with a soft lint free cloth Cover Clean the speaker cover with a soft shaving brush Gold...

Страница 21: ...8 Views 8 1 mbl 111F Radialstrahler front and rear view cover vent opening cable terminals connecting cable cover plate 19 ...

Страница 22: ...20 8 2 mbl 111F Radialstrahler side view and detail magnet housing tweeter HT 37 midrange driver MT 50 gold chrome plate protective covering protective covering tweeter HT 37 midrange driver MT 50 ...

Страница 23: ...z Linkwitz Riley 4th order Acoustic center 107 cm Continuous power 320 W 550 W Peak power 2200 W Subwoofer 2x 220 mm 8 Alu Woofer Double push push 2x 150 mm 5 Alu Midrange high Radial MT50 CFK MBL Tweeter Radial HT37 Al CFK MBL Dimensions WxHxD 450 x 1130 x 565 mm H incl cover 1205 mm 18 x 44 5 47 5 x 22 Weight 60 kg 132 lbs Design and specifications are subject to change without notice ...

Страница 24: ...BL Noble Line Your MBL dealer will help you to choose the optimal components for your perfect high end audio system mbl 1531 CD Player mbl 1521A CD Transport mbl 1511F D A Converter mbl 5011 Preamplifier mbl 7008 Integrated Amplifier mbl 120 120 RC Radialstrahler mbl 111F Radialstrahler mbl 116F Radialstrahler 22 ...

Страница 25: ...mbl 111F Radialstrahler Hybrid Bedienungsanleitung 23 ...

Страница 26: ...24 unique high end audio ...

Страница 27: ...r genau darauf geachtet auch im kleinsten Detail perfekte Arbeit zu leisten Jedes System wird bei uns im Hause detailgenau gemessen und protokolliert um den höchsten Ansprüchen an Qualität und Klang gerecht zu werden Technologisch ist der Radialstrahler ein absolutes Spitzenpro dukt welches weltweit einzigartig ist Dieser Rundumstrahler durchbricht in Klang und Erscheinung die Grenzen konventio ne...

Страница 28: ...alstrahler nicht bei Tempe raturen unter 10 C oder über 50 C Die Membranen der Radialstrahler dürfen nicht berührt werden KETI CE Marking Dieses mbl Gerät entspricht den KETI sowie EMC Richtlinien Garantie Bitte beachten Sie die dem Gerät beiliegende Garantiekarte Die Garantie kann ausschließlich nach Einsenden der originalen Garantiekarte gewährt werden ...

Страница 29: ...lstrahler 34 5 Anschlüsse 34 5 1 Single wiring 34 5 2 Bi wiring 35 6 Verbinden von Radialstrahlern und Endstufe n 35 a Stereo Endstufe single wiring 36 b Stereo Endstufe bi wiring 37 c Stereo Endstufe bi amping 38 d Mono Endstufe single wiring 2 Endstufen 39 e Mono Endstufe bi wiring 2 Endstufen 40 f Mono Endstufe bi amping 4 Endstufen 42 7 So reinigen Sie Ihren Radialstrahler 42 7 1 Entfernen der...

Страница 30: ...an der Oberseite und drehen Sie ihn dann um Nun können Sie den Karton einfach nach oben von der Basseinheit abziehen Entfernen Sie anschließend die Schaumstoffteile und legen Sie diese in die Kartons Öffnen Sie die Unterseite des Baumwollbeutels und drehen Sie die Basseinheiten wieder in ihre richtige Position zurück Stellen Sie nun die Basseinheiten annähernd an den Platz an dem Sie die Lautsprec...

Страница 31: ...igen Bass bevorzugen stellen sie die Radialstrahler direkt d h ohne Spikes auf einen festen Untergrund Um einen schlankeren und dynamischeren Tieftonbereich zu erzielen schrauben Sie die Spikes in die Lautsprecherfüße so dass der Lautspre cher auf den Spikes steht Zum Schutz Ihres Fußbodens empfehlen wir die mitgelieferten Unterlegscheiben zu verwenden Ist der Boden auf dem Sie die Radialstrahler ...

Страница 32: ...die Spike aufnahmen an der Unterseite der Hoch Mitteltoneinheit Hoch Mittelton Einheit Verbindungskabel Basseinheit Schrauben Sie die Spikes in die Lautspre cherfüße Die Vorderseite der Hoch Mittelto neinheit muss in die gleiche Rich tung weisen wie die Vorderseite der Basseinheit 30 ...

Страница 33: ...Möbelstück Rack Schrank etc das höher ist als der Mitteltöner der Lautsprecher ca 1m 4 3 Positionierung der Radialstrahler Um Ihre Lautsprecher optimal im Raum zu positionieren übertragen Sie Ihre Raumabmessungen Länge und Breite auf eine Handskizze Auf Seite 31 finden Sie ein Beispiel Zeichnen Sie die Position der Lautsprecher in diese Skizze ein Den optimalen Standort berechnen Sie wie folgt Ste...

Страница 34: ...f Ihren Raum passen verändern Sie die Entfernung b so lange bis sich ein optimales Verhältnis erreichen lässt 4 5 Aufstellung und Feinabstimmung Installieren Sie die Anlage und stellen Sie die Lautsprecher nach der errechneten Grundlage auf Eine Feinabstimmung ist jetzt durch eine Positionsverschiebung der Systeme möglich Die auftretenden Verände rungen machen sich beim Anhören besonders im Bassbe...

Страница 35: ...4 6 Beispielskizze zur Aufstellung der Radialstrahler 33 a b c d c c b a 2 5 3 5 m d 1 5 m d b b 0 8 m Diffusor Diffusor Hörplatz Lautsprecher Lautsprecher d d 1 5 m d b e ...

Страница 36: ...g Um die Radialstrahler im bi amping bi wiring Modus zu betreiben verbinden Sie die Hoch Mitteltoneinheit MT HT und die Basseinheit TT jedes Lautsprechers separat mit dem Verstärker Hinweis Besonders wenn Sie mehr als einen Verstärker verwenden ist bi wiring empfohlen 5 1 Single wiring Um die Radialstrahler im single wiring Modus zu betreiben verwenden Sie die beiliegen den Kupferbrücken um Hoch M...

Страница 37: ...nschließen möchten ver wenden Sie die Stereo Klemmen auf der Rückseite der Endstufe Verbinden Sie den rechten Lautsprecher mit dem Anschlussbereich R und den linken Lautsprecher mit dem Anschlussbereich L Verbinden Sie die Minusklemme des jeweiligen Lautspechers mit der entsprechenden Masseklemme der Endstufe und die Plusklemme mit der entsprechenden Plusklemme STEREO Stereo Endstufe rechter Lauts...

Страница 38: ...te der Endstufe Verbinden Sie den rechten Lautsprecher mit dem Anschlussbereich R und den linken Lautsprecher mit dem Anschlussbereich L Verbinden Sie die beiden Minusklemmen MT HT und TT des jeweiligen Lautsprechers mit der entsprechenden Masseklemme der End stufe Verbinden Sie die beiden Plusklemmen des jeweiligen Lautsprechers mit den entsprechenden Plusklemmen STEREO der Endstufe linker Lautsp...

Страница 39: ...n im bi amping Betrieb anschließen möchten ver wenden Sie die Stereo Klemmen der Endstufen Verbinden Sie die Minusklemmen MT HT und TT des jeweiligen Lautsprechers mit den entsprechenden Masseklemmen der jeweiligen Endstufe und die Plusklemmen mit den entsprechenden Plusklemmen rechter Lautsprecher linker Lautsprecher rechte Endstufe Stereo linke Endstufe Stereo 37 ...

Страница 40: ...Endstufen im single wiring Betrieb anschließen möchten verwenden Sie die Mono Klemmen der Endstufen Verbinden Sie die Plusklemme des jeweiligen Lautsprechers mit der entsprechenden Plusklemme der jeweiligen Endstufe sowie die Minusklemme mit der entsprechenden Minusklemme linker Lautsprecher rechter Lautsprecher linke Endstufe Mono rechte Endstufe Mono 38 ...

Страница 41: ...stufen im bi wiring Betrieb anschließen möchten ver wenden Sie die Mono Klemmen der Endstufen Verbinden Sie die Plusklemmen MT HT und TT des jeweiligen Lautsprechers mit den Plusklemmen der entsprechenden Endstufe sowie die Minusklemmen MT HT und TT mit den Minusklemmen rechter Lautsprecher linker Lautsprecher rechte Endstufe Mono linke Endstufe Mono 39 ...

Страница 42: ...r Endstufe Wenn Sie Ihre mbl 111F Radialstrahler an vier Endstufen anschließen möchten verbinden Sie Hoch Mitteltoneinheit MT HT und Basseinheit TT separat mit jeder Endstufe Verwenden Sie hierfür die Mono Klemmen der End stufen Verbinden Sie die Minusklemmen mit den entsprechenden Minusklemmen und die Plusklemmen mit den entsprechenden Plusklemmen 40 ...

Страница 43: ...rechte Endstufe 1 MT HT rechte Endstufe 2 TT rechter Lautsprecher 41 ...

Страница 44: ...häuse des Hoch und Mitteltöners können mit einem weichen Lappen oder mit einem Rasierpinsel gereinigt werden Gehäuse und Zierplatte Das Klavierlackgehäuse kann ebenso wie die Zierplatte mit einer milden Seifenlauge gereinigt und mit einem wei chen Lappen trocken gewischt werden Zur Reinigung des seidenmatt lackierten Gehäuses verwenden Sie einen mit lauwarmem Wasser angefeuchteten Lappen und wisch...

Страница 45: ...8 Ansichten 8 1 mbl 111F Radialstrahler Vorder und Rückansicht Abdeckung Bassreflexöffnung Anschlussterminal Verbindungskabel Zierplatte 43 ...

Страница 46: ...8 2 mbl 111F Radialstrahler Seitenansicht und Details Magnetgehäuse Hochton system HT 37 Mitteltonsystem MT 50 Zierschraube Schutzabdeckung Schutzabdeckung Hochton system HT 37 Mitteltonsystem MT 50 44 ...

Страница 47: ...order Akustische Achse 107 cm Nennbelastbarkeit 320 W 550 W Musikbelastbarkeit 2200 W Tieftonsystem 2x 220 mm 8 Alu Bass Double push push 2x 150 mm 5 Alu Mitteltonsystem Radial MT50 CFK MBL Hochtonsystem Radial HT37 Al CFK MBL Maße BxHxT 450 x 1130 x 565 mm H incl Cover 1205 mm 18 x 44 5 47 5 x 22 Gewicht 60 kg 132 lbs Änderungen an Design und technischen Daten sind ohne Vorankündigung vorbehalten...

Страница 48: ...r MBL Noble Line Ihr MBL Händler berät Sie gerne bei der Wahl der Komponenten für Ihr perfektes High End Audio System mbl 1531 CD Player mbl 1521A CD Laufwerk mbl 1511F D A Wandler mbl 5011 Vorverstärker mbl 7008 Vollverstärker mbl 120 120 RC Radialstrahler mbl 111F Radialstrahler mbl 116F Radialstrahler 46 ...

Страница 49: ...ebsanleitungen sind urheberrechtlich geschützt Das Kopieren Vervielfältigen Übersetzen oder Umsetzen in irgendein elektronisches Me dium oder maschinell lesbare Form im Ganzen oder in Teilen ohne vorherige schriftliche Genehmigung von MBL ist nicht erlaubt Ansprüche gegenüber MBL in Anlehnung an die in dieser Betriebsanleitung beschriebenen Produkte richten sich ausschließlich nach den Be stimmung...

Страница 50: ...unique high end audio ...

Страница 51: ......

Страница 52: ......

Отзывы: