background image

10

Sound Controls 

(Continued)

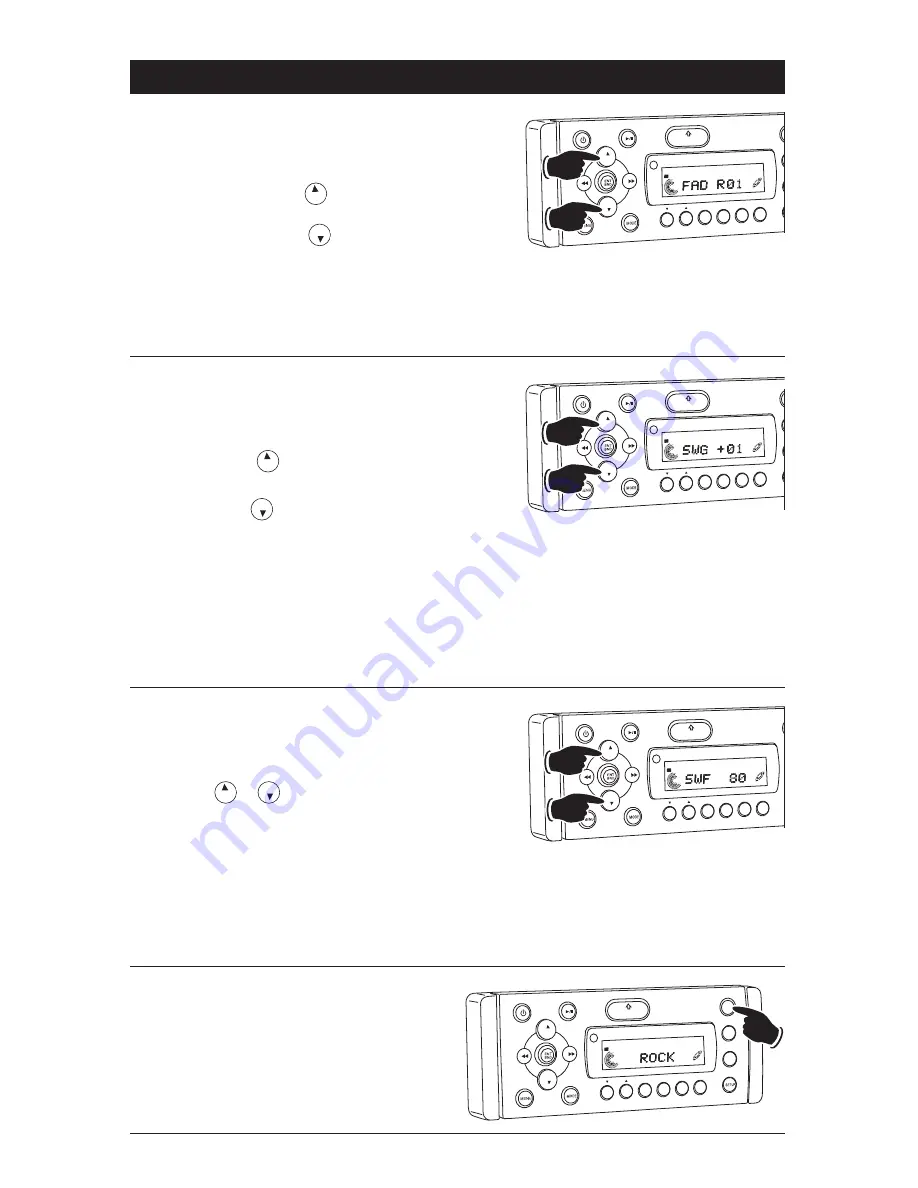
Fader:

1. Select the Fader mode (FAD) by pressing the

SETUP 

button. 

2. To adjust the amount of sound output to the

Rear speakers press the       button.

To adjust the amount of sound output to the
Front speakers press the       button.

FAD 00 = Equal sound front and rear speakers.
FAD R12 = Rear speakers only.
FAD F12 = Front speaker only. 

3. After 5 seconds control reverts back to volume

control.

VOL

VOL

VOL

LOUD

VOL

MUTE


OPEN

1

2

3

4

5

6

SHF

RPT

SCN

DIR/CAT

ST

Front

Rear

Equalizer (EQ):

Press the 

EQ

button to choose between the pre-

set equalizer settings: Rock, Pop, Classic, Vocal,
Flat and Jazz as indicated in the display area. 

VOL

LOUD

VOL

MUTE

D M

S-MOD

  Pod MENU

OPEN

1

2

3

4

5

6

ASM

DISP

EQ

SUB  W

SHF

RPT

SCN

DIR/CAT

ST

Subwoofer Line Level Output (SWG):

1. Select the Subwoofer Line Level Output mode

(SWG) by pressing the 

SETUP 

button. 

2. To adjust the Subwoofer Line Level Output

higher press the       button.

To adjust the Subwoofer Line Level Output

lower press the       button.

SWG  00 = No gain.
SWG -12 = Minimum level.
SWG +12 = Maximum level. 

3. After 5 seconds control reverts back to volume

control.

Note:

If subwoofer output is turned Off, Subwoofer

Line Level Output mode is not accessible. See
Subwoofer Output (page 11) for more information.

VOL

LOUD

VOL

MUTE


OPEN

1

2

3

4

5

6

SHF

RPT

SCN

DIR/CAT

Lower

Higher

ST

VOL

VOL

Subwoofer Cutoff Frequency (SWF):

1. Select the Subwoofer Cutoff Frequency mode

(SWF) by pressing the 

SETUP 

button. 

2. To adjust the Subwoofer Cutoff Frequency

press the       or        button.

SWF 160 = Low Pass 160Hz
SWF 120 = Low Pass 120Hz
SWF  80 = Low Pass 80Hz  

3. After 5 seconds control reverts back to volume

control.

Note:

If subwoofer output is turned Off, Subwoofer

Cutoff Frequency mode is not accessible. See
Subwoofer Output (page 11) for more information.

VOL

LOUD

VOL

MUTE


OPEN

1

2

3

4

5

6

SHF

RPT

SCN

D R/CAT

Lower

Higher

ST

VOL

VOL

Содержание WM1-CD

Страница 1: ...Operation and Installation Manual VOL LOUD VOL MUTE DIM S MOD iPod MENU OPEN 1 2 3 4 5 6 ASM DISP EQ SUB W SHF RPT SCN D R CAT ST WM1 CD Waterproof Marine AM FM Stereo Receiver with CD Player ...

Страница 2: ...USB Operation 23 24 Auxiliary Audio Input Operation 24 Setup Features 25 Installation 26 Speaker Connections 27 Auxiliary Connections 28 Input Connections 29 30 Replaceable Fuse 31 Warranty 32 Safety Information CAUTION THIS MARINE CD PLAYER IS A CLASS 1 LASER PRODUCT THIS UNIT USES A VISIBLE INVISIBLE LASER BEAM WHICH COULD CAUSE HAZARDOUS RADIATION IF EXPOSED DIRECTLY BE SURE TO OPERATE THE MOBI...

Страница 3: ...1 FM2 and FM3 radio bands Loudness Press and hold button until LOUD ON appears in the display to boost high and low tones at low volume levels To deactivate press and hold again until LOUD OFF appears in the display IPOD Mode See IPOD Operation for more information 5 Infrared Eye Receives the signals from the optional remote control 6 Open Button Press to fold down the front panel to access the CD...

Страница 4: ...to cancel 15 Multi Function Button 3 Radio Mode Press and hold until a beep is heard to memorize a radio station into memory 3 CH3 Press and release when recalling preset radio station 3 CD Mode Press to repeat a CD track Press again to cancel CD Changer Mode Press to repeat the CD track Press and hold to repeat the entire loaded disc Press again to cancel 16 Multi Function Button 2 Radio Mode Pre...

Страница 5: ...ation into memory 4 CH4 Press and release when recalling preset radio station 4 CD Mode Press to play all the tracks on the CD in random order Press again to cancel CD Changer Mode Press to play all the tracks on the CD in random order Press and hold to play every loaded CD in random order Press again to cancel 15 Multi Function Button 3 Radio Mode Press and hold until a beep is heard to memorize ...

Страница 6: ...in to restore the brightness of display VOL LOUD VOL MUTE D M S MOD iPod MENU OPEN 1 2 3 4 5 6 ASM DISP EQ UB W SHF RPT SCN DIR CAT ST VOL LOUD VOL MUTE DIM S MOD iPod MENU OPEN 1 2 3 4 5 6 ASM DISP EQ SUB W SHF RPT SCN DIR CAT T Display Selection Press the DISP button to display the information according to the mode selected Example Press the DISP button in the Sirius Radio mode to display SONG T...

Страница 7: ...tuner will scan up to the next strong sta tion and stop seeking then start playing VOL OUD VOL MUTE DIM OPEN 1 2 3 4 5 6 ASM DISP EQ SUB W SHF RPT SCN DIR CAT ST Lower Frequency Higher Frequency VOL LOUD VOL MUTE DIM OPEN 1 2 3 4 5 6 ASM D SP EQ SUB W SHF RPT SCN D R CAT ST Memorizing Radio Stations 1 Press the ENT BND button to select either the FM1 FM2 FM3 AM1 or AM2 radio band 2 Tune in the des...

Страница 8: ...u the preset stations stored in the current band and pause for 5 seconds at each station When a desired station is reached press the ASM button again to stop scanning VOL LOUD VOL MUTE DIM S MOD iPod MENU OPEN 1 2 3 4 5 6 ASM DISP EQ SUB W SHF RPT SCN DIR CAT ST VOL LOUD VOL MUTE D M S MOD Pod MENU OPEN 1 2 3 4 5 6 ASM D SP EQ SUB W SHF RPT SCN D R CAT T Hold Scanning for FM Radio Stations Accordi...

Страница 9: ...6 SHF RPT SCN DIR CAT ST Increase Decrease VOL LOUD VOL MUTE DIM S MOD P d MENU OPEN 1 2 3 4 5 6 ASM D SP EQ SUB W SHF RPT SCN D R CAT ST Treble 1 Select the Treble mode TRE by pressing the SETUP button 2 Increase the Treble by pressing the button Decrease the Treble by pressing the button 3 After 5 seconds control reverts back to volume control VOL VOL VOL LOUD VOL MUTE OPEN 1 2 3 4 5 6 SHF RPT S...

Страница 10: ...y pressing the SETUP button 2 To adjust the Subwoofer Line Level Output higher press the button To adjust the Subwoofer Line Level Output lower press the button SWG 00 No gain SWG 12 Minimum level SWG 12 Maximum level 3 After 5 seconds control reverts back to volume control Note If subwoofer output is turned Off Subwoofer Line Level Output mode is not accessible See Subwoofer Output page 11 for mo...

Страница 11: ...ters Car seats or dashboard Sound Controls Continued Loudness To boost high and low tones at low volume lev els press and hold the ENT BND button until LOUD ON appears in the display To deselect press and hold the ENT BND button again until LOUD OFF appears in the display VOL LOUD VOL MUTE DIM OPEN 1 2 3 4 5 6 ASM D SP EQ SUB W SHF RPT SCN D R CAT ST Hold LOUD Loud On Indicator Mute Press and rele...

Страница 12: ...n the display VOL LOUD VOL MUTE DIM OPEN 1 2 3 4 5 6 ASM D SP EQ SUB W SHF RPT SCN D R CAT Track Number Lower Track Higher Track Disc Warnings Continued Preparing New Discs with Rough Spots A new disc may have rough edges on its inside and outside edges If a disc with rough edges is used the proper setting will not be performed and the player will not play the disc Therefore remove the rough edges...

Страница 13: ...l disappear from the display The entire CD will now be repeated VOL LOUD VOL MUTE D M S MOD Pod MENU OPEN 1 2 3 4 5 6 ASM DISP EQ SUB W SHF RPT SCN DIR CAT Preview CD Tracks Press the SCN button until SCN appears in the display Each track on the disc will play for 10 seconds To cancel this feature press the SCN button until SCN disappears from the display VOL LOUD VOL MUTE D M S MOD Pod MENU OPEN ...

Страница 14: ...higher track The track number will appear in the display VOL LOUD VOL MUTE D M OPEN 1 2 3 4 5 6 ASM DISP EQ SUB W SHF RPT SC DIR CAT Track Number Lower Track Higher Track VOL LOUD VOL MUTE D M S MOD Pod MENU OPEN 1 2 3 4 5 6 ASM D SP EQ SUB W SHF RPT SCN D R CAT Pausing a Disc Press the button to pause the disc Press it again to resume play Ejecting a Disc Press the OPEN button to fold down the fr...

Страница 15: ...The track number will appear in the display VOL LOUD VOL MUTE DIM OPEN 1 2 3 4 5 6 ASM D SP EQ SUB W SHF RPT D R CAT Lower Track Higher Track Track Number CD Disc Selection Press the 1 button to select a lower disc in the CD changer Press the 2 button to select a higher disc in the CD changer The disc number will appear in the display VOL LOUD VOL MUTE DIM S MOD Pod MENU OPEN 1 2 3 4 5 6 ASM D SP ...

Страница 16: ...D Tracks or Disc Press the SCN button and SCN will appear in the display Each track on the current disc will play for 10 seconds Press and hold the SCN button and SCN and will appear in the display The first track on every loaded disc will play for 10 seconds To cancel either function press the SCN button again VOL LOUD VOL MUTE DIM S MOD Pod MENU OPEN 1 2 3 4 5 6 ASM D SP EQ SUB W SHF RPT SCN D R...

Страница 17: ... 3 4 5 6 ASM DISP EQ SUB W SHF RPT SCN DIR CAT SAT Sirius Satellite Radio Operation Option Please note that satellite radio signal may be blocked by trees buildings or other obstacles Channel Selection Modes Channels are selected by the following methods Manual Tuning Use the Manual Tuning method to scan thru the channels Direct Tuning Use the Direct Tuning methods when you know the desired channe...

Страница 18: ... EQ SUB W SHF RPT SCN DIR CAT SAT 2 Press the or button to select the first number of the desired channel VOL LOUD VOL MUTE D M OPEN 1 2 3 4 5 6 ASM DISP EQ SUB W SHF RPT SCN D R CAT Lower Number Higher Number SAT 3 Press the MENU button to select the next number of the channel Use the or buttons to select the desired number Repeat this procedure for the third number VOL LOUD VOL MUTE D M S MOD iP...

Страница 19: ...tegory SAT 4 Press the ENT BND button and the channel will start playing VOL LOUD VOL MUTE D M OPEN 1 2 3 4 5 6 ASM D SP EQ SUB W SHF RPT SCN D R CAT C TEGORY SAT Switching the Display Press the DISP button to cycle through the fol lowing display modes SONG TITLE _ ARTIST NAME _ CATEGORY _ SONG TITLE VOL LOUD VOL MUTE DIM S MOD P d MENU OPEN 1 2 3 4 5 6 ASM D S EQ SUB W SHF RPT SCN D R CAT CATEGOR...

Страница 20: ...tored Sirius Channels Press the ASM button and the tuner will scan the preset channels in the SIR1 band first then SIR2 and finally SIR3 pausing for 5 seconds at each channel Scanning will continue until the ASM button is pressed again When a desired channel is reached press the ASM button again to stop scanning VOL LOUD VOL MUTE DIM S MOD Pod MENU OPEN 1 2 3 4 5 6 ASM D SP EQ SUB W SHF RPT SCN D ...

Страница 21: ... MOD iPod MENU OPEN 1 2 3 4 5 6 ASM DISP EQ UB W SHF RPT SCN DIR CAT AT SK P General Operations 1 Press the button to turn the unit On 2 Connect an IPOD to the cable attached to the WM1 CD 3 The unit will automatically switch to the IPOD mode and start playing Note The IPOD controls will become inoperable and the WM1 CD now controls the IPOD VOL LOUD VOL MUTE DIM S MOD Pod MENU OPEN 1 2 3 4 5 6 AS...

Страница 22: ... 5 6 ASM D SP EQ SUB W SHF RPT SCN D R CAT VOL OUD VOL MUTE DIM S MOD iPod MENU OPEN 1 2 3 4 5 6 ASM DISP EQ SUB W SHF RPT SCN DIR C T Pausing a Track Press the button to pause the track Press it again to resume play 2 Press the or button to select the SONG menu 3 Press the ENT BND button to activate the SONG menu 4 Press the button to select the desired song from the menu Once the button has been...

Страница 23: ...SHF appears in the display The tracks on the IPOD will now play in a random order To cancel this feature press the SHF button again VOL LOUD VOL MUTE D M S MOD Pod MENU OPEN 1 2 3 4 5 6 ASM DISP EQ SUB W SHF RPT SCN DIR CAT IPOD Operation Option Continued Display Selection Press the DISP button to display the following track information Track Elapse Time and Song Title VOL LOUD VOL MUTE D M S MOD ...

Страница 24: ... CD Operation for details Auxiliary Audio Input Operation Selecting an Auxiliary Audio Input Play Source 1 Press the button to turn the unit On 2 Press the MODE button until AUX IN appears in the display 3 Refer to the audio device s owners manual for proper operation Note The WM1 CD will not control the auxiliary source but can adjust the sound controls VOL LOUD VOL MUTE DIM S MOD iPod MENU OPEN ...

Страница 25: ... display Press the SETUP button again until P VOL 12 appears in the display 2 Press the or button to adjust the pri mary volume 3 Wait 5 seconds and the unit will return to last display mode VOL LOUD VOL MUTE DIM S MOD P d MENU OPEN 1 2 3 4 5 6 ASM D SP EQ SUB W SHF RPT SCN D R CAT ST VOL VOL Area Radio Frequency Adjustment Follow the instructions below to change the area configuration 1 Press and...

Страница 26: ...26 Installation 2 71 16 71 2 Metal Strap Washer Nut Sheet Metal Screw Gasket Mounting Screws Dashboard Snap On End Cap Snap On End Cap Attach Metal Strap Here ...

Страница 27: ...aker _ Gray Black Wire Gray Wire Right Front Speaker _ Green Black Wire Green Wire Left Rear Speaker Powered Subwoofer Optional Model LS SUB 75 _ Violet Black Wire Violet Wire Right Rear Speaker Subwoofer Output Mono Green Cable Speaker Connections ...

Страница 28: ...y with a 12 Volt DC power source with a negative ground 2 Channel Audio Output Amplifier Optional Yellow Wire to 12 Volt Constant 2 Channel Audio Output Amplifier Optional Front Line Out Brown Cable Rear Line Out Gray Cable Blue Wire Amplifier Control Auxiliary Connections ...

Страница 29: ...put Connections RCA Connectors TV Optional Audio Input Yellow Cable IPOD Optional Audio Output MENU MP3 Player Optional iPod Cable Optional MP3 Cable Optional Sirius Antenna Optional Sirius Receiver Optional ...

Страница 30: ...30 Input Connections Continued External Automotive Type Antenna Optional CD Changer Optional Wired Remote Controller Optional Model WRC P1 WRC S1 WRC S2 Infrared Remote Sensor Optional ...

Страница 31: ...31 If the fuse should blow check that the wiring is correct If the wiring is correct replace the fuse with the same amperage rating as the original 15 amp Replaceable Fuse 15 Amp Fuse ...

Страница 32: ...pped freight prepaid We will pay the return shipping charges if repairs are covered by the warranty and we are shipping within the United States After the warranty period if your MB Quart Marine Product ever needs service please call 1 800 621 2278 and ask for the service department to determine if the repairs are feasible LIMITATION OF IMPLIED WARRANTIES ALL IMPLIED WARRANTIES INCLUDING WARRANTIE...

Отзывы: