background image

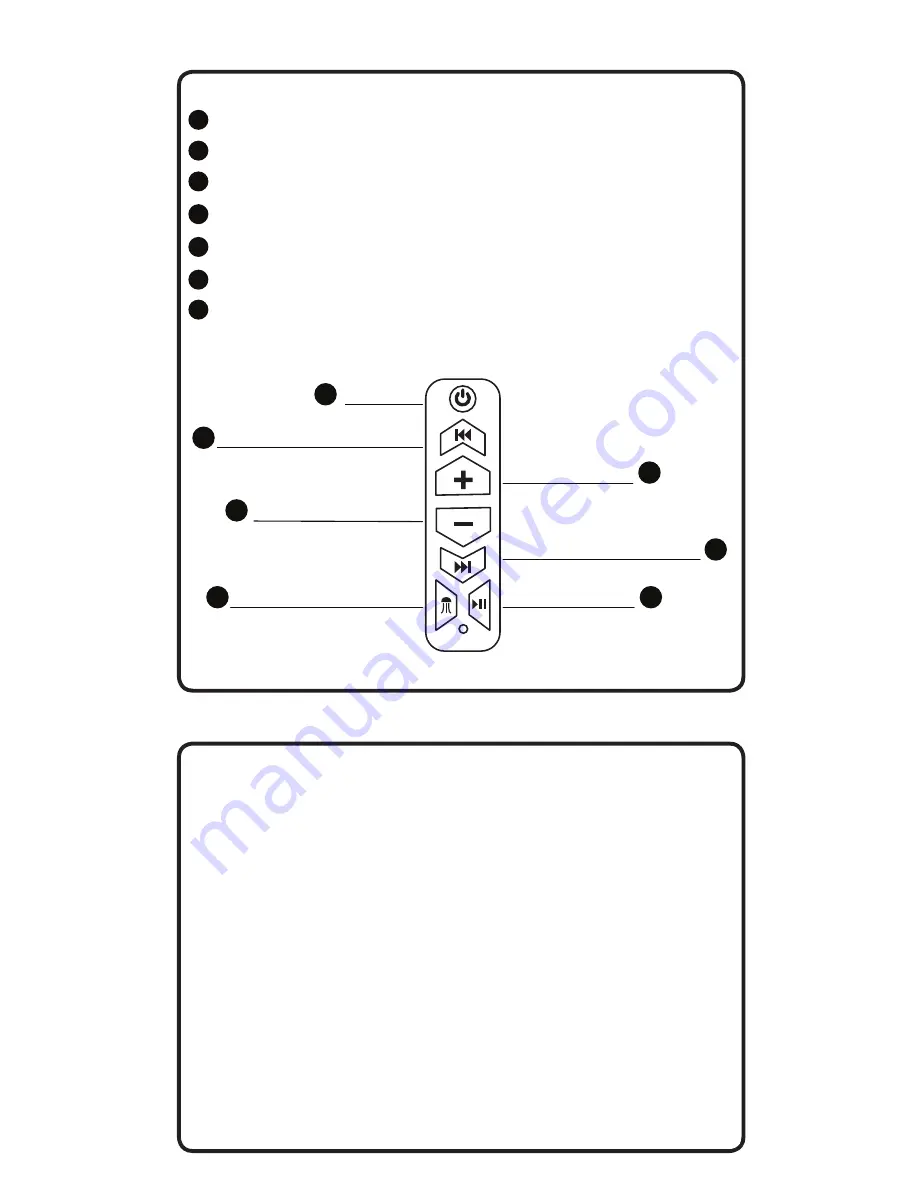
Power  -  Will turn the unit on or off / Five second hold/ quick push will switch inputs. 

Track BACKWARDS  -  Press to restart the current track or to back up to previous tracks.

Volume UP  -  Each press will increase the volume.

Volume DOWN  -  Each press will decrease the volume.

Track FORWARD -  Press to advance to the next track.

Map Light / Illumination - Turn on Map Light, cycle through illumination settings.

PLAY / PAUSE  -  Press once to pause. Press again to play.

During unit power up, the blue LED on the bottom of the control panel will blink 
indicating that it is in Bluetooth search mode.

During this process “MB Quart” should show up in your list of Bluetooth devices when 
the search has connected with your device. When the connection is made the blue LED 
will change to a solid color.

Once a device has been paired, the unit will reconnect at power up to that device 
when in range.

7RFRQQHFWWRDGLIIHUHQWGHYLFHWKH¿UVWGHYLFHZLOOQHHGWREHGLVFRQQHFWHG

When a phone call is received, the audio signal will mute but not disconnect.

To switch to 3.5mm press the power button quickly. 

To switch back to BT press the power button again quickly. 

Controls

Bluetooth Device Pairing

1

2

3

4

5

6

7

The pairing process can vary based on your particular device. Refer to the 
operating instructions of your device. Below is the general process to connect.

Volume UP

Power

Track FORWARD

1

2

Track BACKWARDS

Volume DOWN

Play/Pause

Map Light/ Illumination 

3

4

5

6

7

Содержание Nautic NSB6V1

Страница 1: ...Nautic NSB6V1 NSB10V1 Soundbars Quick Start Installation Guide...

Страница 2: ...ns on your choice of MB Quart Nautic Sound Bars This Quick Start Installation guide is meant to help you complete a basic installation For more detailed information about the product please visit our...

Страница 3: ...your list of Bluetooth devices when the search has connected with your device When the connection is made the blue LED will change to a solid color Once a device has been paired the unit will reconne...

Страница 4: ...the warranty period Components that prove to be defective in materials and workmanship under proper installation and use must be returned to the original authorized Maxxsonics USA Inc retailer from wh...

Страница 5: ...unt review this document to determine which you will use then prepare for installation A Prepare a flat work surface to prepare for installation B Recruit an assistant to help with lifting Sound Bar i...

Страница 6: ...brackets X STEP 1 Mount 1 Surface Mount Bracket 6 per side with the longer 7 M5x20 screws STEP 2 Position the Sound Bar in place Use a marker to identify where the mounting holes will be located on y...

Страница 7: ...using two 4 5 M5X10 screws Make sure to prep both the left and right side of the sound bar Position the hooked edge of the Clamp Base to the back of the sound bar screw holes to the front STEP 4 With...

Страница 8: ...are we recommend our build partner AXIA ALLOYS They offer a wide variety of billet aluminum mounts mounting system for more accessories that you can possibly install on your vehicle Here is a link for...

Отзывы: