Mazda CX-9
㧙
8
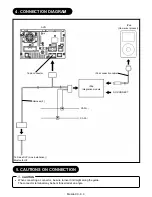
WIRING <Installation of iPod integration module>
iPod connection cable
Electro tap
To Sirius, B/T
To AVN
㩷
iPod integration module
iPod connection cable
Tie wrap (large)
Vehicle front
iPod integration module
Dashboard member
Vehicle front
Display 12 pin connector
(Vehicle wire ) (wire color)
Kit wire
(wire color)
㩷
Terminal J (Red/Yellow)
CAN (+) (Red)
㩷
Terminal L (Blue/Yellow)
CAN (-) (Black)
㩷
Tie wrap (small)
Urethane
Electro taps
Terminal J: CAN (+) (Red/Yellow)
Kit wire: CAN (+) (Red)
Terminal L: CAN (-) (Blue/Yellow)
Kit wire: CAN (-) (Black)
L
J
[ Information display 12-pin connector ]
Pad protector
Information
display connector
Vehicle
wiring harness
x
To prevent an open or short circuit in the wiring of the iPod integration module, be sure to route cables
avoiding sharp edges and burrs of the vehicle's sheet metal.
x
To ensure proper affixing, be sure to degrease the area where the pad protector is affixed.
x
After fixing a cable with a tie wrap, cut off excess tie wrap using nippers. Otherwise it may interfere with
other parts causing failure or noise.
CAUTION
Harness (F)
Harness (F)
Harness (F)
Harness (F)
Tie redundant part
[Step 1]
[Step 2]
[Step 3]
Branching connection using electro-tap
Vehicle wire
Latch
Kit wire
Stopper
Electro-tap
Vehicle wire
Kit wire
1. Pass the vehicle wiring
harness (CAN (+), CAN
(-)) through the
electro-tap.
2. Fold the electro-tap in
the direction of the
arrow and lock it.
3. Press fit the electro-tap
terminal using pliers.
x
Lock the electro-tap locking area firmly until a
click sound is heard.
x
Do not reuse an electro-tap if it has been used once.
CAUTION
Vehicle front


