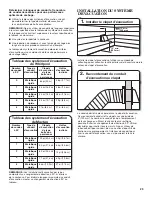
Maytag WGD8200YW Скачать руководство пользователя страница 17

17

TROUBLESHOOTING

DRYER OPERATION
Dryer will not run


Has a household fuse blown, or has a circuit breaker 

tripped? 

There may be two household fuses or circuit breakers  

for the dryer. Check that both fuses are intact and tight,  

or that both circuit breakers have not tripped. Replace  

the fuse or reset the circuit breaker. If the problem  

continues, call an electrician.


Is the correct power supply available? 

Electric dryers require a 240-volt power supply. Check  

with a qualified electrician.


Was a regular fuse used? 

Use a time-delay fuse.

No heat


Has a household fuse blown, or has a circuit breaker 

tripped? 

The drum may be turning, but you may not have heat. 

Elelctric dryers use two household fuses or circuit breakers.

Replace the fuse or reset the circuit breaker. If the problem  

continues, call an electrician.


Is “Check Vent” illuminated on the Airflow screen? 

This indicator will show the status of airflow through the 

dryer vent. The Detecting light comes on during the sensing 

phase at the beginning of a cycle. The Check Vent light will 

come on if a blocked vent or low airflow issue is detected. 


  Try  the  following: 


Clean lint screen. 


Check to see if the vent run from the dryer to the wall is free 

of lint and debris. 


Confirm the exterior vent exhaust hood is free of lint and 

debris. 


Confirm your vent system falls within the recommended run 

length and number of elbows for the type of vent you are 

using. Refer to “Plan Vent System” for details. 


Select a Timed Dry heated cycle, and restart the dryer.

For more information on maintaining good airflow, see 

“Check Your Vent System for Good Airflow” in the “Use and 

Care Guide”. If the message persists, have your entire home 

venting run cleaned.

Dryer displaying code message


“PF” (power failure), check the following: 

Was the drying cycle interrupted by a power failure? 

Press and hold START/PAUSE to restart the dryer. 


   Try  the  following:   

Check to see if a household fuse has blown or circuit breaker 

has tripped. Electric dryers use two household fuses or 

breakers. Replace the fuse or reset the circuit breaker. 


Confirm the power cord is properly installed. 


Select a Timed Dry heated cycle, and restart the dryer. 


If the message persists, consult a qualified electrician.


“F” Variable (F1E1, F2E2, F3E1, F3E2, F7E1, F3E6, F3E7) 

service codes: 

Call for service.

DRYER RESULTS
Clothes are not drying satisfactorily, drying times are 

too long, or load is too hot


Is the lint screen clogged with lint? 

Lint screen shold be cleaned before each load.


Is the exhaust vent or outside exhaust hood clogged with 

lint, restricting air movement? 

Run the dryer for 5-10 minutes. Hold your hand under 

the outside exhaust hood to check air movement. If you 

do not feel air movement, clean exhaust system of lint or 

replace exhaust vent with heavy metal or flexible vent. See 

“Installation Instructions.”


Are fabric softener sheets blocking the grille? 

Use only one fabric softener sheet, and use it only once.


Is the exhaust vent the correct length? 

Check that the exhaust vent is not too long or has too 

many turns. Long venting will increase drying times. See 

“Installation Instructions.”


Is the exhaust vent diameter the correct size?


Use 4" (102 mm) diameter vent material.


Is the dryer located in a room with temperature below 

45°F (7°C)?


Proper operation of dryer cycles requires temperatures 

above 45°F (7°C).


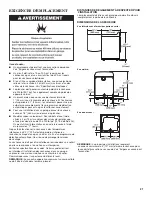
Is the dryer located in a closet? 

Closet doors must have ventilation openings at the top and 

bottom of the door. The front of the dryer requires a minimum 

of 1" (25 mm) of airspace, and, for most installations, the 

rear of the dryer requires 5" (127 mm). See “Installation 

Instructions.” 

Содержание WGD8200YW

Страница 1: ..._______________________ NOTES CONCERNANT L INSTALLATION Table des matières SÉCURITÉ DE LA SÉCHEUSE 18 EXIGENCES D INSTALLATION 20 Outillage et pièces 20 EXIGENCES D EMPLACEMENT 21 RACCORDEMENT DE LA SÉCHEUSE ÉLECTRIQUE CANADA SEULEMENT 22 RACCORDEMENT ÉLECTRIQUE DE LA SÉCHEUSE À GAZ 23 INSTALLATION DES PIEDS DE NIVELLEMENT 25 RACCORDEMENT AU GAZ 26 L EVACUATION 26 Exigences concernant l evacuation...

Страница 2: ...2 DRYER SAFETY IMPORTANT When discarding or storing your old clothes dryer remove the door ...

Страница 3: ...3 ...

Страница 4: ...or further information please refer to the Assistance or Service section in your Use and Care Guide Optional Equipment Not supplied with dryer Refer to your Use and Care Guide for information about accessories available for your dryer Parts supplied all models Flat blade screwdriver Adjustable wrench that opens to 1 25 mm or hex head socket wrench Tin snips new vent installations Caulking gun and ...

Страница 5: ...ves and water pressure of 20 100 psi 137 9 689 6 kPa You may use the water supply for your washer using the Y connector provided Do not operate your dryer at temperatures below 45 F 7 C At lower temperatures the dryer might not shut off at the end of an automatic sensor cycle this can result in longer drying times The dryer must not be installed or stored in an area where it will be exposed to wat...

Страница 6: ...eceptacle The cord is 5 ft 1 52 m long Be sure wall receptacle is within reach of dryer s final location If using a replacement power supply cord it is recommended that you use Power Supply Cord Replacement Part Number 9831317 For further information please reference service numbers located in Assistance or Service section of your Use and Care Guide GROUNDING INSTRUCTIONS SAVE THESE INSTRUCTIONS F...

Страница 7: ... codes and ordinances WARNING Improper connection of the equipment grounding conductor can result in a risk of electric shock Check with a qualified electrician or service representative or personnel if you are in doubt as to whether the dryer is properly grounded Do not modify the plug provided with the dryer if it will not fit the outlet have a proper outlet installed by a qualified electrician ...

Страница 8: ... not use copper tubing Lengths over 20 ft 6 1 m should use larger tubing and a different size adapter fitting If your dryer has been converted to use LP gas 3 8 LP compatible copper tubing can be used If the total length of the supply line is more than 20 ft 6 1 m use larger pipe NOTE Pipe joint compounds that resist the action of LP gas must be used Do not use TEFLON tape Must include shut off va...

Страница 9: ... with Flange Connect gas supply to dryer 1 Remove red cap from gas pipe Using a wrench to tighten connect gas supply to dryer Use pipe joint compound on threads of all non flared male fittings If flexible metal tubing is used be sure there are no kinks NOTE For LP gas connections you must use pipe joint compound resistant to action of LP gas Do not use TEFLON tape MAKE GAS CONNECTION A B Non flare...

Страница 10: ...chimney wall ceiling attic crawlspace or a concealed space of a building Only rigid or flexible metal vent shall be used for exhausting 4 102 mm 4 102 mm heavy metal exhaust vent Only a 4 102 mm heavy metal exhaust vent and clamps may be used Do not use plastic or metal foil vent Rigid metal vent Recommended for best drying performance and to avoid crushing and kinking Flexible metal vent Acceptab...

Страница 11: ...r 4396028 Periscope Installation For use with dryer vent to wall vent mismatch Part Number 4396037 0 0 mm to 18 460 mm mismatch Part Number 4396011 18 460 mm to 29 737 mm mismatch Part Number 4396014 29 737 mm to 50 1270 mm mismatch If you prefer dryer may be converted to exhaust through the bottom You must contact your local dealer to have dryer converted A B A Standard rear offset exhaust instal...

Страница 12: ...ombinations acceptable to use NOTE Do not use vent runs longer than those specified in Vent System Chart Exhaust systems longer than those specified will Shorten life of dryer Reduce performance resulting in longer drying times and increased energy usage Whirlpool Vent System Chart Number of 90 elbows Type of vent Box louvered hoods Angled hoods 1 4 3 2 0 Rigid metal Rigid metal Rigid metal Rigid ...

Страница 13: ...ghten couplings 4 One end of the long hose has a wire mesh strainer inside the coupling Attach this end to the Y connector Attach washer cold inlet hose to other side of Y connector Screw on coupling by hand until it is seated on connector Using pliers tighten the couplings an additional two thirds turn NOTE Do not overtighten Damage to the coupling can result 33 4 95 mm 11 279 mm Attach long hose...

Страница 14: ...ure all four legs are snug against the floor Adjust leveling legs 2 CONNECT VENT 1 Connect vent to exhaust outlet Using a 4 102 mm clamp connect vent to exhaust outlet in dryer If connecting to existing vent make sure vent is clean Dryer vent must fit over dryer exhaust outlet and inside exhaust hood Check that vent is secured to exhaust hood with a 4 102 mm clamp Move dryer to final location 2 Mo...

Страница 15: ...Only Temperature setting If dryer will not start check the following Controls are set in a running or On position Start button has been pushed firmly Dryer is plugged into an outlet and or electrical supply is connected Household fuse is intact and tight or circuit breaker has not tripped Dryer door is closed This dryer automatically runs an installation diagnostic routine at the start of its firs...

Страница 16: ...m screws Tighten all hinge screws 7 Close door to engage door strike Reverse the strike 1 Remove the door strike A from the dryer door opening 2 Remove the cosmetic screw B opposite the door strike A A B A Door strike B Cosmetic screw 3 Reinstall the door strike and cosmetic screw on the opposite side of dryer door opening from where they were removed NOTE Door strike and plugs must be on the same...

Страница 17: ...Dryer displaying code message PF power failure check the following Was the drying cycle interrupted by a power failure Press and hold START PAUSE to restart the dryer Try the following Check to see if a household fuse has blown or circuit breaker has tripped Electric dryers use two household fuses or breakers Replace the fuse or reset the circuit breaker Confirm the power cord is properly installe...

Страница 18: ...18 SÉCURITÉ DE LA SÉCHEUSE IMPORTANT Pour mettre l ancienne sécheuse au rebut ou pour la remiser enlever la porte ...

Страница 19: ...19 ...

Страница 20: ...use Pièces fournies tous les modèles Tournevis à lame plate Clé à molette avec ouverture jusqu à 1 25 mm ou clé à douille hexagonale Cisaille de ferblantier pour l installation d un nouveau conduit Pistolet à calfeutrage et composé de calfeutrage pour l installation d un nouveau conduit d évacuation Brides de conduit Tourne écrou de 1 4 6 mm recommandé Composé d étanchéité des raccords filetés rés...

Страница 21: ...e pression d eau de 20 à 100 lb po2 137 9 à 689 6 kPa On peut utiliser l alimentation en eau de la laveuse à l aide du raccord en Y fourni Ne pas faire fonctionner la sécheuse à des températures inférieures à 45ºF 7ºC À des températures inférieures la sécheuse risque de ne pas s arrêter à la fin d un programme de détection automatique Ceci risque de prolonger les durées de séchage La sécheuse ne d...

Страница 22: ... de la sécheuse 4 wire receptacle 14 30R Espacement pour une installation dans un encastrement ou dans un placard Toutes les dimensions indiquent le dégagement autorisé avec un dégagement testé de 0 0 mm de chaque côté et à l arrière Prévoir davantage d espace pour faciliter l installation et l entretien Un espace supplémentaire peut être requis pour les moulures de porte et de plancher et pour le...

Страница 23: ...ctricien qualifié d installer une prise de courant appropriée RACCORDEMENT ÉLECTRIQUE DE LA SÉCHEUSE À GAZ SPÉCIFICATIONS ÉLECTRIQUES Une source d alimentation de 120 V 60 Hz CA uniquement de 15 ou 20 ampères et protégée par fusible est nécessaire On recommande d utiliser un fusible ou un disjoncteur temporisé Il est également recommandé de raccorder l appareil sur un circuit distinct exclusif à c...

Страница 24: ...isation doit comprendre un connecteur obturé filetage NPT de 1 8 ou plus accessible pour le raccordement de l instrument de mesure immédiatement en amont de la connexion d alimentation en gaz de la sécheuse A B E D C Aux É U Un robinet d arrêt individuel manuel doit être installé à six 6 pieds 1 8 m maximum de la sécheuse conformément au National Fuel Gas Code ANSI Z223 1 L emplacement doit être f...

Страница 25: ...édestal prévoir 10 254 mm ou 15 5 394 mm de plus à partir du sol pour la hauteur de la canalisation d arrivée de gaz en fonction du modèle de piédestal Pour une installation dans un garage prévoir 18 460 mm de plus à partir du sol pour la hauteur de la canalisation d arrivée de gaz Afin d éviter d endommager le plancher utiliser un grand morceau de carton plat extrait de la boîte d emballage de la...

Страница 26: ...uminium par un conduit métallique rigide ou souple Consulter à nouveau le tableau des systèmes d évacuations et modifier le système d évacuation existant au besoin pour obtenir un meilleur séchage 4 102 mm Conduit d évacuation en métal lourd de 4 102 mm Raccorder l alimentation en gaz à la sécheuse 1 Retirer le capuchon rouge de la canalisation de gaz À l aide d une clé pour serrer raccorder l ali...

Страница 27: ...her ou de tout objet susceptible d obstruer l ouverture d évacuation tels des fleurs des pierres des buissons ou de la neige Style acceptable Brides de serrage Utiliser des brides pour sceller tous les joints Le conduit d évacuation ne doit pas être raccordé ou fixé avec des vis ou tout autre dispositif de serrage qui se prolongerait à l intérieur du conduit et retiendrait la charpie Ne pas utilis...

Страница 28: ...nt fixé à une section non combustible de la structure de la résidence mobile et ne doit pas se terminer en dessous de la résidence mobile Acheminer le conduit d évacuation vers l extérieur Installation du système d évacuation en résidence mobile Déterminer l itinéraire d acheminement du conduit Choisir l itinéraire d acheminement vers l extérieur qui sera le plus direct et le plus rectiligne Plani...

Страница 29: ...i 11 6 m 29 pi 8 8 m 21 pi 6 4 m Le tableau des systèmes d évacuation indique les critères d évacuation qui vous aideront à obtenir une performance de séchage idéale REMARQUE Les installations d évacuation par le bas comportent un changement de direction à 90º à l intérieur de la sécheuse Pour établir la longueur maximale du conduit d évacuation ajouter un changement de direction à 90º au tableau ...

Страница 30: ...sécheuse doit être connectée au robinet d eau froide à l aide des nouveaux tuyaux d alimentation Ne pas utiliser de tuyaux usagés Fermer l eau froide retirer et remplacer le joint de caoutchouc 1 Fermer le robinet d eau froide et ôter le tuyau d alimentation de la laveuse Vérifier que le joint de caoutchouc se trouve dans le raccord en Y Retirer l ancien joint de caoutchouc du tuyau d arrivée d ea...

Страница 31: ...r du raccord en Y du robinet et des tuyaux RACCORDEMENT DU SYSTÈME D ÉVACUATION 1 Raccorder le conduit d évacuation au clapet d évacuation À l aide d une bride de fixation de 4 102 mm relier le conduit d évacuation à la bouche d évacuation de la sécheuse Si l on réalise le raccordement au conduit d évacuation existant s assurer que celui ci est propre Le conduit d évacuation doit être fixé par des...

Страница 32: ...ion en gaz est ouverte q Vérifier qu il n y a pas de fuites Tous les modèles q Sélectionner un programme de séchage minuté avec chaleur et mettre la sécheuse en marche Ne pas sélectionner le réglage de température Air Only air seulement Si la sécheuse ne démarre pas vérifier ce qui suit Les commandes sont réglées à la position de marche ou sur ON marche Le bouton Start mise en marche a été enfoncé...

Страница 33: ...deux vis desserrées qui restent du panneau avant de la sécheuse 5 Retirer les quatre chevilles de plastique A situées à l extérieur de l ouverture de la porte de la sécheuse 6 Installer 4 chevilles de plastique A dans les trous des vis sur la gauche de la sécheuse là où les charnières ont été retirées à l étape 4 A A A A Inversion de la gâche 1 Retirer la gâche de la porte A de l ouverture de la p...

Страница 34: ... totale et le nombre de coudes recommandés pour le type de conduit utilisé Consulter Planification du système d évacuation pour plus de détails Sélectionner un programme de séchage minuté avec chaleur et remettre la sécheuse en marche Pour plus de renseignements sur l établissement d une bonne circulation d air voir Inspectez votre système d évacuation pour garantir une bonne circulation de l air ...

Страница 35: ...er seulement une feuille d assouplissant pour tissu par charge et l utiliser une seule fois Le conduit d évacuation a t il la longueur appropriée Vérifier que le conduit d évacuation n est pas trop long ou ne comporte pas trop de changements de direction Un long conduit augmentera les durées de séchage Voir Instructions d installation Le diamètre du conduit d évacuation a t il la taille correcte U...

Страница 36: ...ada LP licensee in Canada Marque déposée Marque de commerce de Whirlpool U S A Emploi sous licence per Whirlpool Canada LP au Canada Registered trademark Trademark of Maytag Properties LLC or its related companies Used under license by Maytag Limited in Canada Marque déposée Marque de commerce de Maytag Properties LLC ou de ses compagnies affiliées Emploi sous licence par Maytag Limited au Canada ...

Отзывы: