Maytag MMW9730FZ Скачать руководство пользователя страница 8

8


Use a meat thermometer to determine the doneness of meats 

and poultry. Check the temperature of pork and poultry in 2 or 

3 different places, including the thickest part.


Before convection cooking, position the rack(s) according to 

the “Positioning Racks and Bakeware” section.


When using more than one rack, position bakeware/cookware 

on the racks to allow movement of the fan-circulated air 

around the food. See the “Positioning Racks and Bakeware” 

section.


If the oven is full, extra cooking time may be needed.


For optimal cooking results, do not cover food.


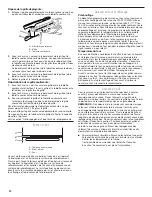
When roasting poultry and meat, use a broiler pan and grid. 

It is not necessary to wait for the oven to preheat, unless 

recommended in the recipe.

To order a broiler pan, see the “Assistance or Service” section.

Convection Baking

Use Convect Bake for single- or multiple-rack baking. When 

convection baking, reduce your recipe baking temperature 

by 25°F (15°C).

1. 

Press CONVECT until “CONVECT BAKE” is displayed.

2. 

Press START LOWER.

3. 

Press the number keypads to set the desired temperature. If 

the temperature entered is not in the range of the temperatures 

allowed, the minimum or maximum allowed temperature will 

be displayed. Enter a temperature in the allowable range.

4. 

Press START LOWER. The oven will begin preheating. There 

are 2 preheat modes on Convect Bake function. Use Rapid 

Preheating when using a single rack only and use the standard 

Preheating when using multiple racks. It is possible to switch 

between “Rapid Preheating” and “Preheating” by pressing 

START LOWER for the selected oven during the preheating.

5. 

Place the food in the oven and close the oven door when 

preheat is completed.

6. 

Press CANCEL LOWER when finished.

7. 

Remove food from the oven.

NOTE:

 The temperature may be changed at any time by pressing 

the number keypads to enter the desired temperature and then 

pressing START LOWER. Changing the temperature once food is 

placed in the oven could affect the performance.

Convection Broil

When convection broiling, enter your normal broiling temperature. 

The oven door must be closed when using Convect Broil.
It is not necessary to preheat the oven for Convect Broil.

1. 

Place the food in the oven and close the oven door.

2. 

Press CONVECT until “CONVECT BROIL” is displayed.

3. 

Press START LOWER.

4. 

Press the number keypads to set the desired temperature. If 

the temperature entered is not in the range of the temperatures 

allowed, the minimum or maximum allowed temperature will 

be displayed. Enter a temperature in the allowable range.

5. 

Press START LOWER.

6. 

Press CANCEL LOWER when finished.

7. 

Remove food from the oven.

NOTE:

 The temperature may be changed at any time by pressing 

the number keypads to enter the desired temperature and then 

pressing START LOWER. Changing the temperature once food is 

placed in the oven could affect the performance.

A

       B

A.  Broiler grid
B.  Broiler pan

Convection Roasting

When convection roasting, enter your normal roasting 

temperature. The roasting time should be 15-30% less 

than in conventional cooking.
It is not necessary to preheat the oven for Convect Roast.

1. 

Place the food in the oven and close the oven door.

2. 

Press CONVECT until “CONVECT ROAST” is displayed.

3. 

Press START LOWER.

4. 

Press the number keypads to set the desired temperature. If 

the temperature entered is not in the range of the temperatures 

allowed, the minimum or maximum allowed temperature will 

be displayed. Enter a temperature in the allowable range.

5. 

Press START LOWER.

6. 

Press CANCEL LOWER when finished.

7. 

Remove food from the oven.

NOTE:

 The temperature may be changed at any time by pressing 

the number keypads to enter the desired temperature and then 

pressing START LOWER. Changing the temperature once food is 

placed in the oven could affect the performance.

Convection Recipe

When using Convection Recipe, enter your normal cooking 

temperature. The oven door must be closed when using 

Convection Recipe.
It is not necessary to preheat the oven for Convection Recipe 

Meats option.

1. 

For Convection Recipe Meats only: Place food in the oven and 

close the oven door.

2. 

Press CONVECT until “CONVECT RECIPE” is displayed.

3. 

Press START LOWER.

4. 

Press CONVECT to cycle between the options. Press START 

LOWER to select the displayed option.

5. 

Press the number keypads to set the desired temperature. If 

the temperature entered is not in the range of the temperatures 

allowed, the minimum or maximum allowed temperature will 

be displayed. Enter a temperature in the allowable range.

6. 

Press START LOWER.

7. 

Press the number keypads to enter the desired cook time, 

and then press START LOWER.

NOTE:

 For Baked Foods and Others options only: The 

temperature will automatically be adjusted by decreasing the 

temperature entered by 25°F (15°C). For baked foods only, do 

not decrease the temperature on the recipe by 25°F (15°C); the 

oven will automatically decrease the temperature entered by 

25°F (15°C).
For Meats and Others options only: The cook time will 

automatically be adjusted to 80% of the time entered and the 

adjusted cook time will appear on the display, but temperature 

will not be adjusted.

NOTE:

 Preheating can cause overcooking. If preheat is 

required for the recipe, add 15 minutes to the cook time. 

Place food in the oven at appropriate time.

8. 

For Baked Foods and Others options only: The preheating will 

start and once complete, the unit will sound a tone. Place the 

food in the oven and close the oven door.

9. 

At the end of the cooking time set, the oven will turn off 

automatically, the end-of-cycle tone will sound, and “Cooking 

Complete” will appear in the text area. It's also possible to 

press CANCEL LOWER to finish the cycle.

10. 

Remove food from the oven.

Содержание MMW9730FZ

Страница 1: ...Serial Number___________________________________________ Para una versi n de estas instrucciones en espa ol visite www maytag com Deber tener los n meros de modelo y serie Se encuentran en el lado in...

Страница 2: ...fire or flame or use dry chemical or foam type extinguisher Use Only Dry Potholders Moist or damp potholders on hot surfaces may result in burns from steam Do not let potholder touch hot heating eleme...

Страница 3: ...ple for 2 minutes enter 2 3 Press KITCHEN TIMER ON OFF to begin the countdown If enabled timer tone s will sound at the end of countdown 4 Press KITCHEN TIMER ON OFF to cancel the Timer and return to...

Страница 4: ...nge the temperature repeat steps 2 and 3 5 Press CANCEL LOWER when finished DELAY START Delayed start The Delay Start keypad is used to enter the starting time for an oven function with a delayed star...

Страница 5: ...instructed by the scrolling text to select the new language 4 Press CANCEL LOWER to exit and display the time of day Oven Temperature Offset Control IMPORTANT Do not use a thermometer to measure oven...

Страница 6: ...o it will not rise into the broil element Allow at least 1 3 cm between pans and the broil element To move a rack pull it out to the stop position raise the front edge and then lift it out Use the fol...

Страница 7: ...re but they may run slightly hot or cool at any point in time due to this cycling Opening the oven door while in use will release the hot air and cool the oven which could impact the cooking time and...

Страница 8: ...ing START LOWER Changing the temperature once food is placed in the oven could affect the performance A B A Broiler grid B Broiler pan Convection Roasting When convection roasting enter your normal ro...

Страница 9: ...at is complete 3 At the end of the time set the oven will keep warm automatically the end of cycle tone will sound NOTE The set cooking time can be changed at any time during the cooking cycle by pres...

Страница 10: ...too high the oven doors will remain locked When the oven is locked the doors of the oven cannot be opened To avoid damage to the doors do not force the doors open when the oven is locked Before self...

Страница 11: ...colored and are harder to slide a light coating of vegetable oil applied to the rack guides will help them slide OVEN CAVITY Do not use oven cleaners Food spills should be cleaned after the oven cools...

Страница 12: ...ween Self Cleaning cycles or spills on oven walls and doors Run additional Self Cleaning cycles The affresh Kitchen and Appliance Cleaner can be used for stubborn soils See the Accessories and Self Cl...

Страница 13: ...th published user operator or installation instructions 2 In home Instruction on how to use your product 3 Service to correct improper product maintenance or installation installation not in accordanc...

Страница 14: ...de mod le______________________________________ Num ro de s rie_________________________________________ Table des mati res S CURIT DU FOUR 15 GUIDE DES CARACT RISTIQUES 17 UTILISATION DU FOUR 19 Comm...

Страница 15: ...ts produits chimiques secs ou un extincteur mousse Utiliser seulement des mitaines s ches de four Des mitaines de four mouill es ou humides sur des surfaces chaudes peuvent provoquer des br lures prov...

Страница 16: ...T Ce produit contient au moins un produit chimique connu par l tat de Californie pour tre l origine de cancers AVERTISSEMENT Ce produit contient au moins un produit chimique connu par l tat de Califor...

Страница 17: ...n minutes jusqu concurrence de 9 heures et 59 minutes 1 Appuyer sur KITCHEN TIMER ON OFF marche arr t minuterie 2 Appuyer sur les touches num riques pour r gler la dur e en hr min Les z ros de gauche...

Страница 18: ...four inf rieur 4 Pour changer la temp rature r p ter les tapes 2 et 3 5 Appuyer sur CANCEL LOWER annulation four inf rieur apr s avoir termin DELAY START mise en marche diff r e Mise en marche diff r...

Страница 19: ...des signaux sonores D sactive tous les signaux sonores y compris le signal sonore de fin de programme et les signaux sonores d appui sur une touche sauf les signaux sonores de rappel Les signaux sonor...

Страница 20: ...r sur SETTINGS r glages jusqu ce que DEMO MODE mode de d monstration s affiche 2 Le r glage utilis ce moment l s affiche 3 Appuyer sur la touche 1 pour modifier le r glage 4 Appuyer sur CANCEL LOWER a...

Страница 21: ...e 2 et 5 pour la cuisson par convection 6 5 4 3 2 1 Cuisson au four des g teaux tages sur 2 grilles Pour des r sultats optimaux lors de la cuisson au four de g teaux sur 2 grilles utiliser les positio...

Страница 22: ...plus lev e le pr chauffage est plus long Le programme de pr chauffage augmente rapidement la temp rature du four La temp rature r elle du four d passe alors la temp rature programm e pour compenser la...

Страница 23: ...n Utiliser la fonction Convect Bake cuisson au four par convection pour la cuisson au four sur une ou plusieurs grilles Lors de la cuisson au four par convection r duire la temp rature de cuisson au f...

Страница 24: ...uera automatiquement la temp rature entr e de 25 F 15 C Pour les options Meats viandes et Others autre uniquement La dur e de cuisson est automatiquement ajust e 80 de la dur e entr e et la dur e de c...

Страница 25: ...de cuisson appuyer sur COOK HOLD cuisson et maintien au chaud apr s que cette fonction ait t activ e L affichage n affichera aucune donn e Une fois le compte rebours de la dur e de cuisson coul Cuiss...

Страница 26: ...trop lev e la porte du four reste verrouill e Lorsque le four est verrouill les portes du four ne peuvent pas tre ouvertes Pour viter d endommager les portes ne pas forcer l ouverture de la porte tant...

Страница 27: ...Ne pas utiliser de nettoyants abrasifs de nettoyants avec agent de blanchiment de produits antirouille d ammoniaque ou d hydroxyde de sodium soude car la surface peinte pourrait se tacher Tableau de...

Страница 28: ...de des caract ristiques Code d erreur l afficheur indique une lettre suivie d un num ro teindre patienter 10 secondes et rallumer Appuyer sur CANCEL annulation pour effacer l affichage Voir Affichage...

Страница 29: ...oxydable Commander la pi ce num ro W10355049 Nettoyant pour acier inoxydable affresh mod les en acier inoxydable Commander la pi ce num ro W10355016 Nettoyant pour cuisine et appareils m nagers affres...

Страница 30: ...ection Cavit perforation par la rouille et soudures rompues uniquement LE SEUL ET EXCLUSIF RECOURS DU CLIENT DANS LE CADRE DE LA PR SENTE GARANTIE LIMIT E CONSISTE EN LA R PARATION PR VUE PAR LA PR SE...

Страница 31: ...en cas de d pannage ou de r paration n cessaire sur ce gros appareil m nager autre que les responsabilit s nonc es dans la pr sente garantie Si vous souhaitez une garantie plus tendue ou plus compl te...

Страница 32: ...W10875903B SP PN W10879195 2016 Used under license in Canada All rights reserved Utilis sous licence au Canada Tous droits r serv s 6 16...

Отзывы: