background image

Component Testing Information

!

WARNING

To avoid risk of electrical shock, personal injury or death, disconnect power to unit before servicing, unless testing
requires power.

18

16026119   Rev. 0

©2005 Maytag Services

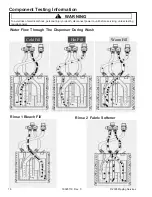
Water Flow Through The Dispenser During Wash

Cold Fill

Hot Fill

Warm Fill

Rinse 1 Bleach Fill

Rinse 2 Fabric Softener

Содержание MAH2440AW series

Страница 1: ...c models This manual includes but is not limited to the following MAH2440AW Service This manual is to be used by qualified appliance technicians only Maytag does not assume any responsibility for property damage or personal injury for improper service procedures done by an unqualified person 16026119 March 2005 2005 Maytag Services ...

Страница 2: ...PPROPRIATE SERVICE INFORMATION BEFORE BEGINNING REPAIRS WARNING To avoid risk of severe personal injury or death disconnect power before working servicing on appliance to avoid electrical shock To locate an authorized servicer please consult your telephone book or the dealer from whom you purchased this product For further assistance please contact Customer Service Support Center CAIR Center Web S...

Страница 3: ...ms 10 Component Testing Information Component Testing Information 15 Disassembly Procedures Top Removal 19 Water Valve Removal 19 Pressure Valve Removal 19 Drain Pump Removal 20 EMI Filter 21 Console Machine Control Removal 21 Boot Removal 22 DoorAssembly Removal 22 Door Disassembly 23 Front Panel Door Removal 23 Motor And Belt Removal 24 Tub Pulley Removal 25 TubRemoval 25 Appendix A Installation...

Страница 4: ...ortant Safety Information To reduce the risk of fire electric shock serious injury or death to persons when using your washer follow these basic precautions Read all instructions before using the washer Refer to the Grounding Instructions in the Installation Manual for the proper grounding of the washer Do not wash articles that have been previously cleaned in washed in soaked in or spotted with g...

Страница 5: ...ors To reduce the risk of fire electric shock serious injury or death all wiring and grounding must conform with the latest edition of the National Electric Code ANSI NFPA 70 or the Canadian Electrical Code CSA C22 1 and such local regulations as might apply It is the customer s responsibility to have the wiring and fuses checked by a qualified electrician to make sure your home has adequate elect...

Страница 6: ...ed three prong wall receptacle installed in accordance with appropriate electrical codes To avoid the risk of electrical shock or death this equipment must be grounded This equipment MUST be grounded In the event of an electrical short circuit grounding reduces the risk of electric shock by providing an escape wire for the electric current This unit is equipped with a cord having a grounding wire ...

Страница 7: ... 2005Maytag Services 16026119 Rev 0 7 Important Safety Information ...

Страница 8: ...or in case warranty service is required To locate an authorized technician For Maytag call 1 800 462 9824 or visit the Web Site at www maytag com For product in Canada call 1 866 587 2002 or visit the Web Site at www maytag com Warranty service must be performed by an authorized technician We also recommend contacting an authorized technician if service is required after warranty expires Parts and...

Страница 9: ...d Toe Panel Compact Washer Nomenclature M A H 2 4 0 0 A Y W Brand M Maytag Listing W 120V 60hz Y 240V 60hz Z Canada 240V 60hz Y 220 240 V 50 60 Hz Feature Content 2400 Feature Package Marketing Code This identifies which version of production the unit is Color W White Q Bisque Product Type AH Automatic Horizontal ...

Страница 10: ...oor open No Tumble Start normal cycle with an empty machine and allow a fill to check tumble Washer does not tumble during most fills or during presoak Perform Board Output Test Check for loose connections at machine control board pressure switch motor tach harness and motor control Check motor windings resistance Pins 8 9 3 6 ohms pins 1 10 1 1 ohms Pins 5 10 1 1 ohms Check belt Will Not Spin Che...

Страница 11: ...p Out Test Check the machine control board connections at CN3 Pin 1 for the pump Should see 110 120VAC Check tub to pump hose for twist in hose Wrong Water Temperature Too Hot Too Cold This washer uses a reduced amount of water while the control board meters the incoming flow to regulate the actual temperature of the water in the tub This may appear to be significantly warmer cooler than expected ...

Страница 12: ...ode pressing the Delay Start Four times followed by the Start Pause button will start an abbreviated White Cottons cycle White Cottons Cycle Test While in Service Mode pressing the Delay Start Five times followed by the Start Pause button will start a White Cottons cycle Spin Test While in Service Mode pressing the Delay Start Six times followed by the Start Pause button will start a spin test Was...

Страница 13: ...emperature has not increased Check for Loose wire connections to heater and thermistor Faulty thermistor Faulty heater Low water fill HE1 Heater is over heating Heater runs continuously Check for Faulty thermostat Faulty heater Low water fill Diag Code Description Trigger Action to be taken UE Unbalance detected during final spin which prevented the spinner from exceeding 400 rpm Never exceeded 40...

Страница 14: ... Check the motor windings the speed sensor wiring connections or Control Board 8E Motor fault Motor locked causing a spike in voltage Replace motor PF Power Failure Cycle interrupted by a power loss Door has been unlocked Displays PF Close door press Start to resume operation Exit Service Mode To exit 1 Press Spin and Temperature keys for 3 seconds again or 2 Press Off or 3 Unplug the machine Pres...

Страница 15: ...s Pin 1 2 or 3 3 5 ohms Drain Pump During drain check voltage at Pin 1 of Heater Relay and Pin 6 of CN2 230V AC During drain Water Valves Unplug harness connector and test from wire insertion side Hot valve Pin 5 of CN2 and Pin 1 of Heater Relay Pre valve Pin 1 of CN2 and Pin 1 of Heater Relay Cold valve Pin 2 of CN2 and Pin 1 of Heater Relay 4500 ohms 4500 ohms 4500 ohms Heater 230V AC 2000W Ther...

Страница 16: ...power 16 16026119 Rev 0 2005 Maytag Services Component Diagnostics NOTE For ohm checks unplug harness connector on console and test from wire insertion side of the harness connectors Reactor 1 2 CN6 Heater Relay 1 Power Relay 1 CN2 1 5 2 3 4 6 7 8 Pin 1 Pre Valve Pin 2 Cold Valve Pin 3 Door Lock Pin 4 Blank Pin 5 Hot Valve Pin 6 Drain Pump Pin 7 Blank Pin 8 Blank ...

Страница 17: ...ent Testing Information WARNING To avoid risk of electrical shock personal injury or death disconnect power to unit before servicing unless testing requires power 2005 Maytag Services 16026119 Rev 0 17 1 2 3 ...

Страница 18: ...cal shock personal injury or death disconnect power to unit before servicing unless testing requires power 18 16026119 Rev 0 2005 Maytag Services Water Flow Through The Dispenser During Wash Cold Fill Hot Fill Warm Fill Rinse 1 Bleach Fill Rinse 2 Fabric Softener ...

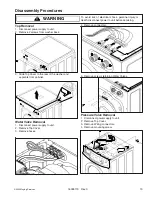
Страница 19: ...ower supply to unit 2 Remove 2 screws from washer back 3 Slide Top Cover to the rear of the washer and separate from cabinet Water Valve Removal 1 Disconnect power supply to unit 2 Remove Top Cover 3 Remove hoses Pressure Valve Removal 1 Disconnect power supply to unit 2 Remove Top Cover 3 Remove Wiring connectors 4 Remove mounting screw 4 Remove connectors 5 Remove screws retaining Water Valves ...

Страница 20: ...ng Disassembly Procedures WARNING Drain Pump Removal 1 Disconnect power supply to unit 2 Gain access to bottom of unit 3 Remove 4 screws securing panel to the bottom of the cabinet 4 Remove drain hose and tub hose from pump 5 Disconnect electrical connector 6 Remove 4 screws and slide pump mounting bracket to free tabs and remove motor ...

Страница 21: ...er 3 Remove 2 screws located behind dispenser Remove 1 screw on console right side 4 Tip Console to access connectors NOTE Clip wire ties if necessary to gain access to Control Board CAUTION Do not reassemble washer without replacing clipped wire ties Do not remove wire ties if replacement are not available 5 Remove connectors from Control Board back EMI Filter Removal 1 Disconnect power supply to...

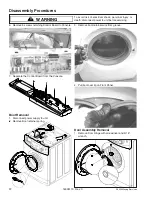
Страница 22: ...bly Procedures WARNING 6 Remove 5 screws retaining Control Board to Console 7 Separate the Control Board from the Console Boot Removal 1 Disconnect power supply to unit 2 Remove Boot retainer spring 3 Remove boot retainer wire from groove 4 Pull boot over lip on Front Panel Door Assembly Removal 1 Remove Door Hinge with screwdriver and 5 16 wrench ...

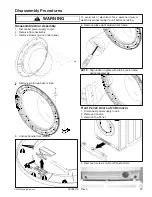
Страница 23: ...isconnect power supply to unit 2 Remove Door Assembly 3 Remove screws on door inner panel 4 Remove pin through door strike 5 Unsnap handle from retainer 6 Remove glass sight window from frame NOTE Align indent in glass with drain hole in frame during reassembly Front Panel Door Latch Removal 1 Disconnect power supply to unit 2 Remove Console 3 Remove Toe Panel 4 Remove 3 screws on Front Panel bott...

Страница 24: ...retaining Door Latch to Front Panel Motor and Belt Removal 1 Disconnect power supply to unit 2 Remove 3 screws retaining Back Cover 3 Remove belt by pulling belt while rotating pulley causing belt to derail from motor 4 Remove Motor wiring connector and ground wires 5 Remove 6 screws on Front Panel top and bottom 6 Lift front Panel from hanger hooks 7 Disconnect Door Latch wire connector ...

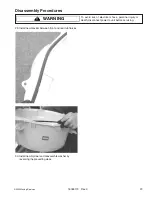
Страница 25: ...ve Back Cover 3 Remove Belt 4 Insert a 3 8 drive extension into hole in bearing cover to lock pulley from rotating 5 Loosen bolt retaining pulley Bolt torque is 21 7 28 9 ft lbs Tub Removal 1 Disconnect power supply to unit 2 Remove Top Cover 3 Remove Back Cover 4 Disconnect and remove Drive Motor and belt 5 Disconnect Drain Pump hose and wiring 6 Remove Front Panel 7 Remove wire harness and hose ...

Страница 26: ...b 10 Remove Dispenser Feeder Hoses 11 Remove screw retaining Dispenser 12 Remove Dispenser from washer 13 Remove 1 2 bolts retaining upper counter weight Bolt torque is 10 8 to 18 1 ft lbs 14 Remove Upper Counter Weight 15 Disconnect Sump Thermistor wire harness 16 Remove 3 1 2 bolts retaining Lower Counter Weight Bolt torque is 10 8 to 18 1 ft lbs NOTE Mark the counter weight front surface for ea...

Страница 27: ... 20 Move Struts to center of washer 21 Mark location and position of Suspension Springs 22 Reinstall Upper Counter Weight bolts to tub without weight in place Use these as handles when lifting tub 17 Remove Lower Counter Weight 18 Remove remaining wire harnesses and hose from tub 19 Remove 2 1 2 bolts retaining the Struts All Strut bolts are torqued to 18 1 25 3 ft lbs ...

Страница 28: ...lt is removed Spinner can fall from tub Block Spinner to prevent Spinner from falling free 27 Remove bolts around perimeter and separate the tub halves NOTE During reassembly snug bolts in a cross pattern before tightening to prevent tub warp 28 Remove Spinner 25 Loosen screw and remove boot from tub lip 23 Use weight bolts to lift tub and unhook Suspension Springs 24 Grasp the front and rear of t...

Страница 29: ...k of electrical shock personal injury or death disconnect power to unit before servicing Disassembly Procedures WARNING 29 Install new Gasket between front and rear tub halves 30 Install new Spinner and reassemble washer by reversing the preceding steps ...

Страница 30: ...30 16026119 Rev 0 2005 Maytag Services A A A A Appendix ppendix ppendix ppendix ppendix A A A A A ...

Страница 31: ... 2005 Maytag Services 16026119 Rev 0 31 ...

Страница 32: ...32 16026119 Rev 0 2005 Maytag Services ...

Страница 33: ... 2005 Maytag Services 16026119 Rev 0 33 ...

Страница 34: ...34 16026119 Rev 0 2005 Maytag Services ...

Страница 35: ... 2005 Maytag Services 16026119 Rev 0 35 ...

Страница 36: ...36 16026119 Rev 0 2005 Maytag Services ...

Страница 37: ... 2005 Maytag Services 16026119 Rev 0 37 ...

Страница 38: ...38 16026119 Rev 0 2005 Maytag Services ...

Страница 39: ... 2005 Maytag Services 16026119 Rev 0 39 ...

Страница 40: ...40 16026119 Rev 0 2005 Maytag Services ...

Страница 41: ... 2005 Maytag Services 16026119 Rev 0 41 ...

Страница 42: ...42 16026119 Rev 0 2005 Maytag Services ...

Страница 43: ... 2005 Maytag Services 16026119 Rev 0 43 ...

Страница 44: ...44 16026119 Rev 0 2005 Maytag Services ...

Страница 45: ... 2005 Maytag Services 16026119 Rev 0 45 ...

Страница 46: ...46 16026119 Rev 0 2005 Maytag Services ...

Страница 47: ... 2005 Maytag Services 16026119 Rev 0 47 ...

Страница 48: ...48 16026119 Rev 0 2005 Maytag Services ...

Страница 49: ... 2005 Maytag Services 16026119 Rev 0 49 ...

Страница 50: ...50 16026119 Rev 0 2005 Maytag Services ...

Страница 51: ... 2005 Maytag Services 16026119 Rev 0 51 ...

Страница 52: ...52 16026119 Rev 0 2005 Maytag Services ...

Отзывы: