


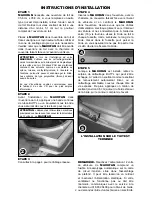


STEP 1
MAXXFAN
requires a 14” x 14” roof
opening, if you are replacing another type
already installed, remove the old existing
roof vent. Remove all old roof sealant for
a minimum of 2” entirely around the roof
opening.
Place the
MAXXFAN
into the roof opening
and trace a pencil line around it to verify the
clean seal area that will be required. Note
that the
MAXXFAN
must be centered in
the roof opening with the hinge of the lid
facing the front of the vehicle.
CAUTION:
When installing your
MAXXFAN
, only
use a caulking/sealant compatible with the flange
(plastic product) and the roof surface. DO NOT
use materials containing solvents such as or similar
to Xylene, Toluene, Methyl Ethyl Ketone, Acetate
or Acetone as they can damage the flange. Also,
Polysulfide (Thiokol) type sealants must be avoided.
If in doubt, please contact the manufacturer of your
RV for further information.
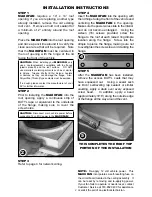
STEP 2
Prior to installing the
MAXXFAN
into the
roof opening, apply a continuous strip of
BUTYL tape or equivalent to the underside
of the flange, making sure to cover the
screw holes.
CAUTION:
Disconnect main vehicle power before
connecting 12 volt DC power to the
MAXXFAN
!
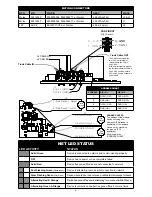
STEP 3
Refer to page 4 for network wiring.
STEP 4
Insert the
MAXXFAN
into the opening with
the lid hinge facing the front of the vehicle and
centering the
MAXXFAN
in the opening.
Make sure the power wires slide to the interior
and do not become entangled. Using the
sixteen (16) screws provided, screw the
flange to the roof at each raised ring dimple
location along the flange. Screw into the
dimple to pierce the flange, making sure not
to overtighten the screws to avoid cracking the
flange.
STEP 5
After the
MAXXFAN
has been installed,
remove the excess BUTYL caulk that may
have squeezed out. Using a sealer such
as Dicor self-leveling lap sealant or similar
caulking, apply a daub over every exposed
screw head. In addition, apply a bead
(approximately 3/16”) along the outside edge
of the flange all the way around the vent.
THIS COMPLETES THE ROOF TOP
PORTION OF THE INSTALLATION
NOTE:
Re-apply 12 volt vehicle power. This
MAXXFAN
incorporates a self-resetting fuse on
the circuit board located in the ceiling assembly. It
can be reset by removing and re-applying power.
If your fan fails to operate or needs reset, contact
Customer Service at 316.832.3400 for assistance
or solicit the aid of an electrical technician.
INSTALLATION INSTRUCTIONS
2
5
4
2
Содержание MAXXFAN Plus 4700N
Страница 7: ...This Page Intentionally Left Blank Cette page est laiss e volontairement blanche...
Страница 14: ...14 This Page Intentionally Left Blank Cette page est laiss e volontairement blanche...
Страница 15: ...This Page Intentionally Left Blank Cette page est laiss e volontairement blanche 15...


