


RJ45 cable can be routed through any
side of the Mini as needed.
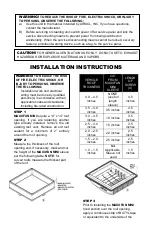
STEP 8
Raise interior plate/sleeve to ceiling and
ensure that sleeve meshes with
MAXXFAN MINI
roof top flange. Refer
to screw lengths in the table of
STEP 2
and use the proper length screws
depending on your roof thickness to
secure the interior plate to the roof top
flange, taking care not to overtighten the
screws to avoid cracking or deforming
the interior plate.
STEP 9
Select a convenient location for the wall
control, keeping in mind the wall control
with the motion sensor will turn on the
light when it senses movement.
Step 10
Installing the Wall Control:
Place mounting screw template against
the wall where wall control will be
mounted.
Using supplied screws, mount the
template to the wall.
Remove plastic from between mounting
screws.
Insert the
RJ45
connector
into the
back of the
wall control.
Place wall
control on
mounting
screws and
gently push
the wall control down to lock the wall
control onto mounting screws.
STEP 11
Reconnect main vehicle power to the
MAXXFAN MINI Plus/Deluxe
.
THIS
COMPLETES THE INSTALLATION OF
YOUR MAXXFAN
®
MINI Plus or
MAXXFAN
®
MINI Deluxe.
OPERATION OF YOUR
MAXXFAN
®
MINI Plus / Deluxe
Operation of your
MAXXFAN MINI
Plus/Deluxe
simply entails pushing the
ON/OFF switch to activate the exhaust
fan or optionally: the LED lighting or the
motion sensor. Open the air baffle in the
interior plate to allow maximum airflow.
Close baffle to impede infiltration of air
when exhaust fan is not in use.
USER SERVICING
INSTRUCTIONS
Cleaning of your MAXXFAN MINI may be
achieved with mild soap and water only.
Before removing the screen for cleaning,
ensure the fan is turned to the OFF
position.
CAUTION: Do not operate the
fan with the screen removed.
Should you have questions, please
contact AIRXCEL / MAXXFAN
VENTILATION SOLUTIONS Customer
Service at 316.832.4357.
Содержание MAXXFAN MINI PLUS Series
Страница 6: ...THIS PAGE INTENTIONALLY LEFT BLANK...
Страница 7: ...THIS PAGE INTENTIONALLY LEFT BLANK...


