background image

Page 5

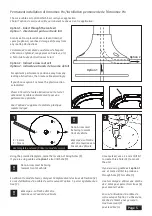
Permanent installation of Omnimax Pro/Installation permanente de l’Omnimax Pro

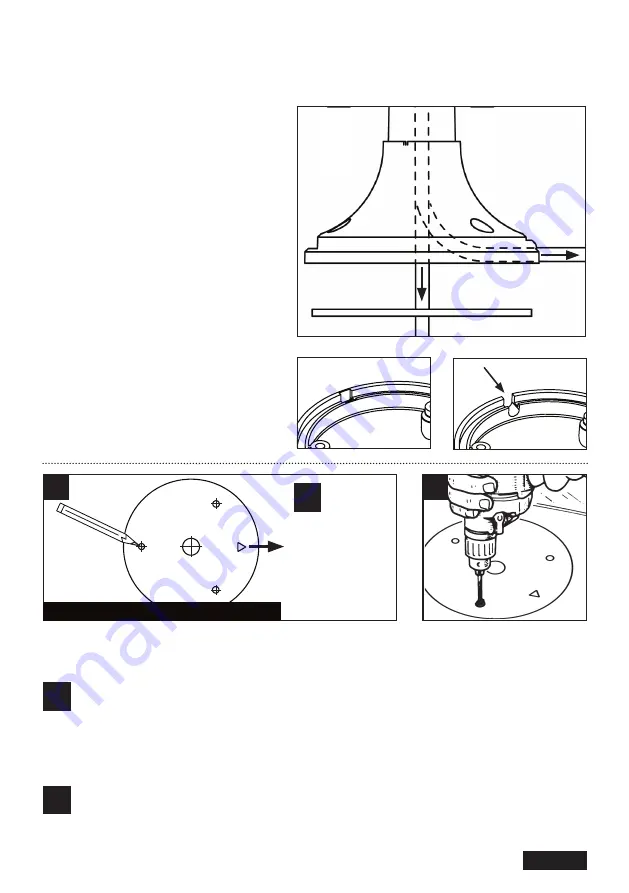
Option 1 - Direct through the roof exit 
Option 1 - directement par la sortie de toit

Option 2 - Indirect across roof exit
Option 2 - indirecte au travers de la sortie de toit

Omnimax Pro is placed above relevant internal 
space (cupboard, overhead storage etc) away from 
any rooftop obstructions.

L’Omnimax Pro est placée au-dessus de l’espace 
utile interne (placard, rangement en hauteur, etc) 
à l’écart de toute obstruction sur le toit.

For optimum performance position away from any 
rooftop obstructions, then route cable accordingly.

If you choose option 2 remove the plastic section 
as indicated.

Placer à l’écart de toute obstruction sur le toit et 
acheminer le câble conformément pour une 
performance optimale.

Pour l’option 2 supprimer la matière plastique 
comme indiqué.

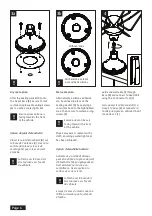
Using the provided template, mark the location of fixing holes (X).
If you are using cable exit 

option 1

 also drill hole (Y).

Note: Arrow must 
be facing towards 
front of vehicle

Remarque: La flèche 
doit être tournée vers 
l’avant du véhicule

X = 2.5mm
Y = 13mm

X

X

X

Y

!

2

Option 1

Option 2

Once marked, use a 2.5mm drill bit 
to create three holes (X) to mount 
the unit. 

If you are using cable exit 

option 1 

use a 13mm drill bit to produce a 
through hole (Y) for cable (I).

Une fois marqué, utiliser une mèche 
de 2,5mm pour percer trois trous (X) 
pour monter l’unité.

En cas d’utilisation d’un câble de 
sortie suivant l’option 1, utiliser une 
mèche de 13mm pour percer un 
trou traversant (Y) 
pour le câble (I).

1

Choose a cable exit option which best suits your application.
Choisir l’option de sortie de câble qui convient le mieux à votre application.

Note: Arrow must be facing 
towards front of vehicle

!

En utilisant le modèle fourni, marquer l’emplacement des trous de fixation (X). 
En cas d’utilisation d’un câble de sortie suivant l’option 1, percer également un 
trou (Y).

Remarque : La flèche doit être 
tournée vers l’avant du véhicule

!

Use template enclosed/Utiliser le modèle ci-joint

Содержание Omnimax Pro B2344/G

Страница 1: ...ht to change specifications without prior notice Maxview beh lt sich das Recht vor die Spezifikation ohne weitere Ank ndigung zu ndern 9111056G Iss 1 Omnimax Pro DE Kontakt Tel 49 0 8145 9969980 Email...

Страница 2: ...Please retain these instructions for future reference Installation Toujours suivre le mode d emploi et les consignes de s curit du fabricant avant d utiliser des outils et ou de l quipement S curit av...

Страница 3: ...allation we recommend Sikaflex 512 caravan For curing times please refer to the manufacturers instructions A Unit principale B Base de l unit C Outil connecteur F D Joint d tanch it E Vis de montage d...

Страница 4: ...Page 4 Installation Installation...

Страница 5: ...ixing holes X If you are using cable exit option 1 also drill hole Y Note Arrow must be facing towards front of vehicle Remarque La fl che doit tre tourn e vers l avant du v hicule X 2 5mm Y 13mm X X...

Страница 6: ...ase B and connect to Head Unit using the F Connector Tool C Faire passer le c ble coaxial I travers la base B et connecter l unit principale en utilisant l outil connecteur F C With Silicone Seleant A...

Страница 7: ...outer insulation Gather strands of screening braid twist together and wind back around outer insulation Cut foil to be flush with outer insulation Couper le c ble la longueur voulue D pouiller 12mm d...

Страница 8: ...signal Power source methods Direct battery connection 12V Universal Male Cigarette adaptor To TV Coaxial Flylead Vers le c ble coaxial d port TV Connection diagram Sch ma de connexion Mounting Options...

Страница 9: ...tes les connexions sont correctes S assurer que le voyant d alimentation LED de l amplificateur de signal est allum Essayer de r gler la molette de commande de gain de l amplificateur de signal tourne...

Страница 10: ...Maxview Ltd et ne peuvent tre reproduites Recyclage des emballages o les quipements existent 2 year guarantee Garantie 2 ans The Maxview Omnimax Pro is guaranteed against defective parts or workmanshi...

Страница 11: ...e Injection Moulded ABS Aerial Height 30cm Aerial Weight 0 5kg Page 11 Sp cifications de l Amplificateur de signal Compatibilit t l vision num rique et radio FM DAB Plage de fr quence Large bande pour...

Страница 12: ...n Maxview B2019 Magnetic Base Base Magn tica Maxview B2017 Suction Pad Base Support ventouse Available online from www maxview co uk or your local Maxview stockist Disponible en ligne sur le site www...

Отзывы: