Maxtor 4-Channel DVR (Digital Recorde Скачать руководство пользователя страница 13


13

CONNECTING THE DVR TO YOUR TV SET OR MONITOR 


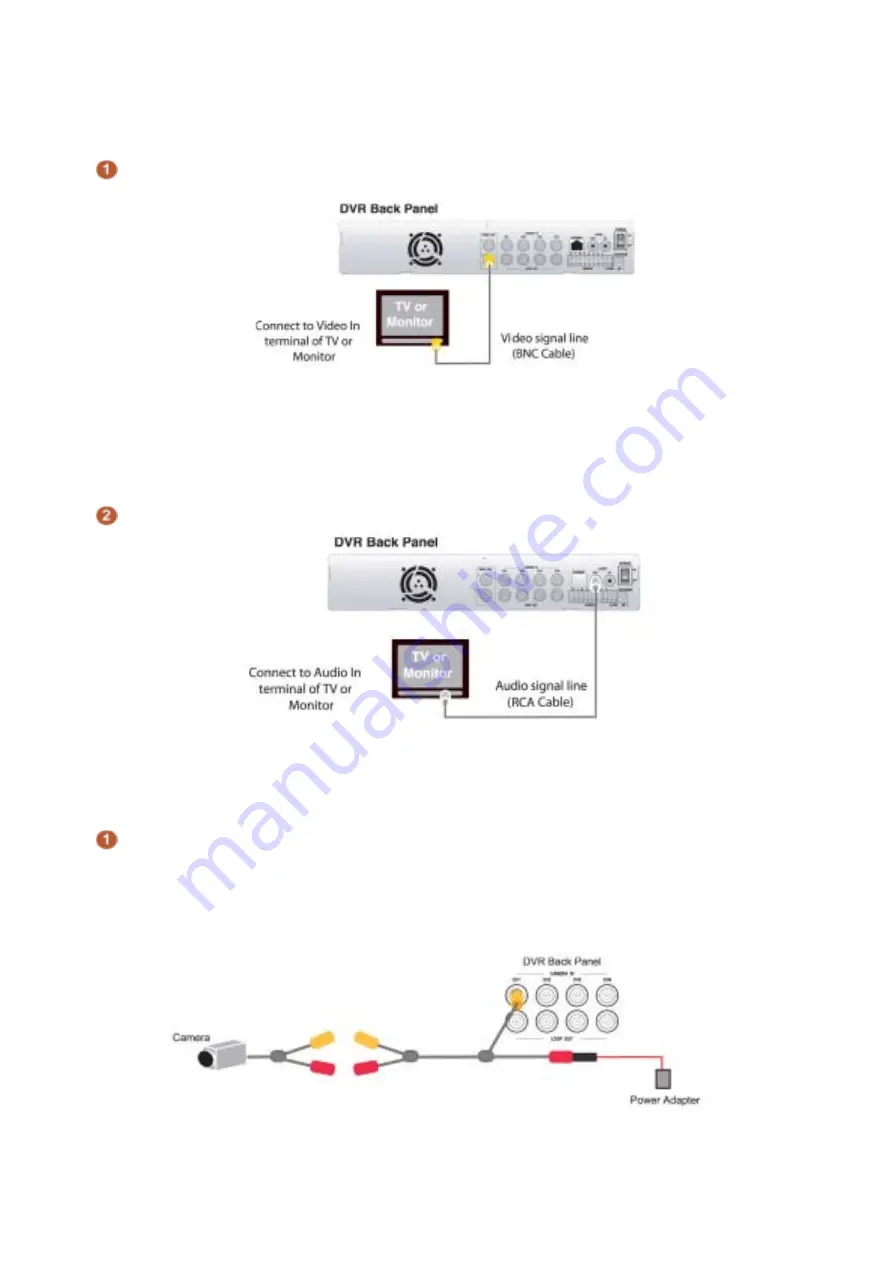
Video Input/Output Connection (For TV / monitor screen display)


To display the DVR’s picture, the video output signal need to be transferred to your TV set or monitor. 
Any TV set that has a VIDEO INPUT terminal is suitable for displaying the picture. The figure above 
shows the video signal line connection. 
 
Using an BNC cable, connect the VIDEO IN terminal of your TV to the VIDEO OUT terminal of your DVR 
rear panel. 

Note: 

The BNC cable required for this connection does not come packaged with the DVR.


Audio Input/Output Connection (For TV / monitor speaker)


Using an RCA cable, connect the AUDIO IN terminal of your TV / monitor to the AUDIO OUT terminal of 
your DVR rear panel. 

Note: 

The RCA cable required for this connection does not come packaged with the DVR

 .


CAMERA INSTALLATION 


For cameras that do not have a built-in microphone


using an BNC cable, connect cameras to the VIDEO IN or CHANNEL IN terminal on the back panel of 
your DVR. Next, plug in the camera power adapter. 

 
Connection Type 1 – 

For indoor/outdoor cameras to use a splitter cable 


Connection Type 2 – 

For cameras that have a VIDEO OUTPUT terminal on the rear panel of the 

camera body. 

Содержание 4-Channel DVR (Digital Recorde

Страница 1: ...User s Manual 4 Channel DVR Digital Video Recorder This manual describes the basic operation of this DVR model...

Страница 2: ...2...

Страница 3: ...sical damage contact an authorized dealer for repair or exchange 10 Use standard lithium cell battery NOTE Manufacturer has preinstalled battery The standard lithium cell 3V battery located on the mot...

Страница 4: ...STALLATION 12 CONNECTING THE DVR TO YOUR TV SET OR MONITOR 13 CAMERA INSTALLATION 13 SENSOR MOTION DETECTOR INSTALLATION 15 ALARM INSTALLATION 15 LAN DVR CONNECTION 16 POWER CONNECTION 17 Chapter 6 DV...

Страница 5: ...CONTROL 31 RESET TO FACTORY DEFAULT SETTINGS 31 Chapter 7 Trouble Shooting Guide TROUBLE SHOOTING 32 Appendix TECHNICAL SPECIFICATIONS 34 RECORDING TIME TABLE 36 PRODUCT WARRANTY 36 TECHNICAL SUPPORT...

Страница 6: ...covered in this manual feature the same user interface Chapter 2 Getting To Know Your DVR DVR FRONT PANEL This chapter briefly describes the button functions on DVR front panel Buttons are used to op...

Страница 7: ...s s FF button 1 time Video plays two times faster x2 than the normal play Press FF button 2 times Video plays three times faster x3 than the normal play Press FF button 3 times Video plays four times...

Страница 8: ...ERMINAL BLOCK The sensor terminal block is used to connect up to 4 motion sensors to the DVR If you add motion sensor devices to your DVR the video recording can be triggered by motion detection ETHER...

Страница 9: ...the DVR to your computer or routing device such as a DSL modem or hub using a LAN cable for remote viewing LAN Port The LAN RJ 45 jack is used to connect the DVR to a Local Area Network This allows y...

Страница 10: ...playback or recording PLAY The button to s tart video playback FF The button to playback recorded video faster REW The button to play recorded video backward PAUSE The button to pause video playback M...

Страница 11: ...a more natural motion in recorded video and require more hard disk drive storage space You may reduce the frame rate minimum rate 1 frame per second to fit longer recording sessions on your hard disk...

Страница 12: ...hard drive into the HDD rack Fasten the hard drive to the hard drive rack using the supplied screws For more information about the hard disk drive jumper settings visit the web sites of major HDD man...

Страница 13: ...this connection does not come packaged with the DVR Audio Input Output Connection For TV monitor speaker Using an RCA cable connect the AUDIO IN terminal of your TV monitor to the AUDIO OUT terminal o...

Страница 14: ...e to install cameras that have a built in microphone follow the diagram below for installation Connection Type 1 For cameras that have a video audio splitter cable Connection Type 2 For cameras that h...

Страница 15: ...at you are recording Refer to Chapter 5 Record Schedule Setup for more information If the DVR is set to QUAD mode and a sensor trips all of the selected cameras will record However if you are in EACH...

Страница 16: ...ram below to make the LAN connection For remote viewing from your computer you must have a LAN connection or Internet access to use this feature Refer to Chapter 6 NETWORK SETUP for information on how...

Страница 17: ...adapter to the power adapter jack located at the rear panel of the DVR unit Now the DVR is ready to run Turn on the power button at the rear side of the DVR The next chapter will explain the about the...

Страница 18: ...e UP or DOWN key on the DVR front panel to move the arrow sign up or down in order to navigate to the menu selection desired You can also use this function via network CAMERA SELECT To select cameras...

Страница 19: ...d settings Note Only the selected camera s will record real time events during recording period RECORD MODE To select a recording mode navigate to RECORD MODE Then press the select button to choose ei...

Страница 20: ...VIDEO QUALITY NORMAL The higher the video quality the clearer the image will be during playback The lower the video quality the more space you will save on the hard disk drive Note The video quality...

Страница 21: ...have finished press the menu button to exit Note You must press the record button to start a recording session SUB MENU To change a password set the time for your DVR or to turn audio recording on or...

Страница 22: ...u that it was not accepted and the SUB MENU returns You may try again by repeating the same steps 2 SUB MENU TIME SET To set the date and time navigate to TIME SET in the SUB MENU and press the select...

Страница 23: ...O RECORD option Note When you do audio recording you have to set the RECORD FRAMERATE over 4 If you set under 4 1 2or 3 you can t do audio recording 4 SUB MENU VIDEO SYSTEM Navigate to VIDEO SYSTEM an...

Страница 24: ...g instructions apply to DVR that came packaged with a hard disk drive If your DVR did not come with a hard disk drive refer to HARD DRIVE SETUP PART B on page 24 To format your hard disk drive navigat...

Страница 25: ...ast detection of movement ALARM OUT TIME Indicates how long the alarm lasts after it sets off SENSOR MOTION RECORD TIME and ALARM OUT TIME are measured in seconds Note You must have sensors connected...

Страница 26: ...There are 5 different modes for sensor activated recording 1 OFF No motion direction is connected to the DVR unit 2 Level 1 4 Level 4 is the most sensitive NETWORK SETUP NETWORK SETUP is available fo...

Страница 27: ...your Internet Service Provider ISP when you setup your account Keep your ISP account information in a safe place for future reference NETWORK SETUP CONTINUED NETWORK SETUP is available for this DVR 1...

Страница 28: ...istered IP addresses called Internet addresses to avoid duplicates The IP address is assigned by your Internet Service Provider ISP but you may assign values to the lowest digits of the address to des...

Страница 29: ...PLAYBACK 1 Press the play button to access the SEARCH TIME menu The arrow will be next to the most recently recorded event Position A shown below 2 Press the FF button on the front of your DVR The ar...

Страница 30: ...k CH1 If you press the select button once you can see camera1 in full screen CH2 If you press the select button twice you can see camera2 in full screen CH3 If you press the select button three times...

Страница 31: ...to CH1 and CH2 indicate that those channels have been selected to record CH3 and CH4 are not recording RESET TO FACTORY DEFAULT SETTINGS To reset the DVR settings back to the factory default press th...

Страница 32: ...HDD BUSY Error HDD DRDY Error HDD initial is Error pull out and put in the hard disk drive or replace the hard disk Also make sure that hard disk rack is firmly locked 8 I push record button but nothi...

Страница 33: ...y desktop PC read the video data on hard disk drive in DVR The file format used on DVR is not supported by any PC operating systems including Windows or Linux so you can t access DVR hard disk drive u...

Страница 34: ...g CH Recording frame rate Quad mode PAL Max 25 fps Quad 25 fps per recording CH NTSC Max 7 5 fps Each mode Each mode MAX frame Number of video source Recording frame rate Each Mode PAL Max 6 25 fps Ea...

Страница 35: ...RCA 1 Port White Audio Output mono Line Output RCA Jack Red Main TV Output 2 Ports BNC Sensor Input 8 pins Terminal Block 4 pins Ground Terminal Alarm Output 2 pins Terminal Block Ethernet RJ 45 10Mbp...

Страница 36: ...with a 120 GB HDD The complexity of the image and the amount of motion recorded greatly influences the recording capacity of your hard drive HDD The higher the frames per second and the higher the vi...

Страница 37: ...37 Remote DVR Client 2 5 Operation Manual Version 2 5...

Страница 38: ...net Connection 3 Software Installation A Remote Viewing with Remote DVR Client 2 5 Software i Remote Connection from your PC to the DVR 4 After Connection A DVR Main Window i Connection Status ii Chan...

Страница 39: ...and audio data from the DVR and play the stored stream Below are simple instructions about how to use PC client for this Digital Video Recorder 2 Overview A DVR PC Network Connection There can be thre...

Страница 40: ...remotely view the current images as well as control and change settings of it i Remote Connection from your PC to the DVR 1 Insert DV Jn03 16 KIT on your PC 2 Click one of icons in the directory a For...

Страница 41: ...41 DVR client main window For the remote connection to the DVR click Connect button Then the following DVR Client Connection Manager window will appear on the screen...

Страница 42: ...value is 111111 six digits 4 When Connection is Failed However if the client failed to connect to the DVR one of following pop up windows will appear on the screen Incorrect IP address When you see th...

Страница 43: ...n the stream of video image will be displayed on the DVR main view window DVR client main window i Connection Status When successfully connected you would see Connected sign This window also displays...

Страница 44: ...hows more natural image However it requires more computing power than 256 Color setting 2 Changing Color Mode A Press Color Setup at the menu bar Then you would see following diagram window i Press 25...

Страница 45: ...e The view mode is a default and the indicator shows the current DVR operational state view Record Mode When you click REC button the remote DVR starts recording video on its hard drive To stop record...

Страница 46: ...ent you want to play Note Figure above shows that only master hard drive has recorded video and there are more than seven recording events the DVR user pressed REC button or Sensor is activated Note C...

Страница 47: ...tton for replay If there are two hard disk drives installed in DVR you can choose one hard drive for the playback starting point to see the recorded event B Event Play First select the event on the li...

Страница 48: ...FF speed1 i FF1 about 2 times faster than normal play mode ii FF2 about 3 times faster than normal play mode iii FF3 about 4 times faster than normal play mode To switch the fast forward play speed pr...

Страница 49: ...you can press REW Rewind button if you want play backward Then you would see PLAY REW on the DVR state indicator Also you would see REW on the screen PAUSE Mode If you want to see still image you can...

Страница 50: ...incoming video on your PC hard disk The DVR client creates stream_files folder where the execution file is located When the client is recording the Capture Play status indicator would show the curren...

Страница 51: ...there are several levels of playing speed but there are five levels i FF1 about two times faster ii FF2 about four times faster iii FF3 about eight times faster iv FF4 about sixteen times faster v FF...

Страница 52: ...still image press PAUSE button to stop the playback for a while Frame Rate There are 30 different frames rate settings that you can choose Maximum frames rate is 30 frames per seconds The minimum is 1...

Страница 53: ...mode change can be made only on DVR Please refer to Record Mode section on our DVR operation manual to know how to change the record mode Hard Disk Information Hard Disk Information shows the number h...

Страница 54: ...m size will be smaller as you lower the video quality Record Frame Rate There are nine different Record Frame Rates 1 2 3 4 5 7 10 15 30 settings that you can choose The less the frame rates the more...

Страница 55: ...is attached to DVR this function will control the motion detect periods in second For example if you set Alarm Record Duration at 5 seconds and the objection in front of camera starts moving the recor...

Страница 56: ...els should be ON mode If you want to turn off some of the cameras click ON button Then it will be turned off Record Channels Select channels cameras which should operate for recording If you turn off...

Страница 57: ...etting button C Statistics While remotely connected you can see all the detailed information including connection status and data stream statistic on the window When the remote DVR connection is on cl...

Страница 58: ...58...

Страница 59: ...59 DVR HDD PC Viewer Operation Manual Version 1 0...

Страница 60: ...ream file Document History 10 14 2004 Initial Documentation 10 17 2004 Minor Editing 10 18 2004 First Release Terms in This Document HDD Hard Disk Hard Disk Drive The Application DVR HDD PC Viewer AX...

Страница 61: ...dware Installation B Software Installation 2 Execution 3 DVR HDD PC Viewer A User Interface B Functions 4 MYS File Player A User Interface B Functions 5 Application Setting A User Interface B Function...

Страница 62: ...or via USB HDD adaptor B Software Installation Make sure that the OS of your PC is Windows 2000 or later XP or 2003 Otherwise the application will not operate properly The application is just one exe...

Страница 63: ...on Screen Valid Stream Region Indicator Positioning Slider Bar Slider Bar Zooming Button Stream Time Display Direct Access Input NTSC PAL Set Button Status Bar Fast Rewind One Frame Backward Play Back...

Страница 64: ...lly displays first screen recorded at the very beginning of it Then you can see stream at anywhere within the valid stream reason iv Channel Selection The default screen display channel setting is ALL...

Страница 65: ...nt screen and saves it as BMP file ix Stream Capturing If you wan to capture or backup current stream press Capture Current Stream button Then it will record the stream you want It will create MYS fil...

Страница 66: ...MYS File Player Select Button Application Option Button Screen MYS File Select Dialog Positioning Slider Bar File Open Button MYS File Info Display Button Status Bar Fast Rewind One Frame Backward Pl...

Страница 67: ...am reason iv Channel Selection The default screen display channel setting is ALL CHANNEL which shows all four channel if the stream has 4 channel streams at the same time If you want to see a channel...

Страница 68: ...Enable Disable Notification Message when the application detects invalid stream Enable Disable Notification Message when the application detects the graphic device does not support hardware color con...

Страница 69: ...aving Directory Press Change button to change the directory where the new MYS stream file will be stored iv Notification Dialog Related Setting 1 Application Closing Enable Disable the confirm message...

Отзывы: