background image

69

Advanced

69

EN

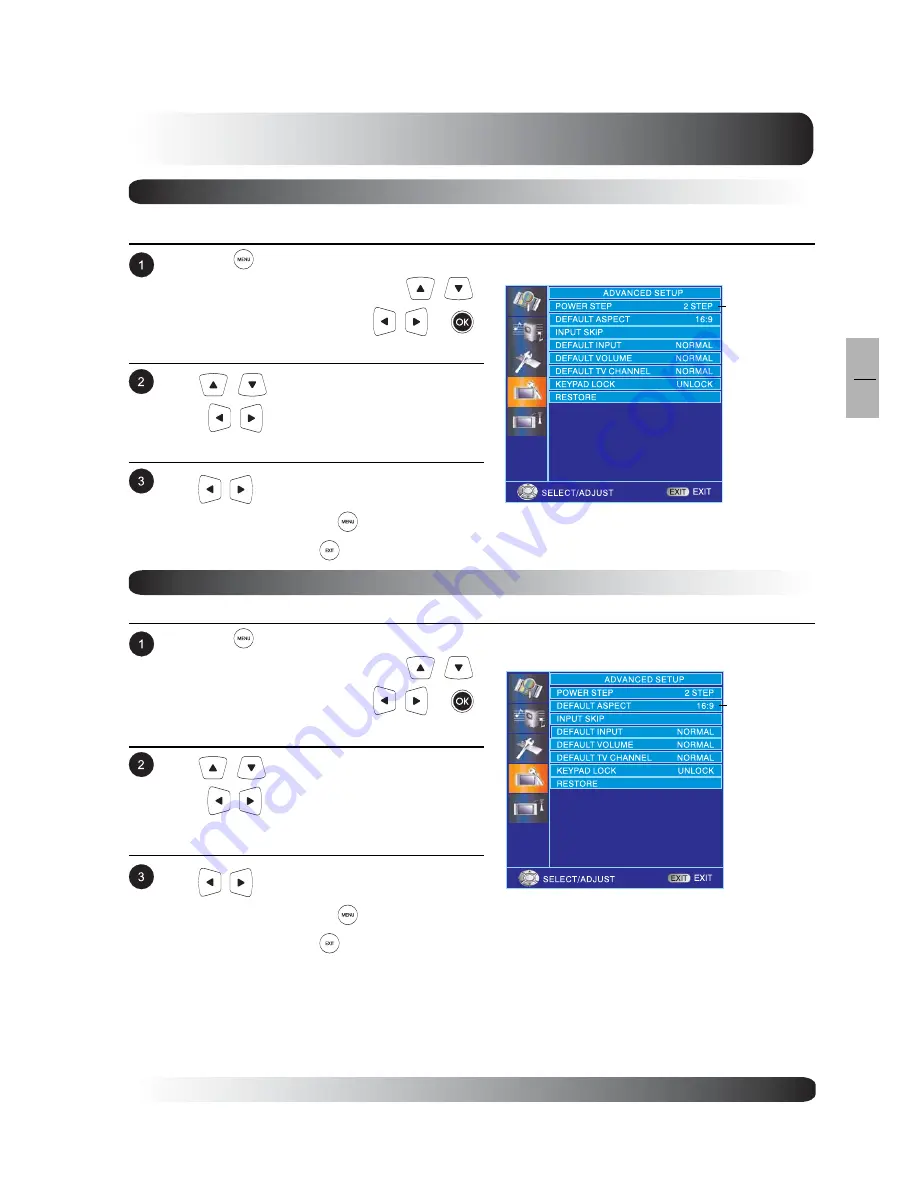
Power STEP

To switch TV to power-on automatically or remain turned off after power is resotred after a “power-outage”
incident.

Press the 

 on remote control or MENU key on

the front panel or remote control.  Use 


to select  ADVANCED and press 


 or 

keys to enter ADVANCED function.

Use 


 to select POWER STEP and

press 


 key to enter POWER STEP menu.

Use 


 to change the setting. After achiev-

ing desired setting,  press  

  to return to

previous menu or press 

 to exit menu.

Default Aspect

To select the default power-on aspect ratio.

Press the 

 on remote control or MENU key on

the front panel or remote control.  Use 


to select  ADVANCED and press 


 or 

keys to enter ADVANCED function.

Use 


 to select DEFAULT ASPECT and

press 


 key to enter DEFAULT ASPECT

menu.

Use 


 to change the setting. After achiev-

ing desired setting,  press  

  to return to

previous menu or press 

 to exit menu.

POWER STEP

DEFAULT

ASPECT

Содержание 58"

Страница 1: ...Owner s Manual l e n a P t a l F a m s a l P 58 Plasma TV ...

Страница 2: ...rce Do not install unit in an enclosed area unless proper ventilation is provided The unit should be operated from the type of power source indicated on the label If the type of available power is unknown consult your dealer or local power company The unit is equipped with a 3 pin grounded plug The plug will only fit into a grounded power outlet This is a safety feature If you are unable to insert...

Страница 3: ...ormally when the operating instructions are not followed Adjust only those controls that are covered by the operating instructions improper adjustment of other controls may result in damage which often requires extensive work by a qualified technician to restore the unit to normal operation Unit has been dropped or the cabinet has been damaged Unit exhibits a distinct change in performance indicat...

Страница 4: ...elp Warning User must use shielded signal interface cables to maintain FCC compliance for the product Provided with this display is a detachable power supply cord with IEC320 style terminations It may be suitable for connection to any UL Listed personal computer with similar configuration Before making the connection make sure the voltage rating of the computer convenience outlet is the same as th...

Страница 5: ...ons 21 Powering On Off 22 Changing Inputs 22 VolumeAdjustment 23 Channel Up Down 23 On Screen Display Menu 24 On Screen Status Display 25 Understanding Widescreen Modes 26 Change Aspect Ratios 27 Picture Controls 29 Adjusting Picture Settings 30 Picture in Picture 32 Noise Reduction 33 Adjusting Screen Size 34 Fine Tuning PC Mode 35 Quick Access 35 Picture Mode 35 Audio Controls 37 Adjusting Audio...

Страница 6: ...annel 55 Closed Captioning Analog Digital TV Modes 56 Parental Block V Chip 58 Quick View 61 Channel Lock 62 Program Guide 63 Understanding HDTV 64 Advanced 67 Adjusting Advanced Settings 68 Power Step 69 Default Aspect 69 Input Skip 70 Appendix 71 Troubleshooting 72 Wall Mount Instructions 73 Specifications for 58 TV 75 How to program the Universal Remote Control 77 Component Program Code 78 ...

Страница 7: ...7 7 EN Getting to Know Your TV Getting to Know Your TV ...

Страница 8: ...8 8 EN Package Contents l o r t n o C e t o m e R V T l e n a P t a l F Batteries d r a C y t n a r r a W l a u n a M r e s U Power Cord Getting to Know Your TV Quick Start Guide ...

Страница 9: ...er Standby Button Turns power on or off from standby mode There is a wait period between on or off cycles Volume Adjustment Buttons Use these buttons to adjust volume up and down These keys also serve as navigation and adjustment keys when On Screen Display menu is engaged Channel Select Buttons Use these buttons to select Channel up or down Menu Button Use this button to engage the On Screen Disp...

Страница 10: ...computer monitor for chaining applications RS 232 Connector Connect to a computer serial port Audio Output Variable or fixed audio output jacks for connecting to an external audio amplifer Component Video Inputs Auto detecting component video inputs Y Pb Pr or Y Cb Cr for connecting to the component output jacks of a DVD player or Set Top Box Getting to Know Your TV SPDIF Digital Audio Output When...

Страница 11: ...ion QuickView Use this key to quickly switch between the channel currently watched and the channel previously watched Volume Up Down Adjust volume up down Sound Mute On Off To switch the sound off and back on again Info Press to display system information Adjustment Keys These keys serve as navigation and adjustment keys when On Screen Menu is engaged Select Keys These keys serve as navigation and...

Страница 12: ... 3D Digital COMB Filter Direct key Turn 3DDigital Filter On and Off under AV mode Guide This button displays program information Note this is only functional for Digital TV Picture Mode Press to select Picture Modes sequentially Recall Recall default picture settings PIP Picture in Picture Button Turns on PIP feature under TV input mode Press it again to turn off PIP feature PIP Source Change the ...

Страница 13: ...13 13 EN Display Connections Display Connections ...

Страница 14: ...ector Note For TV Channels setup please refer to VCR user manual for details Connect the S Video 4 pin DIN connector from the VCR to the S Video input on the back of TV Connecting TV CATV or ATSC Connecting to TV Cable TV or ATSC Connecting the RF cable from the antenna or cable socket to the RF connector labeled as ANT on the back of the TV Using S Video Input ...

Страница 15: ...he red R and white L audio output from the VCR to the R and L audio input located next to the Video yellow connector Note There are two sets of composite inputs provided For TV Channels setup please refer to VCR user manual for details Connecting a DVD Using HDMI Input Connect the HDMI Connector from the DVD to the HDMI input located on the back of the TV ...

Страница 16: ...ite L audio out jacks from the DVD to the R and L audio in inputs located next to the Video yellow connector Note There are two sets of composite inputs provided Using Component Video Input Connect the green colored labeled as Y jack from the DVD to the green colored input of the TV Connect the red colored labed as PR or CR jack from the DVD to the red colored PR CR input of the TV Connect the blu...

Страница 17: ...CB input of the TV Connect the red R and white L audio jacks from the Set Top Box to the R and L audio in inputs located next to the PR CR connector Using HDMI Input Connect the HDMI connector from the back of the HDTV Set Top Box to the HDMI input located on the back of the TV Notes Some HDTV Set Top Boxes may not have a HDMI output Use Component Video input or PC input method if this is the case...

Страница 18: ... pin D Sub RGB connector from the back of the HDTV Set Top Box to the PC IN Connector located on the back of the TV Connect the red R and white L audio out jacks from the HDTV Set Top Box to the R and L audio in jacks located next to the PC IN Connector Notes Some HDTV Set Top Boxes may not have a PC output Use Component Video input or HDMI input method if this is the case Upon connecting your HDT...

Страница 19: ...itself to the computer and automatically sends the PC its Extended Display Identification Data EDID using Display Data Channel DDC protocols How to Set up Your PC for Use with TV Windows The display settings for a typical Windows based computer are shown below however actual screens on your computer will differ depending on the version of Windows and video card equipped with the computer Even thou...

Страница 20: ...g on the type of PC graphics card and its resolution selected Supported Resolutions This TV supports the following resolutions Horizontal Vertical Frequency Frequency Dot Rate Vertical Horizontal Dot x Line KHz Hz MHz Polarity Polarity 720 x 400 70Hz 31 469 70 087 28 322 640 x 480 60Hz 31 469 59 940 25 175 800 x 600 60Hz 37 879 60 317 40 000 1024 x 768 60Hz 48 363 60 004 65 000 1360 x 768 60Hz 47 ...

Страница 21: ...21 Basic Operations 21 EN Basic Operations ...

Страница 22: ...panel or the remote control The TV will now turn on after a brief pause The STATUS LED will now turn green to indicate power on status Changing Inputs Using Side Panel or Remote Control Pressing the key will cycle the TV through all available input signal sources in the following order Press the INPUT key on the panel or the key on the remote control AV1 AV2 COMPONENT PC HDMI1 HDMI2 ...

Страница 23: ...n either the side panel of TV or VOL key on the remote control Channel Up Down Using Side Panel or Remote Control To adjust TV channel up press channel up on either the side panel of TV or CH key on the remote control To adjust TV channel down press channel down on either the side panel of TV or CH key on the remote control Component 2 direct input key is not applicable to this TV Using MUTE If yo...

Страница 24: ...ote control or using the side panel control keys OSD Menu Timeout Setting OSD Menu will automatically disappear after a preset period of time so that it doesn t remain on the screen To change the menu timeout period please follow the steps below Press to access the OSD menu Use keys to select SETUP from menu then press or to enter SETUP menu Use keys to change your settings After achieving the dis...

Страница 25: ...he remote control Note When using AV1 priority is given to the S Video input When using S Video connection AV1 the status display will denote S to indicate the input source is using S Video connector OSD Menu Background Color Setting The background color of the OSD Menu can be customized To change the MENU Background color setting please follow the steps below COMPONENT1 1080I Component HDMI Modes...

Страница 26: ...ode the original 4 3 image is preserved but black bars are used to fill the the extra space on the left and right 16 9 FULL The original 4 3 image is proportionally stretched to fill the entire screen This is the default setting from factory For 4 3 Square Content Content from traditional TV VCR and some DVD s are formatted using a square 4 3 format When viewing content in this Square format the f...

Страница 27: ...e through below modes Digital TV Analog TV Composite S Video Modes Component HDMI PC Modes AUTO PANOROMIC Using OSD Menu Note Under Component PC and HDMI input modes only 16 9 and 4 3 modes are available Under Digital TV input modes only 16 9 4 3 and Auto modes are available Use keys to change your settings After achieving the disired setting press key to return to previous menu or press to exit m...

Страница 28: ...28 Basic Operations 28 EN ...

Страница 29: ...29 Picture Controls 29 EN Picture Controls ...

Страница 30: ...change the setting changes in the picture are immediately reflected in the video picture After achieving the desired setting press to return to previous menu or press to exit menu Using OSD MenuU Various picture adjustments can be set using the Picture Adjustment OSD menu Explanation of Various Picture Control Settings Explanation of each available picture control settings are listed in the table ...

Страница 31: ... tune the monitor to perfectly synchronize to the video signal source under RGB mode V SIZE Use to change vertical size of the picture Increase to enlarge the picture size in the vertical direction Decrease to reduce the picture size in the vertical direction V POSITION Use to change vertical position of the picture Increase to shift the picture up Decrease to shift the picture down H SIZE Use to ...

Страница 32: ...Picture in Picture Turning On PIP PIP feature allows users to view two video input sources simultaneously Press the key once on the remote control to engage in Picture in Picture mode Pressing the key repeatedly will cycle thru the following modes PIP Key Sub Picture Input Source for Main Picture Input Source for Sub Picture PIP Mode MAIN TV PIP AV1 Main Picture When engaged in PIP mode a small wi...

Страница 33: ... switch positions Press ing the key repeatedly will cycle through all four corners of the screen Sub Picture Positions Default Position Noise Reduction To improve the quality of the picture in the case of poor reception Press to access the OSD menu and select PICTURE from the menu Use keys to select PICTURE then press or to enter PICTURE menu Use keys to select NOISE REDUCTION then press to enter ...

Страница 34: ...urn to previous menu or press to exit menu Repeat procedure for V Size V Position H Size and H Position settings until video picture is fully displayed within the TV s display area Notes H Position H Size V Position and V Size adjustments are only available in PC and Component input modes Due to the fact that various PC video cards and Set Top Boxes have different specification it is likely that t...

Страница 35: ... subtle noise or imperfections Please use the following procedures to adjust the picture quality when using PC mode Press to access the OSD menu and select PICTURE from the menu Use keys to select PICTURE then press or to enter PIC TURE menu Fine Tuning PC Mode Use keys to select CLOCK PHASE then press to enter CLOCK PHASE setting After achieving the desired setting press key to return to previous...

Страница 36: ...e keys to select PICTURE then press or to enter PICTURE menu Use keys to select PICTURE MODE then press to enter PICTURE MODE setting Use keys to change your settings After achieving the desired setting press key to return to previous menu or press to exit menu CONTRAST BRIGHTNESS COLOR and SHARPNESS are not adjustable once PICTURE MODE is set to STANDARD CINEMA or VIVID PICTUREMODE ...

Страница 37: ...37 Audio Controls 37 EN Audio Controls ...

Страница 38: ...select AUDIO then press or to enter AUDIO menu Using OSD Menu Various audio adjustments can be set using the audio adjustment OSD menu After achieving the desired setting press key to return to previous menu or press to exit menu Use keys to select BASS then press to enter BASS setting BASS ...

Страница 39: ...This setting will not affect AUDIO OUTPUT jacks AUDIO OUTPUT Sets the type of audio output sent from the audio output jacks located in the rear of TV When set to VARIABLE audio output is affected by the TV s internal volume controls When set to FIXED the audio output bypasses the TV s internal audio control so that functions such as bass treble surround and volume controls have no effect BALANCE A...

Страница 40: ...enu Turning On Surround Sound This TV is equipped with a surround sound circuitry that enhances the sound when using two speakers Use keys to change your settings After achieving the desired setting press key to return to previous menu or press to exit menu Use keys to select SURROUND then press to enter SURROUND setting SURROUND ...

Страница 41: ...ication for optional external speakers You can switch the amplification ON or OFF using the OSD Because these speakers are standard you may consider switching them OFF during hi fidelity playback of movies or other content Use keys to select SPEAKER then press to enter SPEAKER setting Use keys to change your settings After achieving the desired setting press key to return to previous menu or press...

Страница 42: ...ss the OSD menu Use keys to select AUDIO then press or to enter AUDIO menu Use keys to select AUDIO OUTPUT then press to enter AUDIO OUTPUT setting Use keys to change your settings After achieving the desired setting press key to return to previous menu or press to exit menu When set to VARIABLE audio output is affected by the TV s internal audio controls When set to FIXED the audio output bypasse...

Страница 43: ...43 Advanced Functions 43 EN Advanced Functions ...

Страница 44: ...SD Menu This TV has built in sleep timer function Once set the TV will automatically shut off without user intervention Use keys to change your settings Avail able settings are OFF 15MIN 30MIN 45MIN 60MIN 90MINand 120MIN After achieving the desired setting press key to return to previous menu or press to exit menu Use keys to select SLEEP TIMER then press to enter SLEEP TIMER setting The TV will f...

Страница 45: ...es When there are no signals detected by the TV the TV will automatically go into sleep mode until signal is restored Press to access the OSD menu Use keys to select SETUP then press or to enter SETUP menu Use to select the desired amount of time for power down after a signal is no longer detected Available settings are 1MIN 2MIN 3MIN 4MIN and 5MIN After achieving the desired setting press key to ...

Страница 46: ...ct SETUP then press or to enter SETUP menu Image Shift screen eliminates electrically charged residual images and prevents burn in images Time Zone Press to access the OSD menu Use keys to select SETUP then press or to enter SETUP menu Use keys to select TIME ZONE then press to enter TIME ZONE setting Use to change the setting Available options are SAMOA HAWAII ALASKA PACIFIC MOUNTAIN CENTRAL EAST...

Страница 47: ...ODE menu A small display window appears prompting the user to enter the existing passcode Use the number keys on the remote control to input the code If the code has not been set before please use the default 0000 code As each numeric digit is entered a small X fills each slot If the code entered is incorrect an Error status is displayed Simply re enter the passcode again Notes When entering the 4...

Страница 48: ...act authorized customer service center if you forget the pass code Daylight Saving Press to access the OSD menu Use keys to select SETUP then press or to enter SETUP menu Use keys to select DAYLIGHT SAVING then press to enter DAYLIGHT SAVING setting Available options are OFF and ON After achieving the desired setting press key to return to previous menu or press to exit menu EXIT EXIT PASS CODE EN...

Страница 49: ...the menu Press to access the OSD menu Use keys to select SETUP then press or to enter SETUP menu FULLSCREEN TYPE Full Screen Start Use keys to select FULL SCREEN START then press to enter FULL SCREEN START setting Use to change the setting Press to return to previous menu or press to exit the menu Press to access the OSD menu Use keys to select SETUP then press or to enter SETUP menu FULLSCREEN ST...

Страница 50: ...50 Advanced Functions 50 EN ...

Страница 51: ...51 TV Functions 51 EN TV Functions Flat Panel TV ...

Страница 52: ...CHANNEL SEARCH menu is now displayed Use keys to select AUTO SCAN Use keys to select CHANNEL SEARCH from the SETUP menu Press to enter CHANNEL SEARCH setting MANUAL SCAN CHANNEL SEARCH AUTO SCAN EXIT EXIT SELECT ADJUST OK SET AIR CHANNEL SEARCH Use keys to set the TV tuner to AIR or CABLE If you are using an indoor outdoor TV antenna please select AIR If you are using Cable TV please select CABLE ...

Страница 53: ... menu is now displayed Use keys to select AUTO SCAN to start to scan Use keys to select CHANNEL SEARCH from the SETUP menu then press to enter CHANNEL SEARCH setting The TV will now search all available channels It may take several minutes for the search to complete When the search is complete the screen will display 100 to indicate the search is finished SCANNING AIR PLEASE WAIT OR PRESS EXIT TO ...

Страница 54: ... tuned by manually keying the channel using the number keypad on the remote CH ADD Channel is set to ADD to make the channel available for viewing When you use CH UP DOWN keys to scroll thru channels this channel will appear FAV Channel is set to Favorite status so that it can be recalled using the FAV CH key LOCK Channel is set to LOCK to block the channel from viewing unless a passcode is set Ex...

Страница 55: ...g a blue colored background After achieving the desired setting press key to return to previous menu or press to exit menu Use keys to change BLUE BACK settings Changing Channels Using Remote Control or Side Panel To change TV channels users can use either the remote control or the side panel keys Switch input to TV Press button on the remote control To use the side panel press CH UP DOWN Keys to ...

Страница 56: ...PTION CC MODE OFF ANALOG CC SELECTION CC 1 DIGITAL CC SELECTION PRIMARY FONTS DEFAULT DEFAULT DEFAULT DEFAULT DEFAULT TEXT COLOR TEXT OPACITY BACKGROUND COLOR BACKGROUND OPACITY PEN SIZE STANDARD SAMPLE CLOSED CAPTION Press the key on the remote control will cycle all available settings in following order Analog Mode Digital TV Mode CC2 CC3 CC4 TEXT1 TEXT2 TEXT3 TEXT4 CC1 PRIMARY SECONDARY SERVICE...

Страница 57: ...YLE 4 6 STYLE 5 7 STYLE 6 8 STYLE 7 9 STYLE 8 TEXT COLOR Use to change color of font There are 9 settings to choose form 1 DEFAULT 2 WHITE 3 BLACK 4 RED 5 GREEN 6 BLUE 7 YELLOW 8 MAGENTA 9 CYAN TEXT OF OPACITY Use to change opacity of font There are 5 settings to choose from 1 DEFAULT 2 OPAQUE 3 TRANSLUCENT 4 TRANSPARENT 5 FLASHING BACKGROUNDCOLOR Select the color of text box There are 9 settings ...

Страница 58: ...V Chip please follow the steps below A window will now prompt the user to enter a PASSCODE using the remote control If the default system PASSCODE has not been changed enter 0000 this is the initial default from factory EXIT EXIT PASS CODE ENTER ENTER CODE As each numeric digit is entered a small X fills each slot If the code entered is incorrect an Error status is displayed Simply re enter the pa...

Страница 59: ...st enable the V Chip After V Chip is enabled parental restrictions can be set using TV guidelines or the MPAA rating This section covers setting restrictions using TV guidelines After V Chip is enabled users are presented with the TV Guidelines menu Within this menu there are six age based categories TV Y Young children TV Y7 Children 7 and over TV G General audience TV PG Parental guidance TV 14 ...

Страница 60: ...The MPAA guidelines uses the Motion Picture Association of America system for applying restrictions on movies being watched on the TV When the V Chip is set to on the TV will automatically block all content that are coded with objectionable ratings as set using either MPAA or TV guidelines After TV Guidelines are set users are pre sented with the MPAA Guidelines menu Within this menu there are sev...

Страница 61: ...P SETUP COMPLETE and return you to normal viewing Note V Chip will automatically block higher categories that are more restrictive For example if users block PG 13 category then PG 13 and higher categories R NC 17 X will automatically be blocked Using V Chip The V Chip will block all incoming content that meets the guidelines set in the previous section When this occurs the TV s screen will displa...

Страница 62: ...ble unless the same passcode is entered Notes When entering the 4 digit passcode please enter the digits slowly The TV will display X in each of the number slots as it receives the passcode If the wrong passcode is entered three times the TV will go back to normal viewing state EXIT EXIT ENTER NEW CODE ENTER CODE X EXIT EXIT PASS CODE ENTER ENTER CODE CHANNEL LOCK PRESS OK TO LOCK CH EXIT EXIT SEL...

Страница 63: ...V will unlock all locked channels without prompting the entry of the passcode again until the monitor is powered off and on again Program Guide Turning on Program Guide Press to access the OSD menu Use keys to select TV then press or to enter TV menu The PROGRAM menu is now displayed Use keys to select options Press key to previous menu or press to exit menu Use keys to change PROGRAM GUIDE settin...

Страница 64: ...must be reduced to 480 lines in order to be displayed Progressive scan method reduces flicker however picture quality may not necessarily outperform 480 interlaced when viewed at normal viewing distances Vertical Res 1 Horizontal Res 2 Aspect Ratio3 Scan Method4 480 lines 640 dots 4 3 Interlaced SDTV grade televisions and monitors are capable of displaying a maximum of 480 lines using interlaced s...

Страница 65: ...ert Up convert takes place when a digital television s display capabilities exceed the digital broadcast signal and the broadcast signal is increased to match the TV s display capabilities For example if a TV station broadcasts a digital program using 480 lines and the digital television is able to display 1080 lines the signal is increased or up converted to match the TV This TV includes advanced...

Страница 66: ...66 TV Functions 66 EN ...

Страница 67: ...67 Advanced 67 EN Advanced ...

Страница 68: ...cture Control Settings Explanation of each available picture control settings are listed in the table below Power Step Use Power Step to determine whether you would like the display to power on automaticcally or remain turned off after power is restored after a power outage incident Select 1 Step if you want the TV to power on automatically Default Aspect Use to select the default power on aspect ...

Страница 69: ...R STEP menu Use to change the setting After achiev ing desired setting press to return to previous menu or press to exit menu Default Aspect To select the default power on aspect ratio Press the on remote control or MENU key on the front panel or remote control Use to select ADVANCED and press or keys to enter ADVANCED function Use to select DEFAULT ASPECT and press key to enter DEFAULT ASPECT men...

Страница 70: ...ct ADVANCED and press or keys to enter ADVANCED function Use to select INPUT SKIP and press key to enter INPUT SKIP menu Use to change the setting After achieving the desired setting press to return to previ ous menu or press to exit menu To select one input as only one skipped signal Input Skip INPUT SKIP ...

Страница 71: ...71 Appendix 71 EN Appendix ...

Страница 72: ...V s specification section Display image doesn t fill up the full size of the screen 1 If under RGB mode the H Size and V Size is incorrectly set 2 If under TV AV1 AV2 or Component with 480i input the 4 3 WIDE mode is switched on 1 Use H Size and V Size to adjust the size of the video 2 Use the WIDE key to scroll through various full screen modes Can hear sound but no picture 1 Improperly connected...

Страница 73: ...73 Appendix 73 EN Wall Mount Instructions ...

Страница 74: ...74 Appendix 74 EN Wall Mount Instructions ...

Страница 75: ... RCA jack X 1 set RGB 15 pin D SUB X 1 set HDMI 19 pin X 3 set USB X 1 set for service only Audio L R jack X 5 sets RF input X 1 set RS 232 9 pin D SUB X 1 set Video S Video Signal g o l a n A e p y T Polarity Positive Amplitude d Video 1Vp p priority S Video Y 1Vp p C 0 286Vp p Frequency H 15 734KHz V 60Hz NTSC H 15 625KHz V 60Hz PAL Input impedance 75 ohms Y CB CR or Y PB PR Signal Component 1 2...

Страница 76: ...2 HDMI_RXC 5 Ground For 5V 13 No Connect 6 HDMI_RX1 14 No Connect 7 HDMI_RX0 15 RX5V DDC SCL 8 Ground For 5V 16 RX5V DDC SDAt HDMI Signal l a t i g i D e p y T Polarity Positive or Negative Frequency H support to 31K 64KHz V support to 50 70Hz Audio Signal Audio 1 0Vp p Y PB PR For Component 1 Mode Resolution Refresh Rate 1 720 x 480i 60 2 720 x 480p 60 3 1280 x 720p 60 4 1920 x 1080i 60 Maximum R...

Страница 77: ...emote Control Press the or button on the remote control Press and hold the button until the LED LIGHT flashes twice Find the brand of your VCR Cable Box Set Top Box or DVD Player in the component code list and enter the 5 digital code numbers by using the number buttons If the code is accepted the LED will flash after the last digit is entered If the LED does not flash twice please repeat above st...

Страница 78: ...240 Microsoft 21972 Mind 21972 Minolta 20042 Mitsubishi 20067 20043 Motorola 20035 20048 MTC 20240 Multitech 20072 NEC 20035 20037 20048 20104 20067 20038 Newave 20037 Nikko 20037 Noblex 20240 Northgate 21972 Olympus 20035 Optimus 21062 20162 20037 20048 20104 20432 Orion 20184 20209 20002 20479 Panasonic 21062 20035 20162 20616 20225 20035 20037 20184 20240 20045 20121 20043 20209 20002 20278 204...

Страница 79: ...eo 21980 Lite On 21158 21058 Loewe 20511 Magnavox Sears 20035 20037 20047 20042 20104 Sharp 20048 20209 Shintom 20072 Shogun 20240 Singer 20072 Sonic Blue 20616 Sony 20035 20032 20033 20636 21972 STS 20042 Sylvania 20035 20081 20043 Systemax 21972 Tagar Systems 21972 Tashiko 20037 Tatung 20045 20067 Technics 20035 20162 Teco 20035 20037 20048 20038 Teknika 20035 20037 Tivo 20636 20618 21503 20739 ...

Страница 80: ... Howell 00014 Bell South 00899 Clearmaster 00883 ClearMax 00883 Daeryung 01877 00877 00477 00008 Digi 00637 Director 00476 Dumont 00637 Gehua 00476 General Instrument 00476 00810 00276 00003 00014 GoldStar 00144 Hamlin 00009 00273 Hitachi 00014 Jerrold 00476 00810 00276 00003 00012 00014 KNC 00008 LG 00144 Memorex 00000 Motorola 00476 00810 00276 01254 01376 MultiVision 00012 Pace 01877 00237 Pana...

Страница 81: ...gn 30078 GE 00566 Victor 30331 General Instrument 00869 Wards 30078 GOI 00775 Yamaha 30354 30133 Goodmans 01246 Hisense 01535 Hitachi 00819 00222 01250 HTS 00775 Hughes Network Systems 01142 00749 01749 01442 I Lo 01535 JVC 00775 LG 01414 01226 Magnavox 00724 00722 Memorex 00724 Mitsubishi 00749 Motorola 00869 NEC 01270 Next Level 00869 Panasonic 00247 00701 Paysat 00724 Philips 01142 00749 01749 ...

Страница 82: ...1 Magnavox 30157 Marantz 31189 31269 30039 Marantz 30626 30029 30157 MCS 30039 MCS 30029 Onkyo 30842 30135 Miro 30000 Optimus 31023 30670 30531 31074 Mission 30157 Panasonic 31518 30039 MTC 30420 Philips 31189 31269 NSM 30157 Pioneer 31023 30150 30014 30630 30531 Onkyo 30868 30101 Optimus 31063 30000 30032 30037 30420 30179 31075 30145 Panasonic 30029 Parasound 30420 Philips 30626 30157 Pioneer 31...

Страница 83: ...TINSE2186Y1 ...

Отзывы: