background image

81

MAXDATA Notebook PRO 600 IW

  UK

The TouchPad

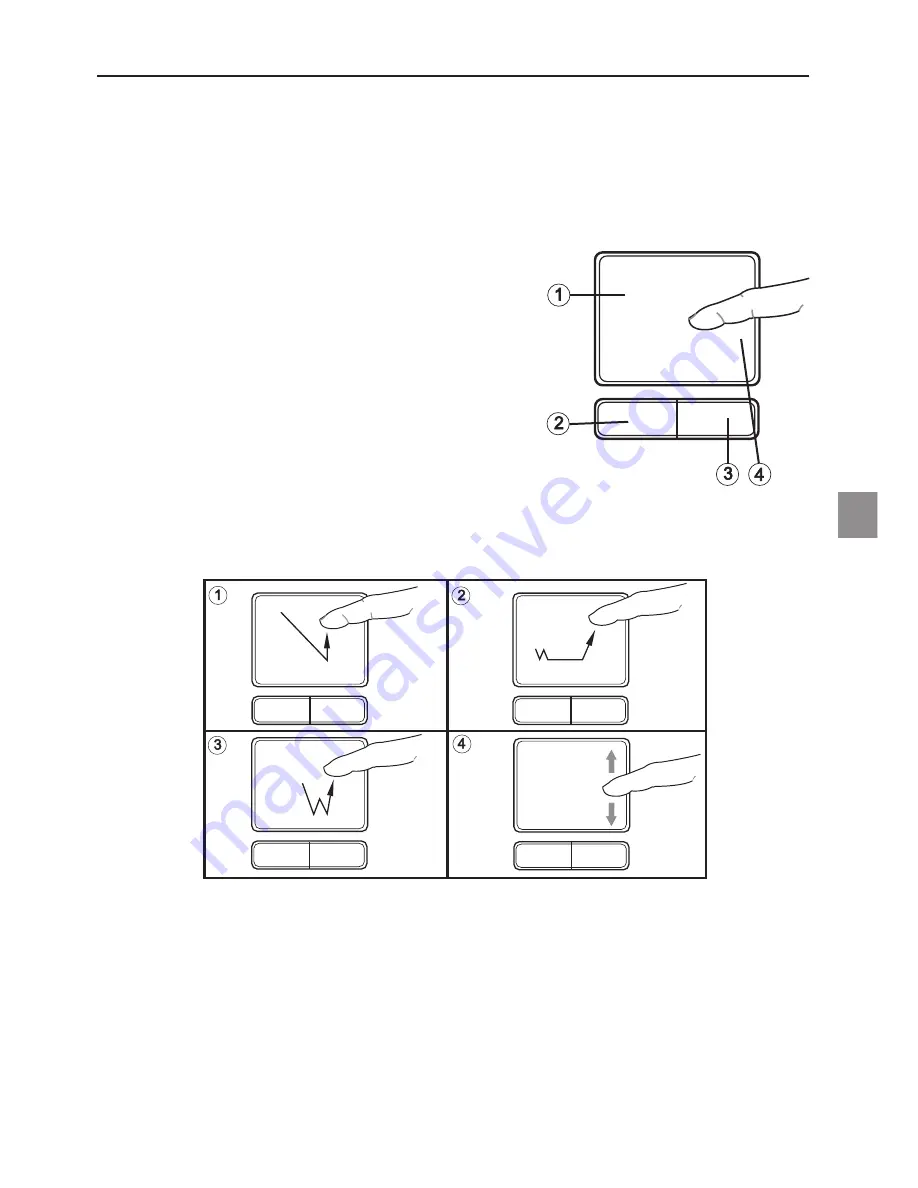
Fig. 14

The TouchPad - Operation

(1)

Sensor field

(2) 

Left “mouse” button

(3) 

Right “mouse” button

(4) 

Scrolling area: works like a mouse wheel

Note for left-handed users: most operating systems 

enable reversal of the mouse buttons.

The  system  automatically  sets  up  the  integrated TouchPad.  If  you  are  using  Microsoft

®


Windows

®

, no driver needs to be installed for the basic functions. If you wish to use the 

advanced functions, you can find the drivers to activate them on the Utility CD. To do this, 

please follow the instructions in the “Installation Instructions” section.

(1)

Select

(2) 

Select, move and release (Drag & Drop)

(3) 

Double-click to run/open files

(4) 

Scroll

When using the TouchPad, make sure it as well as your finger are clean and dry. The TouchPad 

reacts to finger movements. The lighter it is touched, the better it reacts. Pressing hard will 

not increase its accuracy.

Содержание PRO 600 IW

Страница 1: ...UK MAXDATA Notebook PRO 600 IW User s Manual...

Страница 2: ...52...

Страница 3: ...equirements exception clauses 66 Shipping Contents 67 Preparation 69 Inserting the Battery 70 Removing the Battery 70 Power Supply 71 Switching the Notebook On 72 Power Management 73 System Overview 7...

Страница 4: ...87 Port Replicator Overview 87 Installation Procedure 88 Device Ports 88 IEEE 1394 Port 88 External Monitor Port 89 Parallel Port 89 Universal Serial Bus Ports 89 Internal LAN RJ 45 Port 90 Headphone...

Страница 5: ...datory character in regard to the product or manufacturer MAXDATA 2006 Legal Information Acrobat and the Acrobat Logo are trademarks of Adobe Systems Incorporated or its sub sidiaries In certain juris...

Страница 6: ...devices through original replacement parts or exchange of modules or devices with cost for at least 5 years from end of production Operator Note This device has been carefully RF suppressed and teste...

Страница 7: ...or further use or dismantled and recycled in an environmentally sound manner The return is handled through your dealer Rechargeable and disposable batteries containing heavy metals should not be throw...

Страница 8: ...58...

Страница 9: ...t be tted with a grounded earthed plug Never pull on the cable to unplug the power supply always pull the plug itself Disconnect the external power supply power adapter or car adapter before cleaning...

Страница 10: ...ing is required consult quali ed service personnel Disconnect the computer from the power supply If the following problems occur consult quali ed service personnel Cleaning Never apply cleaning agents...

Страница 11: ...AN so that users in different parts of a building can work at different times There are two different ways to operate a WLAN In xed WLANs wireless stations devices with radio network cards or external...

Страница 12: ...ts radio components are switched on do not place the Notebook close to in ammable gases or in an environ ment which could be at risk of explosion e g paint shop since the radio waves which are transmi...

Страница 13: ...n any possible restrictions in its operation can be obtained from the appropriate authorities in each country If your country is not included in the above list then please contact the appropriate supe...

Страница 14: ...lso required to use the unit in internal areas For more detailed information about the necessary procedure to do this please contact your provider It is forbidden to use the unit outside of enclosed a...

Страница 15: ...z Because of the DSSS procedure Direct Sequence Spread Spectrum each of the 11 usable radio channels takes up a width of 22 MHz this means that up to three independent channels are available e g 3 8 a...

Страница 16: ...it The manufacturer is not liable for radio disruptions during the reception of radio and television signals which are due to non authorised alterations to the unit or to the exchange or connection of...

Страница 17: ...d in the shipping contents is missing from your computer package please contact your dealer immediately Notebook Battery Utility CD Power adapter Power cable User guide DVD CD RW combo or DVD Dual RW...

Страница 18: ...68...

Страница 19: ...Before rst using the computer make sure you are familiar with the individual components of your system Slide the release catch 1 to the right and open the display 2 1 LC display 2 Quick buttons 3 Keyb...

Страница 20: ...battery is only partially charged Note that the charging time for the battery is three hours if the computer is switched off and four to ve hours if the computer is switched on It is absolutely essen...

Страница 21: ...r adapter to the DC IN socket on the computer 2 Connect the power cable to the power adapter 3 Connect the power cable to a power outlet You can choose to run the notebook via bat tery or power supply...

Страница 22: ...ld always switch off the computer as follows Click the Start button Select Shut Down Click OK This avoids any prob lems with the hard disk and operating system The operating system is installed the rs...

Страница 23: ...g the on off button the computer returns to the normal operating state The user must log on again Sleep Without power adapter no energy consumption The current operating state is saved to the hard dis...

Страница 24: ...74...

Страница 25: ...lot 2 IEEE 1394 port 3 USB ports 4 Optical drive 5 Activity LED for optical drive 6 Eject button for optical drive 7 Emergency release for optical drive only if notebook is switched off 8 S VideoTV ou...

Страница 26: ...Rear View System Overview All air intake and ventilation openings must be kept free from obstructions at all times If not the device is liable to overheat 1 Battery slot 2 Type plate 3 Cover for WLAN...

Страница 27: ...ss LAN Table 1 Symbol Meaning Lights when Num Lock is on Lights when Caps Lock is on Lights when Scroll Lock is on Lights when the computer is switched on Flashes in power save mode Lights when the ba...

Страница 28: ...the respective quick button see the next page Fn F3 Switches between LCD display monitor both Fn F4 Reduces LCD brightness Fn F5 Increases LCD brightness Fn F6 Switches the loudspeaker on off Fn F7 R...

Страница 29: ...you can nd the drivers to activate the keys on the Utility CD To do this please follow the instructions in the Installation Instructions section 1 Launches the Internet browser 2 Starts the e mail pr...

Страница 30: ...these keys You can nd more detailed information on this in the relevant handbooks Special keys These keys and key combinations are used for controlling various hardware functions 1 Function keys For t...

Страница 31: ...ft Windows no driver needs to be installed for the basic functions If you wish to use the advanced functions you can nd the drivers to activate them on the Utility CD To do this please follow the inst...

Страница 32: ...the CD tray back in until it locks into place The CD is now ready to read Some CDs have an autostart function This means that installation programs or music CDs automatically run after you place them...

Страница 33: ...into place it is recognized as an additional drive The data on the card can then be accessed To remove it simply pull the card out Never remove the card while data is being read from or written to the...

Страница 34: ...one socket This would re sult in serious damage to the device The LAN Port The built in network adapter enables your computer to connect to the Internet via a 10 100 1000 Mbps network or DSL The conne...

Страница 35: ...If this is not the case you can run the CD as follows select My Computer CD Drive and then the utility exe le You can select the driver that you want to install in the Drivers section Recommended Inst...

Страница 36: ...86...

Страница 37: ...fers you the following types of connections Power adapter socket One IEEE 1394 Port One COM Port One VGA Port One Printer Port Two USB 2 0 Ports One RJ45 10 100 1000 Mbit s Ethernet LAN Port One Headp...

Страница 38: ...iety external devices including but not limited to oppy disk drives hard disk drives optical media disk drives keyboards USB devices printers etc IEEE 1394 Port The IEEE 1394 port allows you to connec...

Страница 39: ...connect parallel devices such as a printer to your notebook To connect a parallel device 1 Align the connector with the port opening 2 Push the connector into the port until it is seated rmly in plac...

Страница 40: ...connector into the port until it is seated rmly in place 3 Plug the other end of the cable into a LAN outlet Headphones socket You can connect headphones or portable computer loudspeakers to your note...

Страница 41: ...able to 2 GB DDR2 SDRAM Only allow quali ed service personnel to expand the main memory Two DDR2 400 533 667 SODIMM sockets Display and Video 14 1 inch WXGA TFT display Supported resolution 1280 800 w...

Страница 42: ...Ports One DVI I port monitor One TV output One stereo output socket headphones One microphone input socket mono Three USB ports v2 0 One standard telephone socket RJ 11 One standard network port RJ 45...

Страница 43: ...00 IW UK Operating System O S Microsoft Windows XP Other Data Dimensions 236 D 336 W 26 5 34 H mm Weight 2 2 kg depending on model Operating temperature 5 to 35 C Operating humidity 20 to 80 RH Storag...

Страница 44: ...94...

Страница 45: ...ting Make sure that the battery is in the battery compartment and is inserted properly Check that the battery terminals are making direct contact Connect your notebook to the power adapter so that the...

Страница 46: ...ches itself off Troubleshooting Press any key or press the on off button if none of the status LEDs are lit Possible cause of the problem A software error has caused a system crash Troubleshooting Add...

Страница 47: ...87 ExpressCard 75 External monitor 89 95 96 F Finger movements 81 Fn key 78 80 Function keys 80 G Garbage collection service 59 Graphics functions basic 72 Index H Headphones socket 87 90 Household w...

Страница 48: ...personnel 59 60 91 Quick buttons 69 Quick launch keys 92 R Resolution 72 85 Restarting 72 S S Video 75 Shipping contents 67 Shocks Vibrations 59 Standby 73 Status LEDs 69 75 Sunlight 59 Switch on 72 S...

Отзывы: