


Position the wing onto the fuselage and fix in place
with the two M3 x 50mm screws, (
image 15
). Make
certain that all control wires are kept inside the
fuselage and do not foul the wing seat area.
Connect aileron (marked CH1) and flap (marked
CH6) control leads to the corresponding “Y” lead
connectors. The retracting undercarriage main and
tail wheel control leads connect to the “Y” connector
with 3 female sockets. (marked CH5)
15
6. Receiver installation.
0ote:
We only recommend the use of 2.4GHz radio equipment with this model and make the
following recommendations for receiver location and mounting. These must be followed in
conjunction with the instructions supplied by your receiver manufacturer.
Connect the aileron (marked CH1), retracting gear (marked CH5) and flap (marked CH6)
“Y” leads to corresponding outputs on your receiver. Locate the leads from the ESC, the lead
marked
3
is the throttle control and should be connected to the corresponding output on your
receiver. Please double check that all plugs are connected to the correct outputs on your
receiver and that all leads are routed in a neat and
tidy manner.
Mount the receiver inside the fuselage as shown,
(
image 16
) using your choice of double sided self-
adhesive or “Velcro” tape. The ESC should be fixed
inside the fuselage securely where it will not foul
any moving parts.
The 3 airbrakes should be connected together using
the supplied connector, these can then be plugged into
16
a spare accessory channel in the receiver.
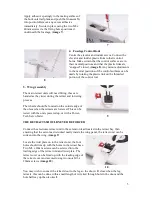
7. Final Assembly
Test all servo connections, and make sure that all control surfaces are operating correctly.
Once you are happy that everything is working, it may be easier to manoeuvre the model with
the wing removed.
Fit the aluminium propeller adaptor to the motor
using the 4 x M2.5 x 10mm cap head screws. It is
very important that these fixings are tightened
securely. Slide the propeller onto the shaft, making
sure it is slotted over the keyed prop adapter. Next fit
the spinner washer and secure in position with the
securing bolt
(image
17). For optimum performance,
some pilots may wish to balance the propeller. It is
17
very important that the propeller bolt is secure.
7


