130
CHAPTEr 11: SofTWArE UPgrADE iNSTrUCTioNS
11.1 SofTWArE UPgrADE iNSTrUCTioNS
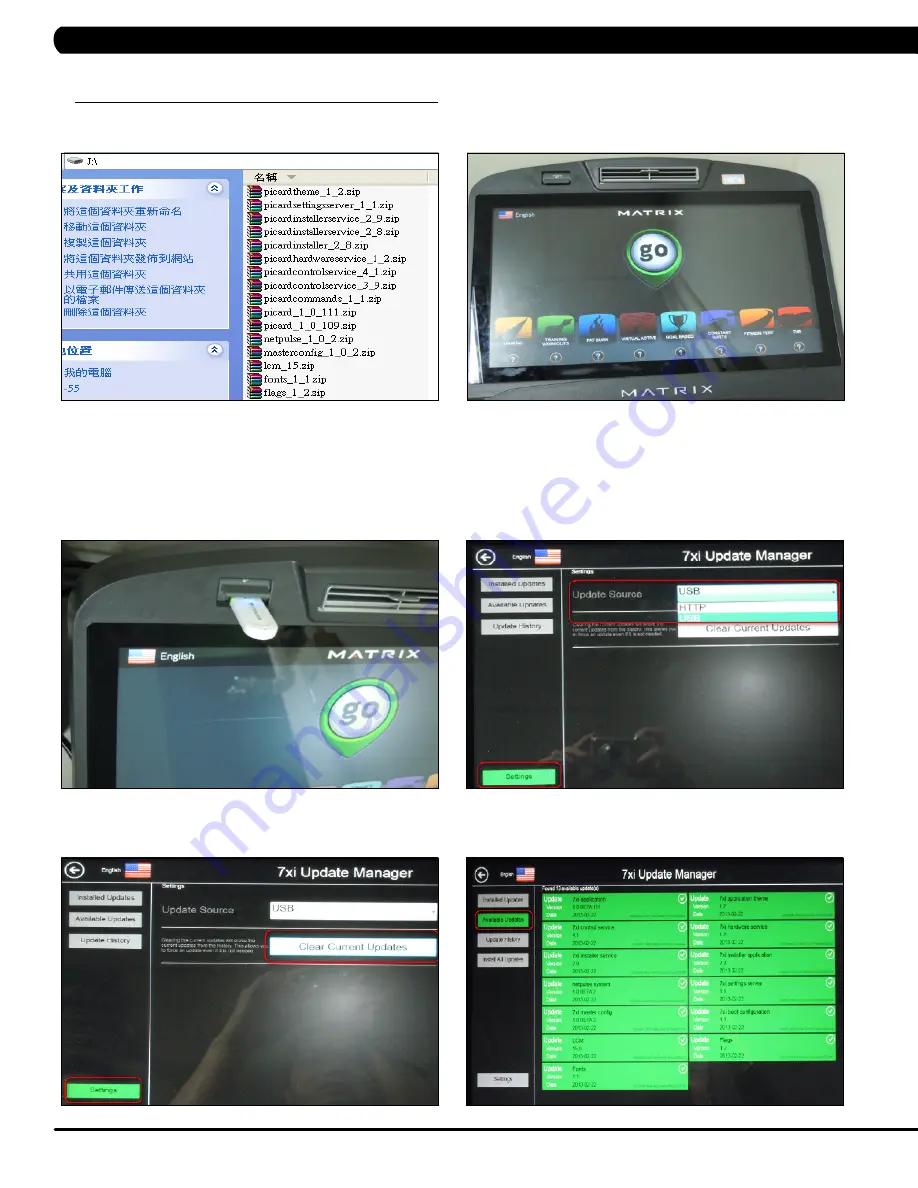
figUrE A
figUrE B
1) Copy the Picard software onto the USB drive (Figure A).
2) Turn on the power to the bike, wait until the standard display picture has been come up (Figure B).
3) Enter Manager Mode by pressing ENTER, 1, 0, 0, 1, ENTER on the lower keypad.
4) Record the Accumulated Mileage, Accumulated Time, and Serial Number. NOTE: The information can be lost during the update procedure
and should be recorded so that the information can be entered into the newly updated console.
5) Press the HOME key to return to the standard display picture.
6) Enter Update manager by pressing ENTER, 3, 0, 0, 4, ENTER on the lower keypad.
7) Insert the USB Drive into the USB port in the console (Figure C).
8) Press the Settings key on the screen. Then select the update source (Figure D).
9) Press the Clear Current Updates Key on the screen (Figure E).
10) Press the Available Updates key on the screen. (Figure F).
figUrE C
figUrE D
figUrE E
figUrE f
Содержание R7XI-01
Страница 1: ...r 7 x i 0 1 B I K E S E R V I C E M A N U A l...
Страница 58: ...55 8 1 Electrical Diagrams Chapter 8 Troubleshooting...
Страница 59: ...56 chapter 8 Troubleshooting 8 1 Electrical Diagrams CONTINUED...
Страница 60: ...57 8 1 electrical diagramS CONTINUED Pulse Sensor Wire Chapter 8 Troubleshooting POWER RESISTANCE WIRE...
Страница 63: ...60 chapter 8 Troubleshooting 8 3 LCB wiring connectionS...
Страница 106: ...103 10 3 Assembly Instructions Continued step 3 chapter 10 Bike specifications and assembly guide...
Страница 107: ...104 step 4 10 3 ASSEMBLY INSTRUCTIONS CONTINUED Step 5 Chapter 10 Bike Specifications and assembly guide...
Страница 108: ...105 final assembly 10 3 assembly instructions continued chapter 10 Bike specifications and assembly guide...
Страница 136: ...133 NOTES...


