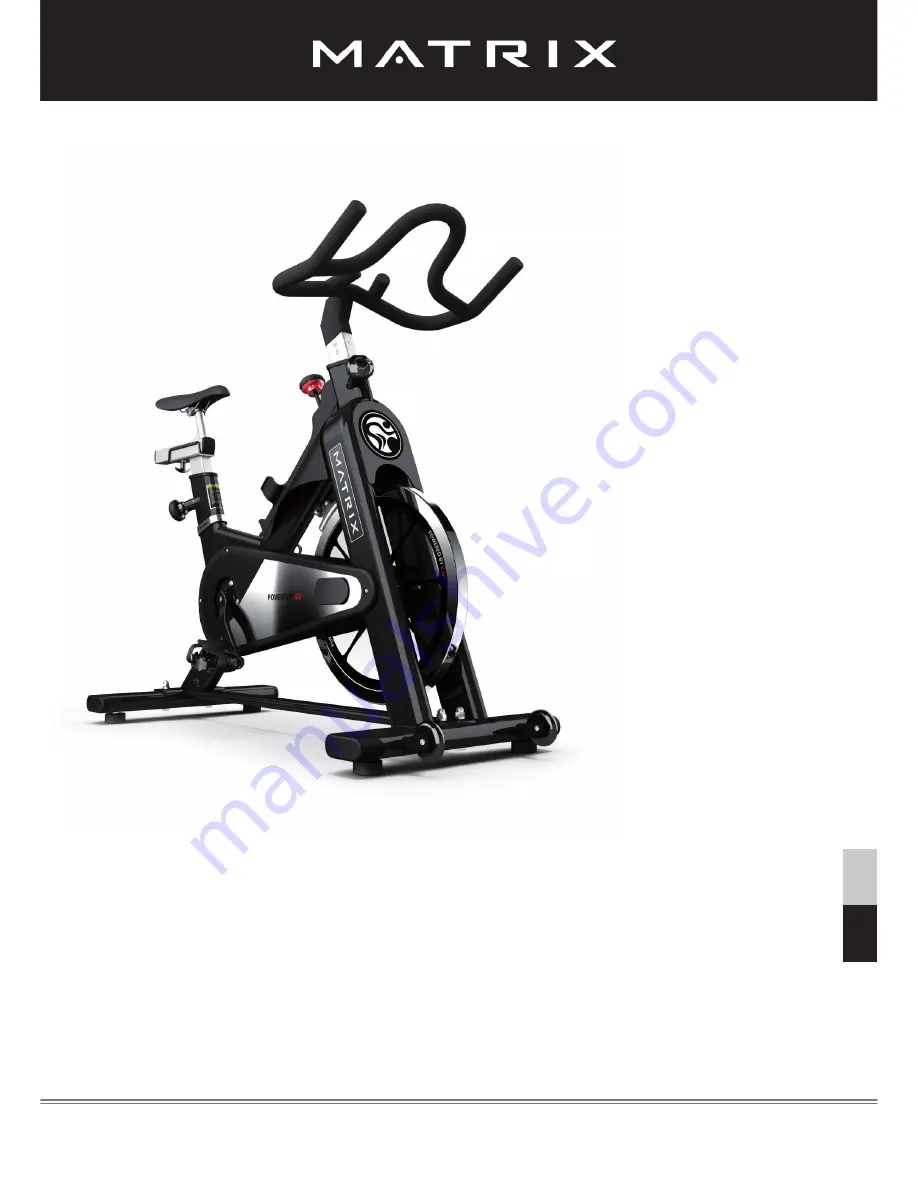
background image

Version 1.0  2013  IC-MXEB-01 Copyright by Indoorcycling Group GmbH 2013 | www.indoorcycling.com  


ENG 1

CAUTION !

Read all precautions and instructions in this manual before using this equipment. Keep this manual 

for future reference.

Improper assembly, maintenance or use can void the warranty terms.

Matrix E-Series 

model no.: 

IC-MXEB-01

Manufactured by:

Indoorcycling Group GmbH

Happurger Str. 86

90482 Nuremberg | Germany

www.indoorcycling.com

[email protected] 

MATRIX Fitness Systems Corp

.

1610 Landmark Drive

Cottage Grove, WI 53527

Libre: 866.693.4863

Local: 608.839.8686

www.matrixfi tness.com

ENG

ESP

Содержание IC-MXEB-01

Страница 1: ...s manual for future reference Improper assembly maintenance or use can void the warranty terms Matrix E Series model no IC MXEB 01 Manufactured by Indoorcycling Group GmbH Happurger Str 86 90482 Nurem...

Страница 2: ...check lists page 18 19 Explosion drawings of structural components page 20 25 Spare part reference list page 26 Limited warranty page 27 Technical specifications The Matrix E Series Bike is according...

Страница 3: ...Matrix E Series Indoor Cycle with parental consent and guided by a specially trained instructor The Matrix E Series Indoor Cycle should not be used by persons weighing more than 290 pounds 130 kg Alw...

Страница 4: ...eet Dear customer Congratulations for selecting the Matrix E Series The Matrix indoor cycle offers an impressive array of features designed to enhance cardiovascular fitness tone muscles and develop e...

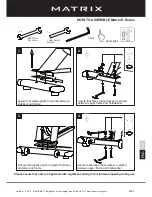
Страница 5: ...gasket is placed between stabilizer and frame Assure that black rubber washer is placed between upper frame and bolt washer Assure that black rubber washer is placed between upper frame and bolt washe...

Страница 6: ...Group GmbH 2013 www indoorcycling com ENG 6 5 6 7 STOP mark HOW TO ASSEMBLE Matrix E Series SW 17mm SW 14mm 3mm hand tight 2x 15mm Pedal Wrench 1x Make sure the seat is fixed properly in a LEVEL HORI...

Страница 7: ...OP mark Stop mark HOW TO ASSEMBLE Matrix E Series SW 17mm SW 14mm 3mm hand tight 2x 15mm Pedal Wrench 1x Pedal marked R installed on right crank clockwise Pedal marked L installed on left crank counte...

Страница 8: ...e and solvent free spray lubricant purchased by the gallon 3 7 L at the local hardware store 5 Apply Lithium grease to the threads on the lower end of the brake rod First turn the Resistance knob cloc...

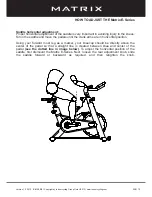
Страница 9: ...ats on the opposite surface If desired use the shoe cleats with cycling shoes instead of the toe clips Saddle height adjustment Sit on the saddle and slowly pedal until the right pedal is in the lowes...

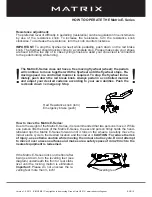
Страница 10: ...k arms are in horizontal position Using your forward most leg as a marker your kneecap should be directly above the center of the pedal so that a straight line is created between knee and center of th...

Страница 11: ...en retighten the handle Changing your hand position can change the angle of your back neck and arms To mini mize the stress on your muscles during your workouts change your hand position frequently A...

Страница 12: ...el stops Re ducing speed in a controlled manner is required To stop the flywheel imme diately push down the red break knob Always pedal in a controlled manner and adjust your desired cadence according...

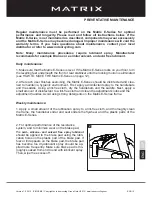
Страница 13: ...eries on page 12 2 After each user finishes exercising the Matrix E Series should be disinfected and clea ned to maintain a hygienic environment First apply a disinfectant spray to the handlebars and...

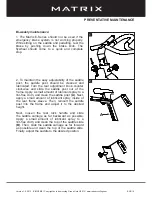
Страница 14: ...adjustment knob counter clockwise and slide the saddle post out of the frame Apply a small amount of lubricant spray to a lint free cloth and clean the saddle post A Next apply a small amount of lubri...

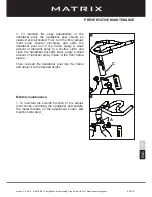
Страница 15: ...bar post out of the frame Apply a small amount of lubricant spray to a lint free cloth and clean the handlebar post C Next apply a small amount of lubricant spray inside of the front frame sleeve Then...

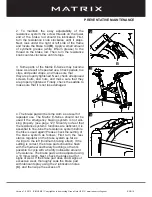
Страница 16: ...ws First turn the resi stance regulator on the brake system as far as it will go to the left minimum braking effect If the setting is correct the brake pads should be flush with the flywheel and barel...

Страница 17: ...king belt tension To check for a loose belt sit on the saddle place your feet on the pedals move the pedals until the crank arms are horizontal Next pull up the emergency brake handle and hold it Then...

Страница 18: ...ly page 13 Check emergency brake function bi weekly page 14 15 Clean and lubricate saddle and handlebar sliders posts bi weekly page 14 15 Check adjustment knobs monthly page 15 Check brake pad for si...

Страница 19: ...Taken Result Name date Bi Weekly maintenance Checklist Bike No Production code Observations Action Taken Result Name date Version 1 0 2013 IC MXEB 01 Copyright by Indoorcycling Group GmbH 2013 www in...

Страница 20: ...04 02 50 03 A 02 50 05 Version 1 0 2013 IC MXEB 01 Copyright by Indoorcycling Group GmbH 2013 www indoorcycling com ENG 20 02 40 C S 08 02 40 CRMO R E 08 02 40 90 02 40 BE 02 40 C MD20 08 02 40 CRMO...

Страница 21: ...ersion 1 0 2013 IC MXEB 01 Copyright by Indoorcycling Group GmbH 2013 www indoorcycling com ENG 21 Handlebar 02 30 01 AL Flywheel 02 40 H L 02 40 02 02 40 08 E 12 02 40 H SPARE PARTS 02 40 BPK ENG ESP...

Страница 22: ...1 Copyright by Indoorcycling Group GmbH 2013 www indoorcycling com ENG 22 02 42 01 E 08 02 42 03 S E 12 02 99 03 02 42 02 E 12 02 42 04 Chain Guard 02 99 02 02 10 A 02 99 11 optional 02 99 10 optional...

Страница 23: ...Version 1 0 2013 IC MXEB 01 Copyright by Indoorcycling Group GmbH 2013 www indoorcycling com ENG 23 Pop pin adjustment knobs 02 99 02 10 HB optional item 02 10 B 08 SPARE PARTS ENG ESP...

Страница 24: ...IC MXEB 01 Copyright by Indoorcycling Group GmbH 2013 www indoorcycling com ENG 24 Saddle Support 0121VL 3125 SW 02 21 AK 02 21 01 AL complete asembly 02 10 G Pedals 01 40 A 2 pair 02 20 02 SPARE PART...

Страница 25: ...2013 IC MXEB 01 Copyright by Indoorcycling Group GmbH 2013 www indoorcycling com ENG 25 Rear Stabilizer 02 11 05 B Front Stabilizer 02 11 E 02 11 02 E 08 02 11 06 02 11 B 02 11 A 02 11 01 E 08 SPARE P...

Страница 26: ...Left cover 02 99 03 Allen bolt M4x15 Pedals 01 40 A 2 Combi Pedals pair 01 40 A 3 toe strap pair Frame 2004 RA E E Series frame 02 10 A Vertical insert sleeve 02 20 04 Rubber stop handleb tube 02 99 0...

Страница 27: ...on or country Please contact www matrixfitness com WARRANTY TERMS Defects caused by inappropriate use or handling of the product may cause denega tion of the manufacturers warranty 10 years warranty F...

Страница 28: ......

Страница 29: ...ystems Corp 1610 Landmark Drive Cottage Grove WI 53527 Libre 866 693 4863 Local 608 839 8686 www matrixfitness com Nota Importante Lea todas las instrucciones y precauciones en este manual antes de la...

Страница 30: ...cionamiento por correa 17 Plan de mantenimiento y lista de revisiones 18 19 Dibujos de los componentes y m dulos 20 25 Lista de piezas de recambio 26 Garant a 27 Datos t cnicos La bicicleta Indoor Mat...

Страница 31: ...utilizar la bicicleta Indoor Matrix E Sereis previo con sentimiento paterno y ser supervisados por un instructor o entrenador cualificado La bicicleta Indoor Matrix E Series no debe ser utilizada por...

Страница 32: ...s alto rendimiento y fiabilidad IMPORTANTE Lea atentamente este manual antes de montar o utilizar la bicicleta Indoor Sin embargo este alto nivel de fiabilidad solamente puede garantizarse mediante un...

Страница 33: ...co locada entre el estabilizador y el cuadro La arandela negra de pl stico tiene que estar co locada entre la estructura del cuadro y la aran dela de acero Aseg rese de que la junta de pl stico est co...

Страница 34: ...oorcycling com ESP 6 5 6 7 Marca STOP MONTAJE DE LA BICICLETA INDOOR Matrix E SERIES SW 17mm SW 14mm 3mm Apretado a mano 2x 1x 15mm Llave de pedal Importante Coloque el sill n A NIVEL en posici n hori...

Страница 35: ...x 1x MONTAJE LA BICICLETA INDOOR Matrix E SERIES Importante El pedal derecho marcado con la letra R ha de montarse en sentido horario en la biela derecha R El pedal izquierdo marcado con la letra L ha...

Страница 36: ...spray lubricante Luego limpie el excesode aceite del volante de inercia con un pa o Recomen damos que use una botella de rociado recargable y la llene con el lubricante sin aerosol y sin cido para pro...

Страница 37: ...se en el sill n en posici n de hacer ejercicio y mantenga la cadera recta Coloque el pie en el pedal m s cercano al suelo en el rastral del pedal y f jelo bien pero no demasi ado fuerte Aseg rese de q...

Страница 38: ...las bielas est n en posici n horizontal La rodilla de la pierna delantera flexionada debe hallarse directamente encima del eje del pedal creando una l nea perpendicular entre rodilla y centro del peda...

Страница 39: ...lable en 2 posiciones Si el manillar est demasiado cerca del sill n puede ser que Ud se sienta restringido al respirar y si el manillar est demasiado lejos del sill n puede ser que le duela la espalda...

Страница 40: ...a se pare por completo Por favor reduzca la velocidad de forma controlada Para detener de inmediato la rueda de inercia presione el pomo rojo del freno hacia abajo Freno de emergencia apretar el pomo...

Страница 41: ...tuados debajo de los estabilizadores delantero o trasero hasta que el movimiento de balanceo quede eliminado 2 Limpieza Por razones higi nicas debe realizarse una limpieza y desinfecci n peri dica de...

Страница 42: ...zar una f cil y suave marcha de la gu a corredera de ajuste de los sillines tiene que limpiar y engrasar regularmente la tija del sill n Gire el pomo de ajuste en sentido anti horario y saque del cuad...

Страница 43: ...y saque el manillar por completo de su gu a aplique el spray lubricante en un pa o y limpie la tija y la camisa interior A continuaci n aplique lubricante en la camisa y tija del manillar A Despu s v...

Страница 44: ...sustituir pie zas que muestren desgaste deterioro o da os ocasionados por el uso de la m quina zapatas de freno sill n rastrales correas pedales ca las del sistema SPD 4 Zapata de freno Dependiendo d...

Страница 45: ...ea m n tese en el sill n coloque sus pies en los pedales mueva los pedales hasta que las bielas del pe dal est n en posici n horizontal Luego accione el freno de emergencia y balancee de pie en los pe...

Страница 46: ...elaci n de los pies de la bicicleta Diario P gina 13 Lubricaci n de la zapata de freno y limpieza detallada de la bicicleta Semanal P gina 13 Comprobaci n de la funci n de freno de emergencia Cada 2 s...

Страница 47: ...www indoorcycling com ESP 19 Lista de chequeo para cada 2 semanas Bici n C digo producci n Notas Acci n Resultado Nombre Fecha Lista de chequeo para cada mes Bici n C digo producci n Notas Acci n Resu...

Страница 48: ...02 50 05 Version 1 0 2013 IC MXEB 01 Copyright by Indoorcycling Group GmbH 2013 www indoorcycling com ESP 20 02 40 C S 08 02 40 CRMO R E 08 02 40 90 02 40 BE 02 40 C MD20 08 02 40 CRMO L E 08 02 40 C...

Страница 49: ...0 2013 IC MXEB 01 Copyright by Indoorcycling Group GmbH 2013 www indoorcycling com ESP 21 Manillar 02 30 01 AL 02 40 H L 02 40 02 02 40 08 E 12 02 40 H PIEZAS DE RECAMBIO Volante de inercia 02 40 BPK...

Страница 50: ...t by Indoorcycling Group GmbH 2013 www indoorcycling com ESP 22 02 42 01 E 08 02 42 03 S E 12 02 99 03 02 42 02 E 12 02 42 04 02 99 02 02 10 A 02 99 11 opcional 02 99 10 opcional PIEZAS DE RECAMBIO Se...

Страница 51: ...Version 1 0 2013 IC MXEB 01 Copyright by Indoorcycling Group GmbH 2013 www indoorcycling com ESP 23 02 99 02 10 HB opcional 02 10 B 08 PIEZAS DE RECAMBIO Pomos de ajuste y fijaci n ESP ENG...

Страница 52: ...IC MXEB 01 Copyright by Indoorcycling Group GmbH 2013 www indoorcycling com ESP 24 Tija del sill n 0121VL 3125 SW 02 21 AK 02 21 01 AL M dulo completo 02 10 G Pedales 01 40 A 2 02 20 02 PIEZAS DE REC...

Страница 53: ...EB 01 Copyright by Indoorcycling Group GmbH 2013 www indoorcycling com ESP 25 Estabilizador trasero 02 11 05 B Estabilizador delantero 02 11 E 02 11 02 E 08 02 11 06 02 11 B 02 11 A 02 11 01 E 08 PIEZ...

Страница 54: ...03 S E 12 Cubierta izquierda 02 99 03 Llave Allen M4x15 Pedales 01 40 A 2 Pedales Combi par 01 40 A 3 Correa cincha de pedal par Cuadro 2004 RA E Marco serie E 02 10 A Manguito de inserci n vertical 0...

Страница 55: ...inadecuado pueden derivar en la can celaci n de la Garant a PLAZOS DE GARANT A Matrix E Series 10 a os de garant a Rotura de la estructura del cuadro errores de soldadura 3 a os de garant a Montaje de...

Страница 56: ......

Отзывы: