8
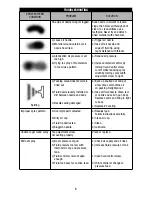
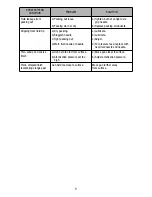
SPRAY PATTERN
CONDITION
PROBLEM
SOLUTION
One side of nozzle wing is clogged.
Soak nozzle in solvent to loosen
clogs, then blow air through until
clean. To clean orifices use a
toothpick. Never try and detach
dried material with sharp tool.
a) Loose air nozzle.
b) Material around outside of air
nozzle has dried.
a) Trigger air nozzle.
b) Take off air nozzle and
wipe off fluid tip, using
rag moistened with thinner.
a) Atomization air pressure is set
too high.
b) Trying to spray a thin material
in too wide a pattern.
a) Reduce air pressure.
b) Increase material control by
turning fluid. Control screw
to left, while reducing spray
width by turning spray width
adjustment screw to right.
Spitting
a) Packing around needle valve is
dried out.
b) Fluid nozzle loosely installed or
dirt between nozzle and body.
c) Needle sealing damaged.
a) Back up knurled nut and put
a few drops of machine oil
on packing. Retighten nut.
b) Take off fluid nozzle. Clean rear
of nozzle and seat in gun body.
Replace nozzle and bring in tight
to body.
c) Replace #4 sealing.
Improper spray pattern
a) Gun improperly adjusted.
b) Dirty air cap.
c) Fluid tip obstructed.
d) Sluggish needle.
a) Readjust gun.
Follow instructions carefully.
b) Clean air cap.
c) Clean.
d) Lubricate.
Unable to get round spray
Fan adjustment screw
not seating properly.
Clean or replace.
Will not spray
a) No air pressure at gun.
b) Fluid pressure too low with
internal mix cap and pressure
tank.
c) Fluid control screw not open
enough.
d) Fluid too heavy for suction feed.
a) Check air supply and air lines.
b) Increase fluid pressure at tank.
c) Open fluid control screw.
d) Thin material or change to
pressure feed.
TROUBLESHOOTING

