18
REMOVING THE CHUCK
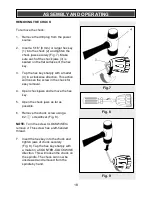
To remove the chuck:
1. Remove the drill plug from the power
source.
2.
Insert a 5/16” (8 mm) or larger hex key
(1) into the chuck (2) and tighten the
chuck jaws securely (Fig. 7). Make
sure each of the chuck jaws (3) is
seated on the flat surfaces of the hex
key.
3. Tap the hex key sharply with a mallet
(4) in a clockwise direction. This action
will loosen the screw in the chuck for
easy removal.
4. Open chuck jaws and remove the hex
key.
5. Open the chuck jaws as far as
possible.
6. Remove the chuck screw using a
#2 screwdriver (Fig. 8).
NOTE:
Turn the screw CLOCKWISE to
remove it. This screw has a left-handed
thread.
7. Insert the hex key into the chuck and
tighten jaws of chuck securely
(Fig. 9). Tap the hex key sharply with
a mallet in a COUNTER-CLOCKWISE
direction. This will loosen the chuck on
the spindle. The chuck can now be
unscrewed and removed from the
spindle by hand.
ASSEMBLY AND OPERATING
Fig. 7
Fig. 9
Fig. 8


