background image

Installation & Operation Manual | HORIZON3D 


© 

MASTERIMAGE 3D, Inc.


45 


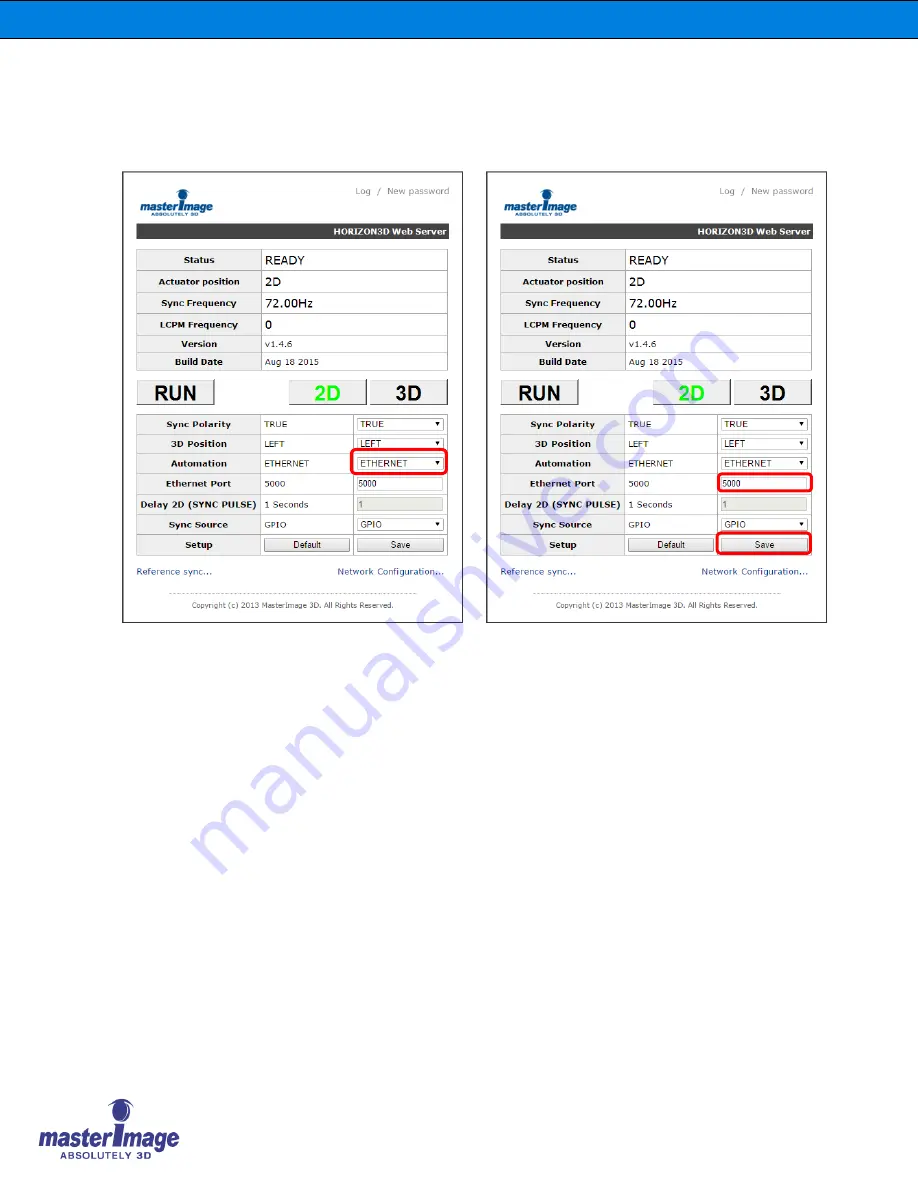
8.10. 

Ethernet Automation Port Number Allocation 

When using the Ethernet Automation feature configure the port number being used. The 
default setting is 5000. 


Once the Automation Source has been set to the Ethernet option the Port Number can be 
configured accordingly. 

Click the [Save] button once the correct Port Number has been entered. 


Содержание HORIZON3D S

Страница 1: ...Installation Operation Manual HORIZON3D 55 HORIZON3D Digital 3D Cinema System Installation Operation Manual Revision No 1 0 1...

Страница 2: ...tober 2015 2 nd Draft RJG Picture replacement d1 0 2 17 th November 2015 3 rd Draft RJG Drawing Replacement 1 0 0 3 rd December 2015 1 st Release RJG 1 0 1 7 th December 2015 2 nd Release RJG Picture...

Страница 3: ...3D ASIA LLC Gasandong BYC HIGHCITY Building A 22F 131 Gasandigital1 ro Geumcheon gu Seoul 153 803 South Korea TEL 82 2 3438 1600 FAX 82 2 3438 1698 MASTERIMAGE 3D EUROPE PLC Pinewood Studios Pinewood...

Страница 4: ...t Overview 12 5 1 Three Way Beam Optical Head Assembly 12 5 2 Head Assembly Component Identification 13 5 3 Lift Column Actuator 15 6 System Setup 16 6 1 Initial System Assembly 16 6 1 1 Attach Optica...

Страница 5: ...tor Application 41 8 7 Automation Source via the Monitor Application 42 8 8 Sync Pulse Automation Reference Frequency via the Monitor Application 43 8 9 2D Delay Time via the Monitor Application 44 8...

Страница 6: ...Installation Operation Manual HORIZON3D MASTERIMAGE 3D Inc 6 11 1 2 Qube Server 69 11 1 3 GDC Server 72 12 Appendix C Installation Record 78 13 Appendix D Dimensional Drawings 79...

Страница 7: ...ear the HORIZON3D provides the clearest and truest color 3D picture of any available liquid crystal 3D system This user manual provides all the information required for simple installations and the op...

Страница 8: ...ratio is greater than 1 1 1 2 2 Heat Damage To avoid burning the polarizer film of the liquid crystal panel ensure a panel surface temperature of 80 F is maintained 2 3 General Electrical Safety Disc...

Страница 9: ...digital cinema projector HORIZON3D s patented construction three way beam uses three specific Liquid Crystal LC panels that are accurately bonded to ensure effective polarization of the left and righ...

Страница 10: ...0 4 Installation and Configuration 4 1 Unpacking the HORIZON3D Inspect the HORIZON3D packaging box for any external damage Report any damage to shipper and to MasterImage 3D Palletized Outer Carton co...

Страница 11: ...lation Operation Manual HORIZON3D MASTERIMAGE 3D Inc 11 4 2 Confirm Package Contents of HORIZON3D Optical Three Way Beam Head Assembly Lifting Column Unit Power Adaptor Sync Cable 3D Glasses Cleaning...

Страница 12: ...Installation Operation Manual HORIZON3D MASTERIMAGE 3D Inc 12 5 Detailed Component Overview 5 1 Three Way Beam Optical Head Assembly...

Страница 13: ...l To improve the alignment of the lower half image if required E F G H I 2 Back Panel E Upper Vertical Alignment Used to align the vertical offset of the upper half reflected image Operated manually o...

Страница 14: ...n M Actuator Port Connected between Control Panel and lift column actuator to move the Optical Head between 3D position or 2D position N DC Port DC 24V Power Port Note If the Actuator Cable is connect...

Страница 15: ...r mounting of the Optical Head Assembly B Lift Column Actuator Used to move the Optical head between 3D position or 2D position C Lift Colum Actuator Control Box D Rolling wheels Used to move the HORI...

Страница 16: ...8x1 25x22L Two Guide Pins 1 Before attaching the Optical Head Assembly observe the two guide pins of Tilt Angle Stage on Lift Column Actuator 2 Lift the Optical Head carefully into position 3 Attach t...

Страница 17: ...ecurely 3 Connect the other end to the DLP Projectors GPIO Port B Connecting the Actuator Cable 1 Connect the Actuator Cable from the Lift Column Actuator to the Optical Head Assembly Actuator Port C...

Страница 18: ...and 2D position information will be erased from the system memory if the 3D or 2D button is pressed the Lift Actuator Column doesn t move The 3D position and 2D position setting must be re memorized b...

Страница 19: ...he 3D 2D button at the same time and hold for more than 1second then release 4 Press the 3D button to activate the Lift Column Actuator and move the position upwards 5 When the Optical Head is at the...

Страница 20: ...it to be release the 2D button 10 To save the 2D position press the RUN 2D button at the same time and hold for more than 1 second then release 11 To exit the setting mode of 3D and 2D position press...

Страница 21: ...s on and off Once the Optical Head reaches the memorized position the 3D button LED becomes solid 15 Press 2D button While the Lift Actuator Column is moving to the 2D position the 2D button LED blink...

Страница 22: ...light path 2 If necessary adjust the 3D position height slightly Adjusting 3D position refer to section 6 1 4 Setting 3D Position 3 Check if Optical Head Assembly is positioned perpendicular to the c...

Страница 23: ...lignment covers by loosening the thumb screws by hand 2 Remove the four lock screws by turning the lock screw clockwise When aligning the image the Mirror Lock Screws must be removed If not removed yo...

Страница 24: ...ex key wrench Type Small Right Angle 3 Load the standard cross pattern image from the projector 4 Align the Upper image lines by turning the upper horizontal alignment screw Clockwise LEFT Counter Clo...

Страница 25: ...y Tools Required 2mm or 5 64 hex key wrench Type Small Right Angle 7 Align the Lower image lines by turning the lower horizontal alignment screw Clockwise LEFT Counter Clockwise RIGHT 8 Align the Lowe...

Страница 26: ...MASTERIMAGE 3D Inc 26 Alignment Covers Alignment Covers After Image Alignment the Alignment Covers must be closed 10 To protect the dust or foreign substances the four alignment covers must be closed...

Страница 27: ...alignment covers by loosening the thumb screws by hand 2 Remove the four lock screws by turning the lock screw clockwise When aligning the image the Mirror Lock Screws must be removed If not removed y...

Страница 28: ...eb browser e g Safari Enter the IP address of the HORIZON3D and you will be taken to the wireless Alignment Controller home page as below Initially the button displaying the O indicates the wireless A...

Страница 29: ...is active in low speed mode Use this mode for slower more accurate alignment if the image once the correct position has nearly been reached Use the directional buttons to accurately align the image fo...

Страница 30: ...MASTERIMAGE 3D Inc 30 Alignment Covers Alignment Covers After Image Alignment the Alignment Covers must be closed 3 To protect the dust or foreign substances the four alignment covers must be closed...

Страница 31: ...e switch to the ON position as indicated to Invert the sync polarity 6 4 Actuator 3D Position Boothless Version If necessary it is possible to change the actuator 3D position by changing the position...

Страница 32: ...e control files for Series II projectors The Dark Time should be set to 350 S with the Delay being set to 100 S These figures are applicable to all frame rates and projector flash configurations Follo...

Страница 33: ...llation Operation Manual HORIZON3D MASTERIMAGE 3D Inc 33 7 2 2 Christie Series II File Settings for External Server Playback Christie 7 2 3 Barco Series II File Settings for External Server Playback B...

Страница 34: ...te specific ILS File Site specific Auxiliary Lens Site specific Selected if Anamorphic Lens or WCL needed otherwise unselected Config 2 Measured Color Site Specific Create on site Target Color DC28_DC...

Страница 35: ...ou can use a different IP address that is suitable to your network 8 2 Execute the Monitor Application using a Web Browser Input the default IP address of the HORIZON3D 192 168 10 95 into your web bro...

Страница 36: ...assword link in the upper right corner of the HORIZON3D Web Server shown above and the Change Password dialog box will be displayed HORIZON3D Web Server shows all the system status information Status...

Страница 37: ...3D Inc 37 8 3 System Operation via the Monitor Application Click the RUN button to start the Liquid Crystal Panel operation Input the current password mi Input a new password Input the new password f...

Страница 38: ...nitor Application 8 4 1 3D Position Click the 3D button to move the actuator to the 3D position The color of the 3D button will change from black to green The color of the RUN button will change from...

Страница 39: ...he color of the 2D button will change from black to green The color of the RUN button will change from green to black The indication under Status will change from Running to Ready Whilst the actuator...

Страница 40: ...E 3D Inc 40 8 5 Sync Polarity via the Monitor Application Check the current value of the Sync Polarity Depending on the condition of 3D material on screen change the Sync Polarity as required from Tru...

Страница 41: ...tting 3D Position via the Monitor Application Check the current setting for the 3D position of the Actuator If required by the installation requirements for the system the 3D Position can be changed f...

Страница 42: ...Automation Source of the system by default this is set to Manual The options available for selection are Manual Control via front panel button GPIO 37 9 Automation via the 37 pin GPIO cable connection...

Страница 43: ...rce has been set to Sync Pulse click Reference Sync in the bottom left of the application Up to five reference frequencies can be activated and these can be altered from 45 150Hz as required The defau...

Страница 44: ...with material of varying frequency or frame rate it may be necessary to apply 2D Delay Time to the system to prevent unwanted 2D transition Enter the required 2D Delay Time for your particular situati...

Страница 45: ...r Allocation When using the Ethernet Automation feature configure the port number being used The default setting is 5000 Once the Automation Source has been set to the Ethernet option the Port Number...

Страница 46: ...on Click Network Configuration to access the settings window Enter the IP Address Gateway Subnet Mask Primary DNS and Secondary DNS of your network accordingly Click the Save Config button to accept a...

Страница 47: ...MAGE 3D Inc 47 8 12 Sync Source via the Monitor Application Check the current setting for the Sync Source The default is GPIO Choose the option for TTL if the system is being used in a non cinema appl...

Страница 48: ...ains a log function that stores the last 200 records of activity including any errors that occurred In order to access the log file click Log at the top of the Monitor Application The Log File will be...

Страница 49: ...E 1 72Hz Reference Sync Frequency Setting REFERENCE 1 72Hz ON Reference Sync Frequency Enabled REFERENCE 1 72Hz OFF Reference Sync Frequency Disabled POLARITY TRUE Sync Polarity Setting PASSWORD CHANG...

Страница 50: ...nc 50 8 14 Factory Default via the Monitor Application Should it be necessary for any reason to reset the system to Factory Default this can be achieved by clicking the Default button This can be comp...

Страница 51: ...3D Sync Polarity True or Inverted of the 3D setting in the projector title configuration No Moving Lift Column Actuator or Suddenly Frozen 1 Check if the lift column actuator cable is properly connect...

Страница 52: ...nings are shown in the table below ERROR CODE LOG TEXT MEANING E01 ERR ACT NOT DETECT Actuator Lift stand is not connected E02 ERR ACT NOT LIMIT Positioned not in 2D or 3D E03 ERR ACT FAULT Actuator f...

Страница 53: ...ile having a hex file extension Example HORIZON3D_v1 1 1_20121119 hex 4 Prepare a CAT5 E cable for connection to the system 10 1 2 Web Server MPFS Upgrade 1 From the ftp site download and save the lat...

Страница 54: ...the Monitor Application as described in section 8 of this manual 4 You will be asked to select the upgrade file from the saved location on your computer 5 Click the Select button indicated above and...

Страница 55: ...p utility by double clicking the utility s icon on your PC 3 Configure the utility to match your individual site network requirements Device s IP Address Default 192 168 10 95 Hex file name Hex file s...

Страница 56: ...ORIZON3D MASTERIMAGE 3D Inc 56 4 Click the Open button to select the firmware hex file saved to your PC 5 Select the file to be used and click Open 6 Click the Upgrade button to start the upgrade of t...

Страница 57: ...the Upgrade button 8 You will see the Success Firmware Upgrade message in the utility after the progress bar reaches the end Click the Exit button to close the utility after successful upgrade Note S...

Страница 58: ...e Upgrade Procedure 1 Make sure the HORIZON3D system is disconnected from the power supply and connect the micro USB cable as indicated in the image below 2 Having installed the USB_Downloader driver...

Страница 59: ...59 3 Connect the power to the HORIZON3D system and the PICDEM FS USB0 Boot will be automatically selected by the software 4 Click the Load HEX File button and locate the previously saved upgrade file...

Страница 60: ...RIMAGE 3D Inc 60 5 Click the Program Device button and the upgrade will commence once complete a success message will be displayed 6 Disconnect the micro USB cable and power cable the next time the sy...

Страница 61: ...Connection PRJ_COM_nRUN 2 12 Liquid Crystal Panel Module RUN command Compartor 24V max 12V threshold LM2901H PRJ_SYNC 3 9 SYNC pulse PRJ_COM_n3D 4 2 Optical Head Assembly 3D command Low Pulse width 2...

Страница 62: ...B 2 GPIO TTL Automation DSUB GPIO TTL Comm Direction DSUB37 Description Comments Pin Name Pin Number Pin Number NC 1 NC 2 PRJ_SYNC 3 7 SYNC pulse Compartor 24V max 12V threshold LM2901H NC 4 GND 5 13...

Страница 63: ...ver 1 Within the server menu open Device Manager Menu DTS Digital Cinema Device Manager 2 Click the Add button and the list of devices will display shown right 3 Select the Raw option to create Master...

Страница 64: ...control the HORIZON3D The files required are MasterImage Start MasterImage Stop MasterImage 2D MasterImage 3D and MasterImage Up Down Stop These are created in the Macro Editor option of the server me...

Страница 65: ...ditor screen Repeat this process for the other four required macros MasterImage Stop MasterImage 2D MasterImage 3D and MasterImage Up Down Stop 3 To insert an action for each newly created macro selec...

Страница 66: ...n completed click the OK button 6 Repeat this step for the remaining four macros entering the corresponding message text MasterImage Stop Stop n MasterImage 2D PFD DOWN n or 2D n MasterImage 3D PFD UP...

Страница 67: ...MasterImage macros will be included in a file named MasterImage_cueslib This will remove the requirement for the information to be entered manually as described in the above steps The MasterImage_cue...

Страница 68: ...Installation Operation Manual HORIZON3D MASTERIMAGE 3D Inc 68...

Страница 69: ...y name Address value address value Key name Port value port value Configuration Device Devices 2 Complete the red fields with the details of the MasterImage HORIZON3D where Device Name is MasterImage...

Страница 70: ...e 2Dposition Instructions Send PFD Down x0D x0A Send Instructions Method Method name PFDStop Instructions Send PFD Stop x0D x0A Send Instructions Method StreamDevice The symbols x0D x0A are necessary...

Страница 71: ...ue name 3D Position Actions InvokeMethod name 3Dposition device MasterImage Actions Cue Cue name 2D Position Actions InvokeMethod name 2Dposition device MasterImage Actions Cue Cue name Up Down Stop A...

Страница 72: ...cribed below are specific to the GDC SX 2001 server If information is required for different models please contact GDC directly 1 In the SMS Main Menu click the Control Panel button and log on as Main...

Страница 73: ...n Operation Manual HORIZON3D MASTERIMAGE 3D Inc 73 The HORIZON3D must be added as a device within the GDC server configuration 3 Select the Devices tab and click the Add button The following screen wi...

Страница 74: ...enter the configuration settings for the HORIZON3D IP Address and Port Number 6 In the Transport option select TCP and in the Linefeed Type select CR and ensure the Status is set to Enabled 7 Once all...

Страница 75: ...ation Manual HORIZON3D MASTERIMAGE 3D Inc 75 9 Click the Add button to create a new event In this case name the event START 10 Click the Enter button and enter the command value for the event Again in...

Страница 76: ...Event Name UP DOWN STOP Enter Value PFD STOP 12 Once all macros have been created return to the Actions tab of the Automation screen to create the events that are needed to communicate This is done by...

Страница 77: ...Installation Operation Manual HORIZON3D MASTERIMAGE 3D Inc 77 15 Once all event actions have been created click the Save button followed by Yes...

Страница 78: ...below is an example of the installation record form to be filled out once the HORIZON3D has been set up and configured For a copy of the form to be filled out contact your equipment provider or email...

Страница 79: ...Installation Operation Manual HORIZON3D MASTERIMAGE 3D Inc 79 13 Appendix D Dimensional Drawings...

Страница 80: ...Installation Operation Manual HORIZON3D MASTERIMAGE 3D Inc 80 Optical Head Assembly...

Страница 81: ...Installation Operation Manual HORIZON3D MASTERIMAGE 3D Inc 81 End of Manual For additional information go to www support masterimage3d com...

Отзывы: