background image

Martin Engineering M4101-01/19

7

Martin

®

 HD QB1™ Cleaner

Installing Belt Cleaner and Tensioner

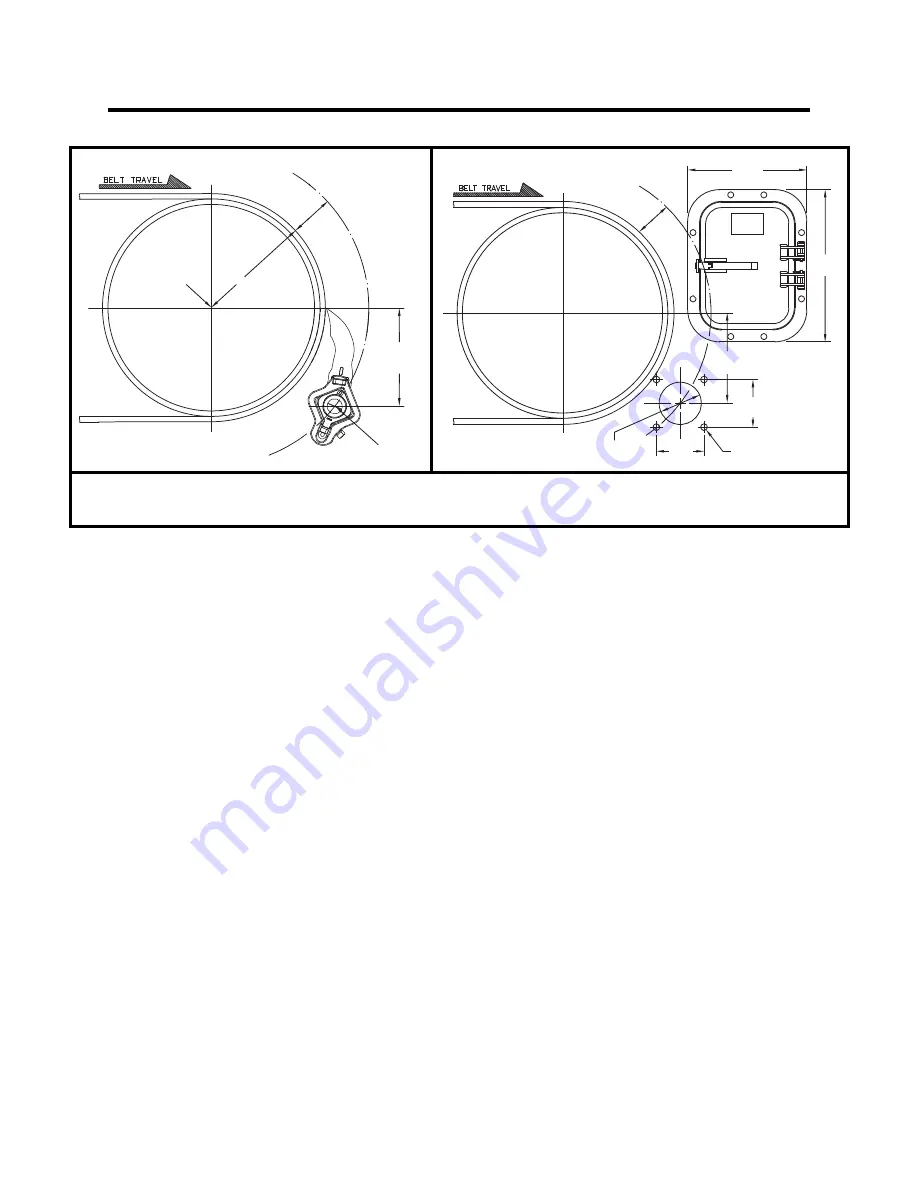
Figure 3. Belt Cleaner Mainframe Location & Chute Wall Cutouts

Locating belt 
cleaner 
mainframe

1. On operator side of chute, find pulley center point (A).

2. Measure radius of head pulley including lagging and belt thickness (B). 

To this dimension, add 3.50 in. (89 mm).

3. Starting from center point (A), measure the total distance calculated in 

step 2 (B + 3.50) and draw an arc on chute wall.

4. Measure down from pulley's horizontal centerline the distance shown in 

Figure 3 and draw a horizontal line parallel to it. Locate center point of 
belt cleaner mainframe (C) where this line intersects the arc on the chute 
wall.

5. Make sure mainframe and blade do not lie in path of material unloading 

from conveyor belt.

6. Repeat steps 1 through 5 for far side chute wall.

7. Drill or cut holes for tensioner mounting plates on chute walls as follows:

a. If bolting tensioner mounting plates to chute walls, do the following:

(1) Drill or cut one 4-in. hole for mainframe and four 5/8-in. holes for 

screws in both operator side and far side chute walls. Remove 
burrs and sharp edges.

b. If welding tensioner mounting plates to chute walls, do the following:

(1) Drill or cut one 4-in. hole for mainframe in both operator side and 

far side chute walls. Remove burrs and sharp edges.

8. If using Martin

®


Inspection Door, cut access door opening and mounting 

holes according to 

Martin

®

 Inspection Door Operator's Manual

P/N M3891.

Center point of pulley

Center point of belt

Radius of head pulley

A.

B.

C.

including lagging and belt

cleaner mainframe

8.50

(216)

minimum

B

3.50

(89)

A

C

Ø4.00

(102)

4.50

(114)

Ø0.625

(16)

4.50

(114)

8.50 (216)

minimum

3.50

(89)

14.39

(365)

11.26

(286)

Installation

Содержание HD QB1

Страница 1: ...Martin HD QB1 Cleaner Operator s Manual M4101 Go to Martin HD QB1 Cleaner web page...

Страница 2: ...an National Standards Institute ANSI z244 1 1982 American National Standard for Personnel Protection Lockout Tagout of Energy Sources Minimum Safety Requirements and Occupational Safety and Health Adm...

Страница 3: ...ls required 1 Urethane shelf life 2 Safety 3 Before Installing Belt Cleaner 4 Installing Belt Cleaner and Tensioner 7 Locating belt cleaner mainframe 7 Removing blade 8 Installing torque tubes 8 Insta...

Страница 4: ...alling Blade 8 5 Torque Tube Installation 8 6 Mainframe Locating Tabs 9 7 Centering Cleaner on Belt 9 8 Martin HD QB1 Cleaner Assembly P N C1QHASXXSXXXXRX 14 9 Martin Conveyor Products Warning Label P...

Страница 5: ...tallation Belt cleaner inspection access If the belt cleaner is installed on enclosed pulley chutework at least one Martin Inspection Door should be installed Martin Inspection Doors are available fro...

Страница 6: ...sentative Table II Urethane Shelf Life URETHANE SELECTION APPLICATION DESCRIPTION TYPICAL MATERIALS CONTINUOUS TEMPERATURE Orange Standard Martin Urethane Suitable for 80 or more of all belt cleaner a...

Страница 7: ...y or death DANGER If this equipment will be installed in an enclosed area test the gas level or dust content before using a cutting torch or welding Using a torch or welding in an area with gas or dus...

Страница 8: ...d result in serious injury or death 4 Turn off and lockout tagout blockout testout energy source according to ANSI standards see References DANGER If this equipment will be installed in an enclosed ar...

Страница 9: ...eaner Figure 1 Belt Cleaner Mounting Locations 30 maximum Conveyor Center Line Conveyor Center Line 30 maximum 30 maximum Conveyor Center Line 30 maximum Conveyor Center Line 45 minimum BELT TRAVEL Po...

Страница 10: ...ot in the direct flow of discharging material causing premature blade wear 2 The diameter of the pulley is big enough that the blade does not trap or hold material between the inside of the blade and...

Страница 11: ...nloading from conveyor belt 6 Repeat steps 1 through 5 for far side chute wall 7 Drill or cut holes for tensioner mounting plates on chute walls as follows a If bolting tensioner mounting plates to ch...

Страница 12: ...p B from blade cartridge D 3 Pull blade cartridge away from blade clamp C and remove from mainframe Figure 5 Torque Tube Installation Installing torque tubes 1 Insert torque tube F into mainframe E 2...

Страница 13: ...om blade stops Installing blade 1 See Figure 4 Position blade on mainframe with blade curve facing conveyor belt Push far side end of blade into blade stop C until it locks 2 Push blade cartridge D on...

Страница 14: ...elt is running Body or clothing can get caught and pull body into conveyor belt causing severe injury or death 4 Turn on conveyor belt for 1 hour then turn off DANGER Before installing servicing or ad...

Страница 15: ...ering or a representative for replacements 5 Check blades for excessive wear Replace if necessary 6 Remove equipment from service if there is any indication it is not functioning properly Call Martin...

Страница 16: ...Check blades and replace if necessary Blade wears only in the center Use a segmented style blade for crown pulleys Consider narrowing the blade width to clean the middle of the belt Noise or vibratio...

Страница 17: ...wist Tensioners P N 38850 2 Dual Martin Twist Tensioners with L Bracket P N 38850 2L Dual Martin Spring Tensioners P N 38180 2 Operator s manuals Martin Spring and Air Tensioners Operator s Manual P N...

Страница 18: ...able II 1 3 Blade Retainer with Set Screw C1QHRIT 2 4 Torque Tube Collar with Set Screw C1QACIT 2 5 Torque Tube Table III 2 6 NS Label Martin Products 38048 2 7 NS Label Conveyor Products Warning 2339...

Страница 19: ...XRX 52 1321 90 2286 C1QAMRS58 C1QHBS52XX C1QATTS30 C1QHAS60S54XXRX 54 1372 90 2286 C1QAMRS58 C1QHBS54XX C1QATTS30 C1QHAS60S56XXRX 56 1422 90 2286 C1QAMRS58 C1QHBS56XX C1QATTS30 C1QHAS66S58XXRX 58 1473...

Страница 20: ...es de energ a al Label P N 23395 conveyor system and loading system before performing any work on conveyor or conveyor accessories Failure to do so could result in severe injury or death sistema trans...

Страница 21: ...oner Assembly P N 38850 Martin HD QB1 Cleaner Assembly P N C1QHASXXSXXXXRX 4 00 102 4 50 114 0 625 16 3 50 89 4 50 114 8 50 216 minimum 1 93 49 3 10 79 Chute Wall 7 18 182 9 27 235 6 00 152 Appendix M...

Страница 22: ......

Страница 23: ...ies or regions Other trademarks and service marks belonging to Martin Engineering Company in the United States and or other countries or regions may be designated with the TM and SM symbols Brands tra...

Страница 24: ...ical Resource for Total Dust and Material Control is a 576 page hard cover volume that provides information of value to industries where the efficient handling of bulk materials is a key to productivi...

Отзывы: