background image


  11


On-Screen Menu (continued)


VIDEO CONFIGURATION SUBMENU (Continued) 


Use the 

 and 

 buttons to select each individual bias or gain control. Press SELECT to begin adjusting the control. Use 

the 

 and 

 buttons to increase or decrease the value. 

 
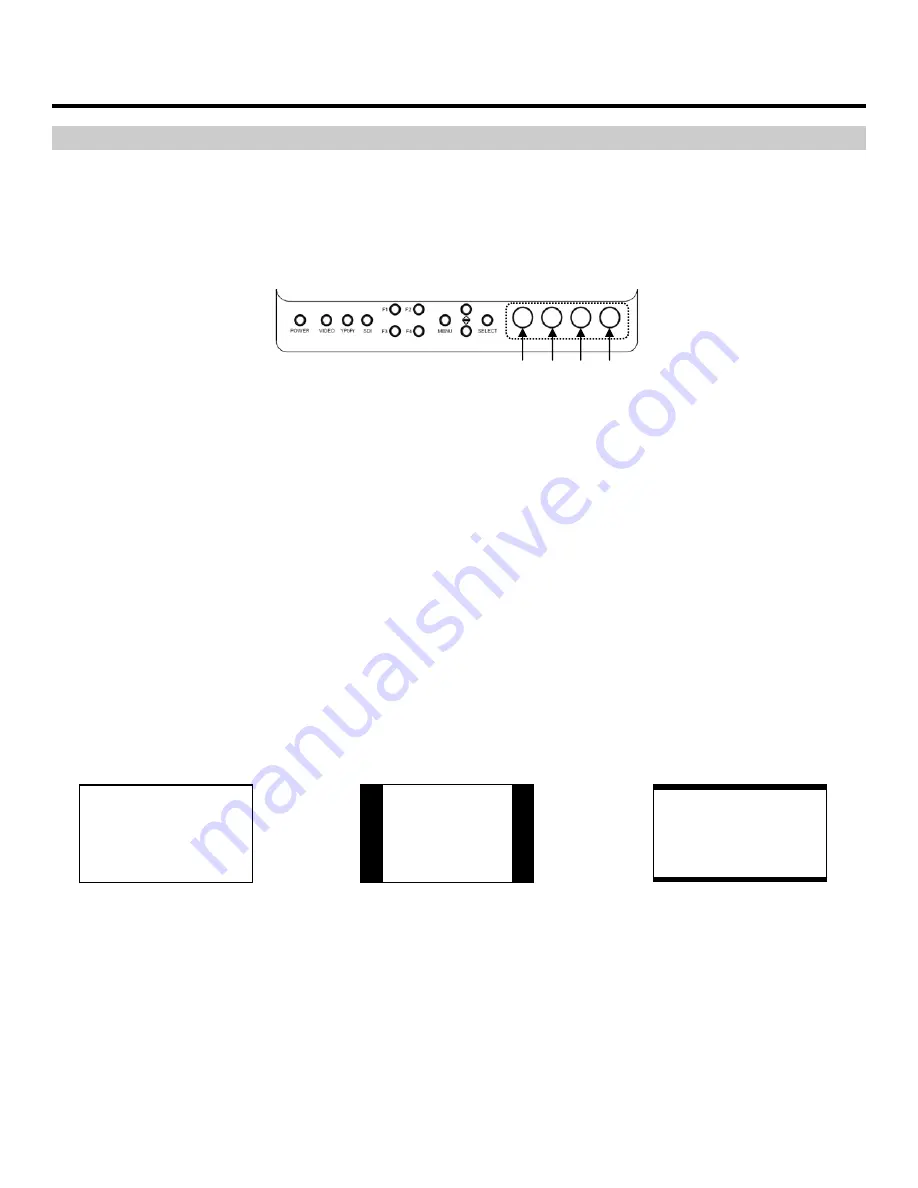
Alternately, the image adjustment knobs (Brightness, Color, Tint, Contrast) can be used to easily adjust the bias and gain 
settings as shown below. The knobs affect whichever row of controls (gain or bias) is currently selected. 


  Check Field 


Use the check field modes for monitor calibration or to analyze individual color components of an image. In 

Mono

chrome mode, all color is disabled and only a grayscale image is shown. In 

Blue

,

 Green

, and 

Red

 check field 

modes, only the selected color will be shown. 


  Ratio  


Use to switch between Full Screen, 4:3 and 16:9 aspect ratios. 


As the V-LCD70XP-HDMI monitor has a native resolution of 800 x 480 RGB pixels, incoming images are automatically 
scaled to fit the screen: 
 
• 

In Full Screen, images are scaled to fill the entire screen. 


• 

In 4:3 mode, images are scaled to fill the maximum 4:3 portion of the screen (640 x 480), with black bars filling the 
remainder of the screen. 


• 

In 16:9 mode, images are scaled to fill the maximum 16:9 portion of the screen (800 x 450), with black bars filling 
the remainder of the screen. 


Note: The aspect ratio setting is ignored when Pixel-to-Pixel mode is enabled. 
 

  Pixel-to-Pixel Mode 


Use this setting to enable Pixel-to-Pixel mode.  
 
This mode bypasses the monitor’s internal scaling function and displays incoming images in their native resolution and 
aspect ratio, with a one-to-one mapping:  


RED GREEN BLUE  ALL 

4:3 Mode  
 

Full Screen 

16:9 Mode 

Содержание V-LCD70XP-HDMI

Страница 1: ...Marshall Electronics V LCD70XP HDMI 7 High Resolution Field Monitor Operating Instructions ...

Страница 2: ...2 This page intentionally left blank ...

Страница 3: ... VIDEO CONFIGURATION SUBMENU 10 Color Temperature Presets 10 Gamma Correction 10 RGB Bias and Gain 10 Check Field 11 Aspect Ratio Setting 11 Pixel to Pixel Mode 11 H V Delay 12 Underscan 12 NTSC Black Level 12 MARKER CONFIGURATION SUBMENU 12 Marker Enable 13 Center Marker 13 16 9 Markers 13 4 3 Full Screen Markers 13 Marker Background 14 User Markers 14 FILTER CONFIGURATION SUBMENU 15 False Colors...

Страница 4: ...og input signals are digitized using an advanced 10 bit process with 4x over sampling 5 line super adaptive 2D comb filtering and exacting color space conversion Video is scaled to fit on the screen in the highest possible resolution using a state of the art LSI that incorporates precision gamma correction and our HyperProcess motion adaptive interpolation for interlaced images ColorMatch Conversi...

Страница 5: ... Sony NP Q and Sony NP F Installation To uninstall one of the above battery adapters remove the 5 screws on the adapter Remove the adapter and carefully disconnect the 4 pin connector between the monitor and adapter To install one of the above battery adapters connect the 4 pin connector of the new battery adapter to the monitor and re install the 5 screws Note Do not change the pinout of the 4 pi...

Страница 6: ...u Navigation Buttons Use the Menu and Select buttons to display and navigate the on screen menu See Main Menu and Navigation Page 9 Image Adjustment Knobs Use the image adjustment knobs to adjust color saturation brightness and contrast of the image The status of each image adjustment parameter is shown on the bottom left of the screen with values ranging from 0 to 100 Default value is 50 Power Sw...

Страница 7: ...LR power input connector Power can be supplied from the included power supply or from a variety of DC sources supplying at least 1 Amp at 12 Volts IMPORTANT If using a power source other than the included power supply be sure that the polarity of the DC input is correct Pin 1 GND Pin 2 N C Pin 3 N C Pin 4 12VDC Battery Adapter The V LCD70XP HDMI can be powered from a variety of batteries Several u...

Страница 8: ... 720p 29 97 720p 25 720p 24 720p 23 98 1035i 60 1035i 59 94 1080i 60 1080i 59 94 1080i 50 1080psF 24 1080psF 23 98 1080p 30 1080p 29 97 1080p 25 1080p 24 1080p 23 98 640 x 480 60 Hz 640 x 480 72 Hz 640 x 480 75 Hz 800 x 600 56 Hz 800 x 600 60 Hz 800 x 600 72 Hz 800 x 600 75 Hz 1024 x 768 60 Hz 1024 x 768 70 Hz 1024 x 768 75 Hz ...

Страница 9: ...n Off Curtain Color Blue Black Green Splash Screen On Off Contrast Backlight Contrast Backlight Freeze Input Off Freeze Image Flip Off On Manufacturer Default Select HDMI Input Format Auto YCbCr RGB HDMI Ratio Detection Off Auto System Configuration Version Firmware Version Number Displayed Function on F1 Function on F2 Function on F3 Main Menu Function Presets Function on F4 Ratio Check Field Ima...

Страница 10: ...lor balance R G B This should only be done by someone experienced with video engineering as this will alter the overall color shading of the screen The purpose is to allow color matching to other types of monitors and or displays Note The Color Temperature preset will automatically switch to USER when Color Bias settings are adjusted It is normal for color bias adjustments to be very subtle When s...

Страница 11: ... will be shown Ratio Use to switch between Full Screen 4 3 and 16 9 aspect ratios As the V LCD70XP HDMI monitor has a native resolution of 800 x 480 RGB pixels incoming images are automatically scaled to fit the screen In Full Screen images are scaled to fill the entire screen In 4 3 mode images are scaled to fill the maximum 4 3 portion of the screen 640 x 480 with black bars filling the remainde...

Страница 12: ... vertical sync are delayed resulting in both horizontal and vertical blanking periods being shown on the screen In V Delay mode vertical sync is delayed so that the vertical blanking period is displayed on screen In H Delay mode horizontal sync is delayed so that the horizontal blanking period is displayed on the screen Underscan Use this setting to enable or disable Underscan mode When Underscan ...

Страница 13: ...een when in 16 9 mode 4 3 13 9 14 9 1 85 1 2 35 1 95 Safe 93 Safe 90 Safe 88 Safe 85 Safe 80 Safe User 16 9 Marker Examples 4 3 Markers Full Screen Markers Select to superimpose one of the markers on the screen when in 4 3 or Full Screen mode This setting is disabled when the aspect ratio is set to 16 9 or when Pixel to Pixel Underscan or H V Delay is enabled 95 Safe Area 93 Safe Area 90 Safe Area...

Страница 14: ...The area masked by the marker is mixed with video picture 25 0 No Blend only edge of marker appears Example 80 Marker in 4 3 Mode User Markers Use this setting to define the size and shape of the on screen marker To change choose User then press Select The screen should appear as below Turn the 4 Knobs to change the Left Right Top and Bottom edges of the User Marker 0 Background 100 Background LEF...

Страница 15: ...like people it is common practice to set exposure of faces to the equivalent of approximately 56 IRE The false color filter will show this area as the color PINK on the monitor Therefore as you increase exposure open the IRIS your subject will change color as indicated on the chart PINK then GREY then a few shades of YELLOW Over exposed subjects above 101 IRE on the monitor will be shown as RED In...

Страница 16: ...his feature is most effective when the subject is properly exposed and contains enough contrast to be processed Mosquito Filter Use this setting to filter out Mosquito Noise an artifact that appears as specs around edges of objects This artifact is the result of video that has been compressed at some point Video sources from DVD Players PDA s Digital Cable Boxes Camcorders etc often have this arti...

Страница 17: ...elect this menu item to reset all adjustments and menu settings to the factory default configuration HDMI Input Format Use this setting to select the color space RGB or YCrCb of incoming HDMI video This should match the color space of the video output settings on your playback device Note that this option is disabled when viewing VESA Computer formats HDMI Ratio Detection When AUTO is selected mon...

Страница 18: ...2 N C Pin 3 N C Pin 4 12VDC ELECTRICAL Power Consumption 1 Amp Max 12VDC 12 W Max Voltage Requirement 12VDC 10VDC 18VDC V PS12 5V XLR Power Supply Input 100V 240V 1 5A 50 60Hz Output 12VDC 5A 60W Max BATTERY ADAPTER Field Interchangeable Battery Adapter Options Sold Separately Marshall Adapter Battery Type Battery Voltage Recommended Battery IDX V Mount 14 4 V IDX E7S AB Anton Bauer 14 4 V Anton B...

Страница 19: ...are coarse and may scratch the surface of the polycarbonate faceplate or leave streaks on the surface Antistatic and fingerprint resistant cleaning agents are recommended Do not apply excessive pressure to the screen to avoid damaging the LCD Faceplate Dusting Dust the unit with a soft damp cloth or chamois Dry or abrasive cloths may cause electrostatic charge on the surface attracting dust partic...

Страница 20: ...alterations or modifications in design or construction void this warranty It is considered normal for a minimal amount of pixels not to exceed three to fail on the periphery of the display active viewing area Marshall Electronics reserves the option to refuse service for display pixel failure if deemed unobtrusive to effective use of the monitor by our technicians No sales personnel of the seller ...

Отзывы: