background image

Lynx

 LCD Monitor User Manual

Lynx

 LCD Monitor User Manual

13

SETTING UP THE MONITOR 

Carefully unpack the items from the box and take a moment to ensure that the 
following items are included:


1. Lynx monitor


2. Power cord  


3. VGA cable


4. Remote control (Lithium battery included)

If any of these items are missing, contact customer support at 800 800-6608.

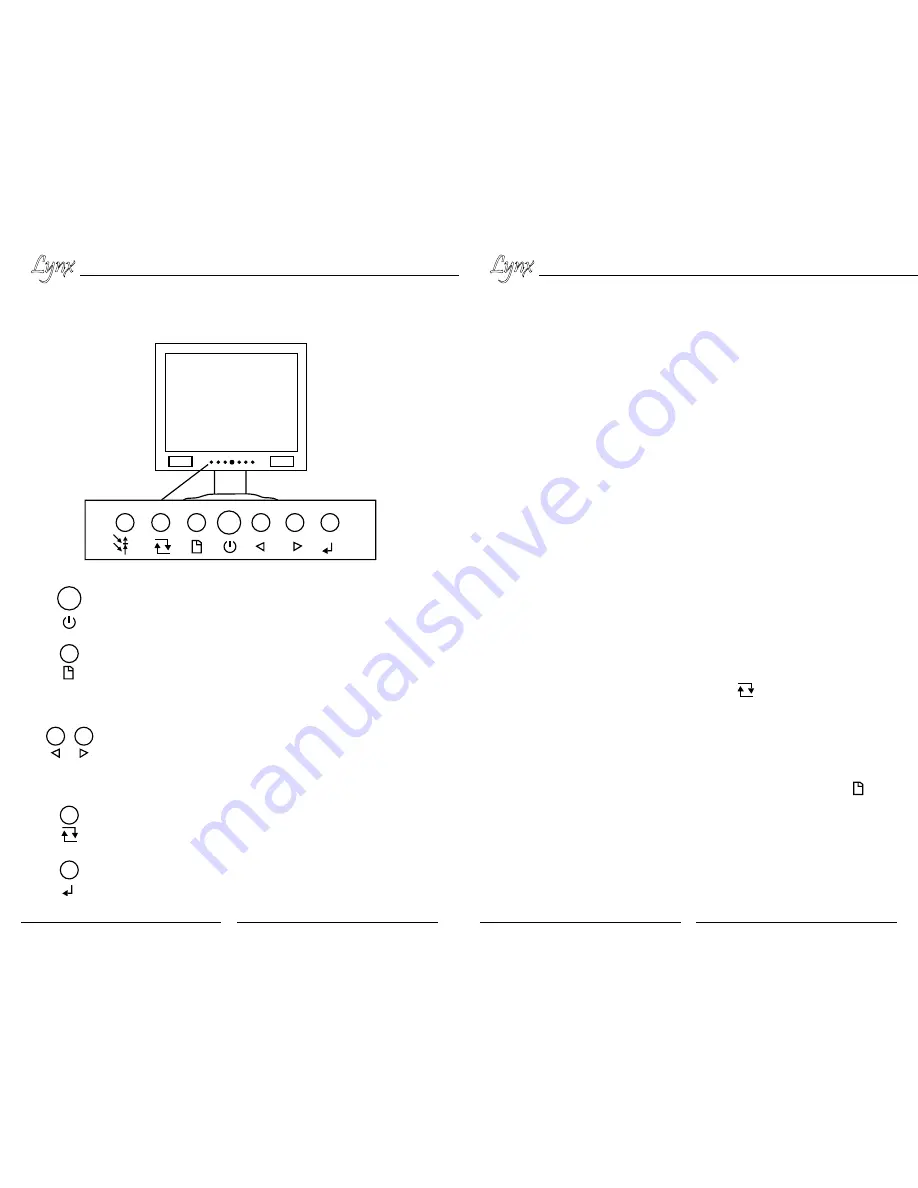
Next, take a few moments to familiarize yourself with the front and rear panel 
controls and inputs. The front panel of the Lynx Monitor includes hard-button 
controls for Menu, Volume, Channels and Power (stand-by). 

The rear panel of your Lynx monitor includes S-video inputs, 2-channel multiple 
video BNC input/outputs, and 1 channel YPbPr input. 

After finding a suitable and secure location for the monitor, plug the power cord 
into the rear panel and then to an AC power source. Turn the Power Switch on.

VIDEO MAIN MENU

To access the Main Menu features, press Menu on the remote control or the  
button on the front panel. 

The Image Settings screen will appear along with three icons on the left-hand side: 
Image Settings, Display Settings, and Setup. See Figures 1, 2 and 3.  Use the arrow 
buttons on the remote control or front panel to scroll through the settings.

VOLUME CONTROL

To adjust the volume on the Lynx monitor, press the         on the front panel of the 
monitor. Use the left and right arrow keys on the remote or front panel to adjust the 
volume.

12

Power button (stand-by)

Exit Menu

With menu off, adjust volume (0 ~100). 

With menu on, use to scroll through menu 

With menu on, use to select or change menu functions 

When menu is off, selects video input: Video 1, Video 2,  
S-video, YPbPr, VGA, DVI

Select item

FRONT PANEL COMPONENTS AND CONTROLS

Содержание M-Lynx-15

Страница 1: ...For more information contact Marshall Electronics Industrial Video Security 800 800 6608 Marshall Industrial Video Security Div Marshall Lynx LCD Universal Monitors User Manual www mars cam com...

Страница 2: ...t magnitude to constitute a risk of electric shock The exclamation point within the triangle is intended to alert the user to the presence of important operating and maintenance servicing instructions...

Страница 3: ...and to protect it from over heating These openings must never be blocked The monitor should never be placed near or over a radiator or head register This monitor should not be placed or built in to a...

Страница 4: ...e and cable installation Note A V inputs outputs as well as optimal resolution will vary by screen size Refer to Specifications section for more in depth details 7 SPECIFICATIONS Display Unit 15 4 3 T...

Страница 5: ...300cd m2 Maximum Contrast 1000 1 Response Time 8ms Viewing Angle 170 160 Operating Environment Temperature 0 C 40 C Humidity 10 85 9 Display Unit 19 5 4 TFT LCD Video Input Output 1 channel s video in...

Страница 6: ...s 500cd m2 Maximum Contrast 1000 1 Response Time 8ms Viewing Angle 176 176 Operating Environment Temperature 0 C 40 C Humidity 10 85 10 Display Unit 20 4 3 TFT LCD Video Input Output 1 channel s video...

Страница 7: ...or the monitor plug the power cord into the rear panel and then to an AC power source Turn the Power Switch on VIDEO MAIN MENU To access the Main Menu features press Menu on the remote control or the...

Страница 8: ...brightness contrast sharpness etc Adjust the Image Settings In the Image Settings Screen you can adjust Brightness Contrast Sharpness as well as more Advanced Settings like Noise Reduction and Flesh...

Страница 9: ...djustments to the screen Note PIP mode disabled Adjust the Display Settings To select press the button on the front panel or Enter on the remote control The settings will be highlighted see Figure 9 U...

Страница 10: ...the remote or the button on the front panel to exit the Setup menu Figure 10 The Set up menu allows you to set the language of preference as well as factory presets 19 Audio Video Inputs The rear pane...

Страница 11: ...cable included connects the monitor to computers and other devices that support VGA The 15 pin VGA is a common connection found on most video cards computer monitors and high definition televisions t...

Страница 12: ...rference received including interference that may cause undesired operation Video 2 Channel Video 1 Channel VGA Channel Submenu Channel when menu off when in VGA menu adjusts horizontal position 23 MO...

Страница 13: ......

Отзывы: