5
4
Footcontroller
(optional - PEDL-90008)
Footcontroller Factory Settings
Footswitch 1: Clean : Crunch Switch
Footswitch 2: Overdrive Switch
Footswitch 3: Tap Tempo Switch
Footswitch 4: Tuner
Programming
The footswitch can be programmed to store front panel
switches (Switch Store) or complete presets (Preset
Store).
Switch Store
To assign a front panel switch to a Footswitch
(1),
press and hold the front panel switch and while held
down press the Footswitch (1) you wish to assign it to.
The Digital Display (3) will swirl to show that the
footswitch has been assigned. You can then release the
footswitch and front panel switch.
Preset Store
To assign a preset to a Footswitch
(1), select the
required channel and modify the front panel controls if
required, press and hold the Store switch on the front
panel and while held down, press your chosen
Footswitch (1).
The Digital Display (3) will swirl to show that the
footswitch has been assigned. You can then release the
footswitch and Store switch.
Footcontroller Presets are independent of the dedicated
Channel presets stored within the amplifier. This allows
you to create a number of presets based on the same
channel/pre-amp setting.
When either a Channel preset or Footswitch preset has
been altered the Digital Display (3) will begin to flash.
The footcontroller will flash the relevant number if a
Footswitch preset has been altered or will flash a “-“ if a
Channel preset has been altered.
Pressing only the Store switch at this point will overwrite
the altered Channel or Footswitch preset.
To store an altered Channel preset to the
Footswitch instead
, hold the Store switch and while
held down, press your chosen Footswitch (1) - Just like
a normal Preset Store.
To store an altered Footswitch Preset to another
Footswitch
hold the Store switch and while held down,
press your chosen Footswitch (1) - Just like a normal
Preset Store.
Digital Display
When recalling a footswitch preset, the Digital Display
(3) will indicate which footswitch number has been
pressed.
If a Channel preset has been recalled the Digital
Display (3) will remain blank.
When either a Channel preset or Footswitch preset has
been altered the Digital Display (3) will begin to flash.
The footswitch will flash the relevant number if a
Footswitch preset has been altered or will flash a “-“ if a
Channel preset has been altered.
Tuner
The Tuner can be accessed in two ways:
By simultaneously pushing the Tap (10) and Store (12)
switches on the front panel or by assigning the Tuner to
the footswitch. Note: On factory reset / first switch on,
the Tuner is already assigned to Footswitch number 4.
Assigning the Tuner to a footswitch is carried out like
any other Switch Store. To assign the Tuner to the
footswitch hold down the Tap (10) and Store (12)
switches and press the chosen footswitch you wish to
assign it to. The Digital Display (3) will swirl to show that
the footswitch has been assigned. You can then release
the footswitch and front panel switch.
For all amplifiers, when entering Tuner mode the unit
mutes and Clean : Crunch (3) and OD (5) switches light
yellow.
The Digital Display (3) indicates the closest current note
being played. The indicator dot on the lower right hand
corner shows if the current closest note is #.
The LED Status Panel (2) is used to show how far away
from the closest note the current note being played is.
When the central FX Status LED lights, it indicates the
correct tuning, with the others progressively indicating
the tuning is up to 50 cents up or down.
To exit the Tuner push any footswitch, the amplifier will
then exit returning to the settings before entering.
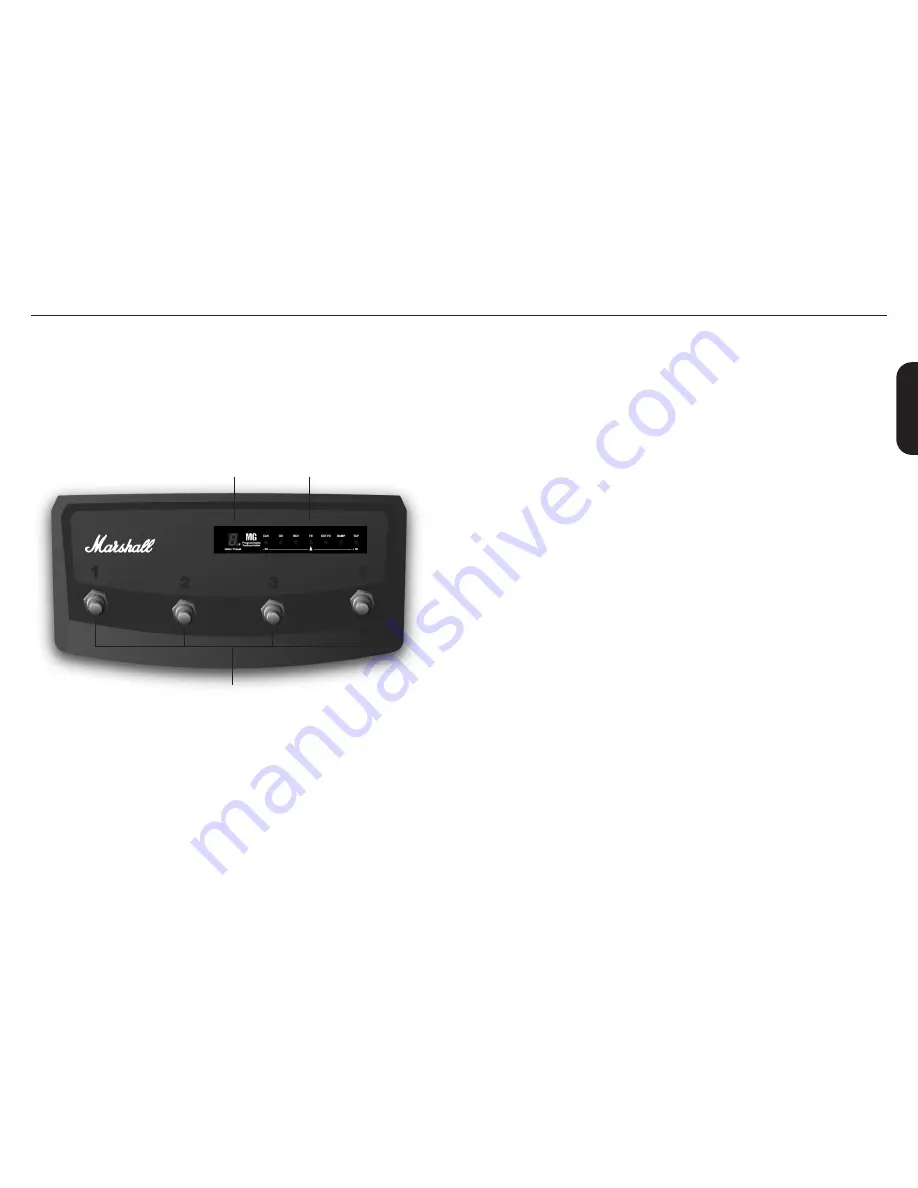
1
3
2
1. Footswitches
Each footswitch can be assigned a different stored function.
2. LED Status Panel
This always reflects the current status of the amplifier or tuner details:
CLN & OD:
Current Channel
REV:
Reverb On/Off
FX:
FX Section On / Off
Ext FX:
External FX Loop On/Off (MG50FX & MG100FX)
Damp:
Damping Mode (MG50FX & MG100FX)
Tap:
Tap Tempo speed.
3. Digital Display
This display indicates the various functions of the footcontroller.
E
N
G
L
IS
H
Содержание MG15HFX
Страница 1: ......


