background image

CV355-30X-NDI Manual

www.marshall-usa.com

15

16

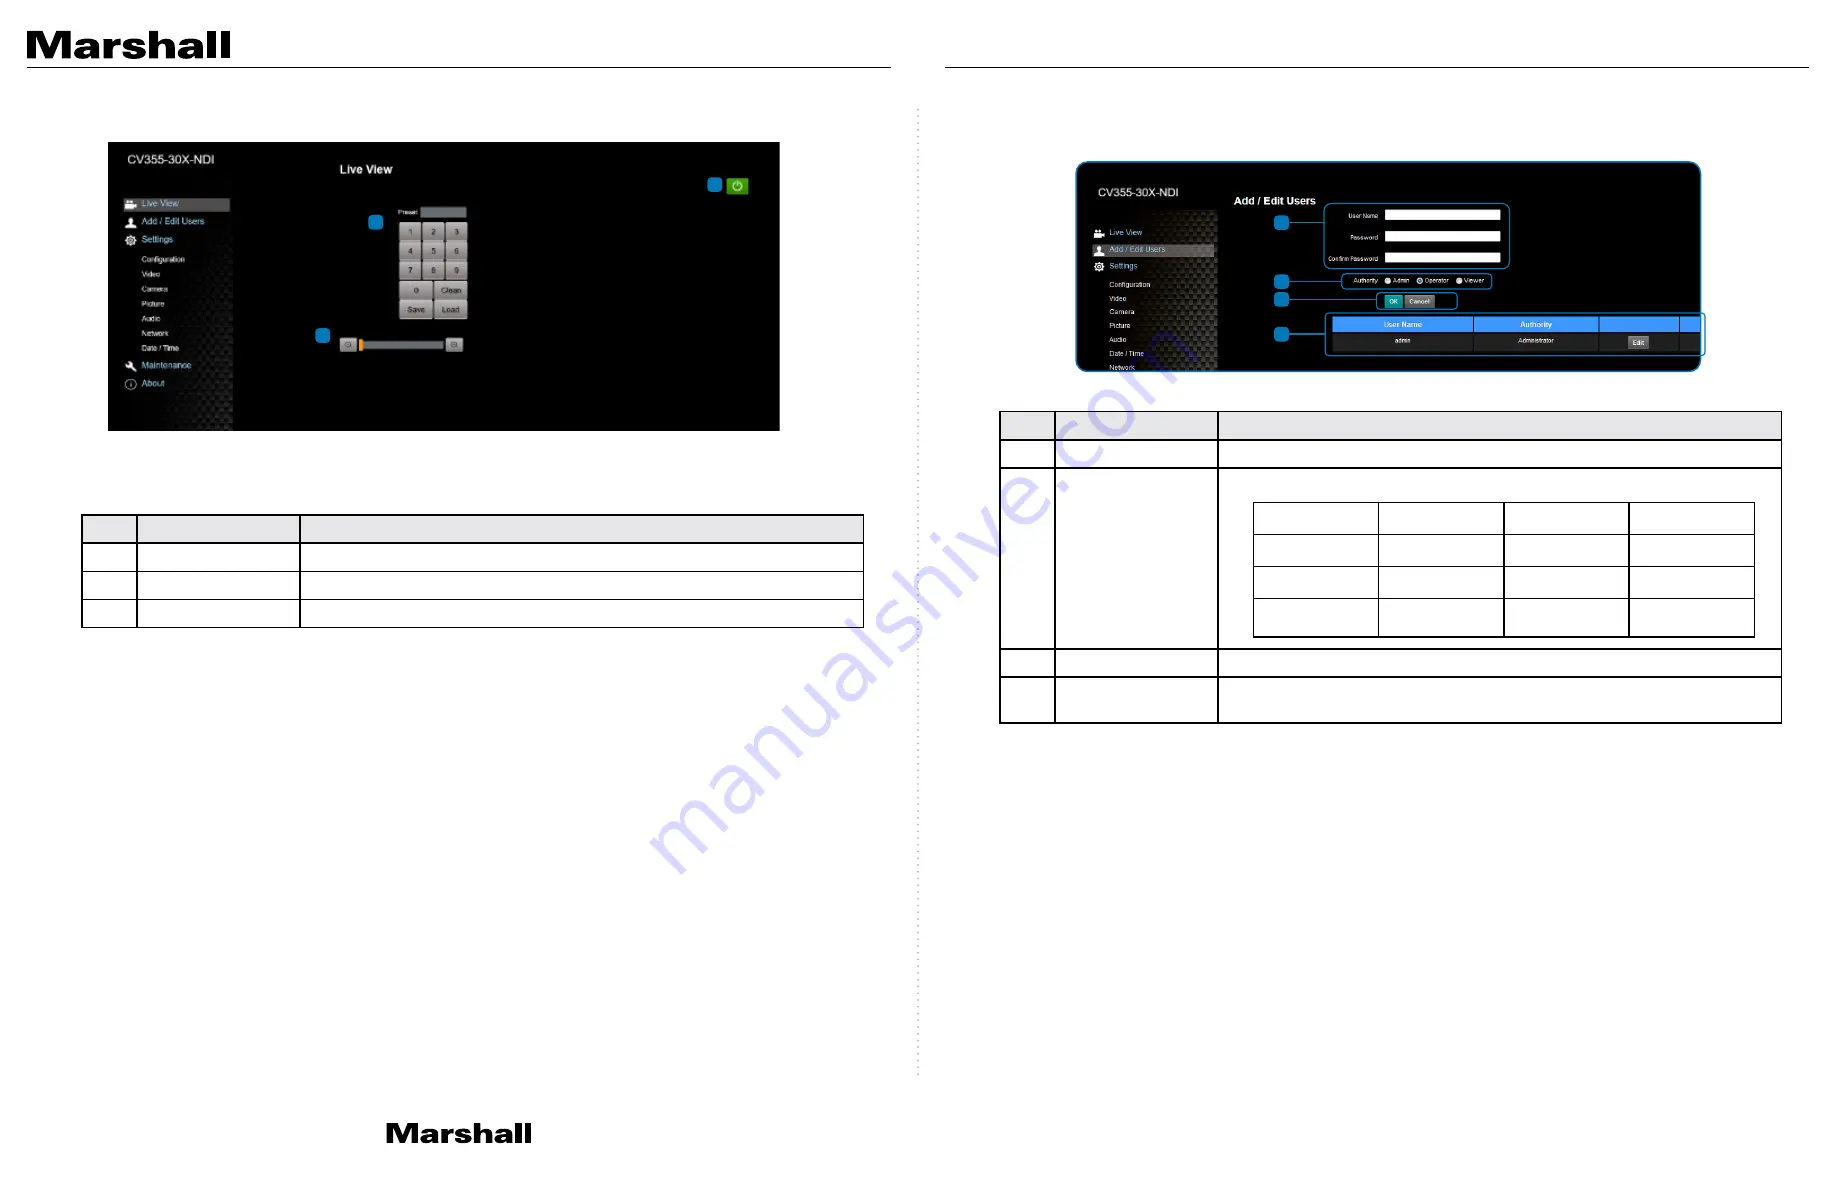
5.3.2 Viewing In Real Time

5.3.3 Account Management

No.

Item.

Function Descriptions

1

Preset setting

Select the number first and then select SAVE or LOAD

2

Zoom ratio

Adjust the zoom-in or zoom-out ratio via scroll bar

3

Power button

Turn on or turn off the camera power

2

Permission setting

Set the new account management permissions

3

Applying setting

Add the newly created user to the account list

4

List of accounts

Edit: Modify the user password and permissions
Delete: Delete the user account

No.

Item.

Function Descriptions

1

Add user account

Enter a username and password to add a new user

User Type

Admin

Operator

Viewer

View images

Y

Y

Y

Settings

Y

Y

N

Account 
management

Y

N

N

1

2

1

2

3

4

3

Содержание CV355-30X-NDI

Страница 1: ...Broadcast A V Division CV355 30X NDI 30X NDI HX Box Camera User Manual Firmware Version 0 43...

Страница 2: ...orated Copying reproducing or transmitting this file is not allowed if a license is not provided by Marshall Electronics Inc unless copying this file is for the purpose of backup after purchasing this...

Страница 3: ...nding Quick setup of CV355 30X NDI with NDI HX This section explains how to quickly configure the Marshall CV355 30X NDI camera with NDI HX It also explains how to update the device and where you can...

Страница 4: ...B 003 edictee par l Industrie EN55032 CE Radiation Warning Operation of this equipment in a residential environment could cause radio interference 2 Package Contents 3 Function Introduction CV355 30X...

Страница 5: ...hrough the control of VISCA command The setting method is as follows Tally Mode 8x 01 7E 01 0A 01 0p FF p 0 OFF p 4 On half brightness p 5 On full brightness 4 1 Installation Basics 4 1 1 CV355 30X ND...

Страница 6: ...ls of web page connection setting and description please refer to Chapter 5 Network Function Settings Description 4 2 4 Connecting RS 232 RS 232 serial connection With RS 232 in out at most 7 Marshall...

Страница 7: ...ods are shown below 1 Connecting via switch or router 2 If the camera is connected to the computer directly the computer IP address must be modified to have the same network segment as the camera For...

Страница 8: ...unt admin Default Password 9999 Default 5 3 Web Page Function Description 5 3 1 Login Screen No Item Function Descriptions 1 Username Enter user account name default admin 2 Password Enter user passwo...

Страница 9: ...button Turn on or turn off the camera power 2 Permission setting Set the new account management permissions 3 Applying setting Add the newly created user to the account list 4 List of accounts Edit M...

Страница 10: ...rmat Set HDMI color format YUV422 or RGB 3 Apply After the setting has been modified select this button to apply the setting 1 2 3 1 2 No Item Function Descriptions 1 Camera name Modify the camera nam...

Страница 11: ...tter images in dynamic lighting environments Shutter Speed The shutter speed is adjustable when the exposure mode is set to Manual or Shutter Priority 1 2 3 4 5 3 White balance Mode Select the color t...

Страница 12: ...actory default by selecting this item 6 Gamma Gamma Level adjustment Adjustable when the image mode is set to Custom 7 Brightness Brightness adjustment Adjustable when the image mode is set to Custom...

Страница 13: ...are Port 80 and Port 81 respectively Remark Change of setting is available only when DHCP function of camera is closed 5 3 10 Time Settings No Item Function Descriptions 1 Camera Time Display the dat...

Страница 14: ...set button to resume the factory default setting as the web page setting Setting Profile The web page setting parameters can be exported from the computer and imported applied to another camera Protoc...

Страница 15: ...nstant effort to improve products and product features specifications may change without notice Warranty V 1 2 27 No Problem Solution 1 Boot without power signal 1 Make sure you have plugged in the po...

Отзывы: