background image

6.0 GENERAL CALIBRATION 

Some settings need to be calibrated regularly. Each time a different product is used the operator 
must change the spread width, product density, hopper door height and working speed range. 

For each of the 8 different products the last calibration setting is stored within memory. The stored 
settings can be re-used at anytime without the need to re-calibrate. 

Press              key to display the menu. 

6.1 PRODUCT SELECT SCREEN

Press Spreader Product to select the product to be spread.

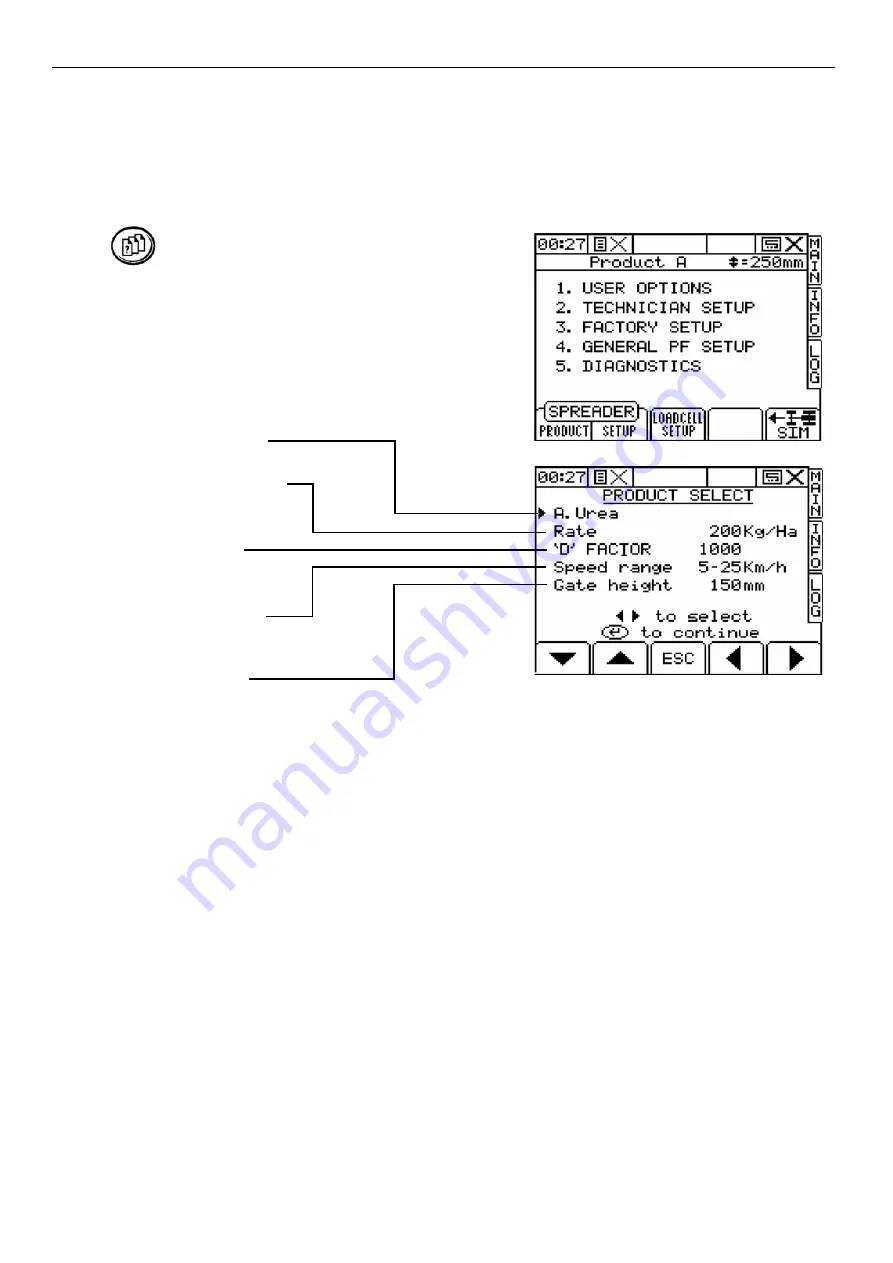
The Product Select screen is shown.  (fig 18)

PRODUCT NAME 

This setting displays the current product. Use the cursor to select a different product. The product 
names can be edited on the Customise Menu from the User Options Menu. 

APPLICATION RATE


The Target Application for the selected product is displayed here. The Target Application can also 
be changed on the MAIN screen.  

“D” FACTOR

The Density in kg/m3 of the current product is displayed here.

SPEED RANGE

The operating speed range for the selected product is displayed here. 

GATE HEIGHT

The gate height for the selected product is displayed here.


Product Name

Application Rate

“D” Factor

Speed Range 

Gate Height

pg 21

fig 18 : Product Select Screen 

Содержание APOLLO 8000

Страница 1: ...RDS PRO SERIES APOLLO 8000 SPREADER CONTROLLER CALIBRATION MANUAL SOFTWARE ISSUE PS401000...

Страница 2: ...damage whatsoever death or personal injury excluded 2 The capabilites and functions of the precision farming system the system are limited as set out in the specification of the System details of whic...

Страница 3: ...ro Series Configuration Menu 13 3 3 Loadcell Interfaces 13 3 3 1 Loadcell Calibration Procedure 14 3 3 2 Angle Sensor Calibration 15 3 3 3 Factors Store 15 3 4 PIN Number Change 16 User Options 4 1 Us...

Страница 4: ...Width 23 6 2 4 Speed Sensor Factor 24 6 2 5 GPS On Off 25 6 2 6 Simulated Forward Speed 25 General PF Setup 7 1 Logging Interval 26 7 2 Tag Names 26 7 3 Edit Function names and Values 27 7 4 GPS Anten...

Страница 5: ...upon the product to be spread 1 1 THE FACTORY SETUP SCREEN Press the key to select the menu screen fig 1 Choose Option 3 Factory Setup fig 2 Channel Options Gate Width Max Gate Height Drive roller Dia...

Страница 6: ...3 DATA ENTRY Alpha numeric values are entered via the right hand key pad Letters are entered by pressing the key 2 to 5 times and scrolling through the letter options as per writing an SMS message on...

Страница 7: ...D CONTROL IN USE YES NO TYPE PWM VALVE MOTOR 2 SPREADER CONFIG GATE WIDTH mm MAX GATE HEIGHT mm DRIVE ROLLER DIA mm MAX WEIGHT kg SHAFT 1 RPM SHAFT 2 RPM 3 PRO SERIES CONFIG AREA CUTOUT INPUT 4 CHANNE...

Страница 8: ...NTROLLERS 1 PRO SERIES BELT FEEDBACK HZ FORWARD SPEED KM H VOLTAGE V C O I P HIGH LOW LCI s ON BUS DEPENDANT ON LOADCELL SETUP 2 CHANNELS BELT CHANNEL BELT FEEDBACK HZ FORWARD SPEED KM H ACTUAL RPM TA...

Страница 9: ...the Pulse Per Revolution ppr returned from the rotary encoder mounted on the final drive shaft The default value is 360 ppr The rotary encoder returns 360 pulses per revolution of the final drive sha...

Страница 10: ...m and Maximum Duty of the Danfoss Proportional Valve needs to be setup on first installation Proportional Valves dont respond over the full PWM range from 1 100 Typically they operate from 20 to 70 To...

Страница 11: ...using the PWM UP KEY until the feedbelt just begins to move When the belt is just moving press enter to store the minimum duty and minimum feedbelt RPM Then move the cursor down to MAX DUTY To set the...

Страница 12: ...spread model Open the door to its maximum height and then use a tape to measure the distance from the bottom of the door to the feedbelt DRIVE ROLLER DIAMETER The diameter of the final drive roller in...

Страница 13: ...ensor is fitted to the loadcell interface to ensure accurate weighing when the spreader is parked on uneven terrain The loadcells and angle sensor must be configured before use fig 9 MENU 3 FACTORY CO...

Страница 14: ...N ROUTINE and press enter fig 10 Ensure the spreader is on level ground and that there is no material in the hopper Then press enter to Zero the loadcells The Spreader must then be loaded with a known...

Страница 15: ...ter The Angle Sensor calibration is then complete fig 15 3 3 3 FACTORS STORE For extra security calibration data can be manually saved to a separate memory area called STORE A This data will NOT be ov...

Страница 16: ...Ltd or RDS for instructions on reseting the PIN 4 1 USER OPTIONS MENU The user options menu enables the operator to customise the Pro Series display date time and the product names 4 2 SET DATE AND T...

Страница 17: ...d step set size 4 4 1 UNITS USER OPTIONS 3 CUSTOMISE 1 UNITS Select appropriate units and then press enter 4 4 2 EDIT PRODUCT NAMES Up to 8 different product names can be stored within memory The prod...

Страница 18: ...the application rate fluctuates either side of the nominal application rate before the instrument display changes For example if your actual application rate fluctuates in normal operation from 97 kg...

Страница 19: ...in measured and calibrated weight Default 200 0 kg 5 2 3 DYNAMIC TIME This is the time period for each dynamic test The calibration will be updated at this interval Default 30 secs 5 2 4 DYNAMIC WEIG...

Страница 20: ...RINT CAL DATA menu function immediately sends the data to the serial port The message PRINTER BUSY will be displayed while the data transfer is taking place If the bar on the screen stops filling up p...

Страница 21: ...d The Product Select screen is shown fig 18 PRODUCT NAME This setting displays the current product Use the cursor to select a different product The product names can be edited on the Customise Menu fr...

Страница 22: ...paddock forward speed and product density SPREADER SETUP 1 CALIBRATION ROUTINE ALSO SEE PRO SERIES QUICK START CARD enter target spreading rate 100 kg ha WORKING WIDTH 24 0m D FACTOR enter product den...

Страница 23: ...ication rate was 50kg ha and over 1 ha the spread dispensed 55 kg the product D factor was 1150kg m3 SPREADER SETUP 2 NUDGE FACTOR Enter the target weight in kg 50 and press enter Enter the actual wei...

Страница 24: ...or Row Crop Tyres Radar Sensor Move the cursor to the appropriate tyre sensor configuration and press enter to select fig 22 To edit the factor press enter again To manually enter the SSF move the cur...

Страница 25: ...the GPS controller press the GPS ON OFF button 6 2 6 SIMULATED FORWARD SPEED SPEED FACTOR SIMULATED FORWARD SPEED For setup and diagnostic purposes the instrument can simulate a forward speed signal T...

Страница 26: ...n exception is when boundary mapping where less data is being generated you can reduce the logging intervals to get better definition of the field boundary Simply enter the interval value and press en...

Страница 27: ...the enter key Using the RIGHT ARROW key move the screen cursor across to the function name and enter the data up to 20 alpha numeric characters via the alpha numeric keypad To enter a value move the...

Страница 28: ...dius value Any position received outside the operating radius will be ignored and as sumed to be corrupt data Moving to another location If you subsequently move outside the radius circling the home l...

Страница 29: ...other controller Check with RDS or Roesner Pty Ltd for a list of compatible instruments Set the top port as appropriate Direct Transfer of Field Data to a PC If you are connecting a PC using an RDS Do...

Страница 30: ...rument and loadcell interfaces if fitted 8 2 CHANNEL DIAGNOSTICS The Channel Diagnostics menu displays ACTUAL and TARGET feedbelt RPM and the PWM 8 3 LOADCELL INTERFACES At the Loadell Interfaces menu...

Отзывы: